Unreal Engine Plugin Manual
The Unreal Engine plugin comes with full blueprint support to make it as easy as possible to use ODIN in your game. Please make sure to have a basic understanding of how ODIN works as this helps a lot understanding the next steps.
This manual highlights the key steps to take to get started with ODIN. For a more detailed implementation please refer to our Unreal Sample project. Select the blueprints in the Unreal Sample Project, Copy them and Paste them in your own project to get started quickly!
Basic Process
If you have read the introduction you have learned that every user connected to the same ODIN room (given by a string of your choice) will be able to exchange data and voice. An ODIN room is automatically created by the ODIN server when the first user joins and is automatically removed once the last user leaves.
To join a room an access token needs to be created. An access token gives access to an ODIN room and can be created within the client. For testing and development purposes that’s fine. In production you should create an access token on server side. We’ll provide various packages for JavaScript (npm) or PHP (Composer) to create access tokens and we also have a complete server ready to go that you can deploy as a cloud function to AWS or Google Cloud.
After the room has been joined, data can be exchanged, i.e. text chat messages or other real-time data. If your user should be able to talk to others, a microphone stream (a so called media) has to be added to the room. Now, every user can talk to every other user in that room. More advanced techniques include 3D audio that allows you to update your position every couple of seconds to the server which then makes sure, that only users nearby hear your voice to reduce traffic bandwidth and CPU usage. But more on that later.
So, to summarize, the basic process is:
- Get an access key
- Create an access token with the access key for a specific room id (just a string identifying the room)
- Join the room with the access token
- Add a media stream to connect the microphone to the room
Implementing with Blueprint
Let’s get started adding ODIN to an existing (or new) Unreal Engine Project. You’ll find all Blueprint nodes in the
root folder Odin.
This is the full blueprint that we are about to create:

The blueprint that we’ll create
You can create the blueprint anywhere in your project - but it makes most sense on your Default Player Character Class - since this is where your Odin Synth Components will live. Just make sure that you have it in a class that exists on each client (for example the Game Mode only exists on the server and therefore is not eligible for this logic).
Creating an access key
First, you need to create an access key. As the access key is used to authenticate your requests to the server and also includes information about your tier, e.g. how many users are able to join the same room and a few other settings. You can create a free access key for up to 25 users right here. If you need more or want to go into production, you need to sign up with one of our tiers. See pricing for more information.
More information about access keys can be found in our Understanding Access Keys guide.
For now, you can use this widget to create a demo access key suitable for up to 25 concurrent users:
Press the Create Access Key button and write the access key down somewhere. We’ll need this access key a bit later
down the road.
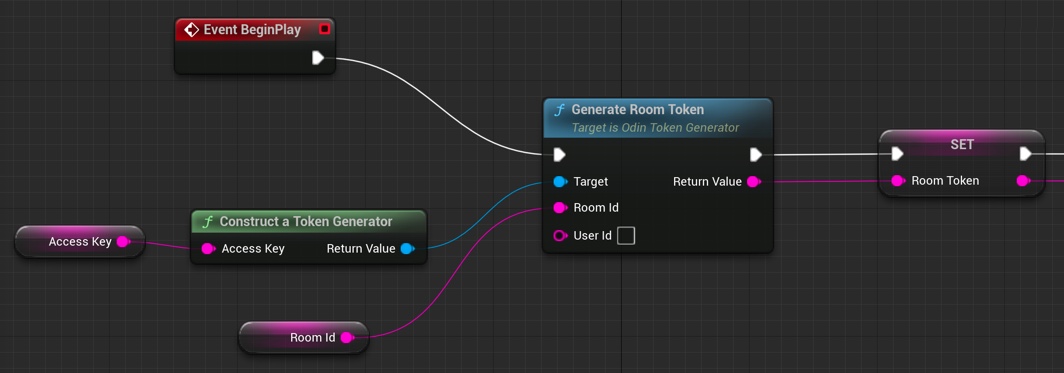
Creating an access token
Add a Generate Room Token
node to your Blueprint Canvas. Now, drag out from the left Target and
choose Construct a Token Generator
from the list. This will add the node to your canvas and connect
both. Please note: In production you would load the token from your cloud function (see above) but for now we just
generate a random access token directly in the game.
Now, drag out from “Room Id” and choose Promote to Variable to create a variable for the name of the Room. You’ll
need to compile your Blueprint and then enter Lobby as the default value for the room name or anything else that
makes sense to you.
Next, drag out from Access Key of your Construct a Token Generator
node and choose Promote to Variable. This variable will hold our access key. Compile again and set the default value to the access key you created
above.
Last but not least create an Event Begin Play node and connect it to the Generate Room Token
node. In
most use cases you might not want players to be able to talk to everyone else right from the start. Choose another event
in this case. But for testing purposes this should be fine.
Your blueprint should look like this now.
Creating an Access Token
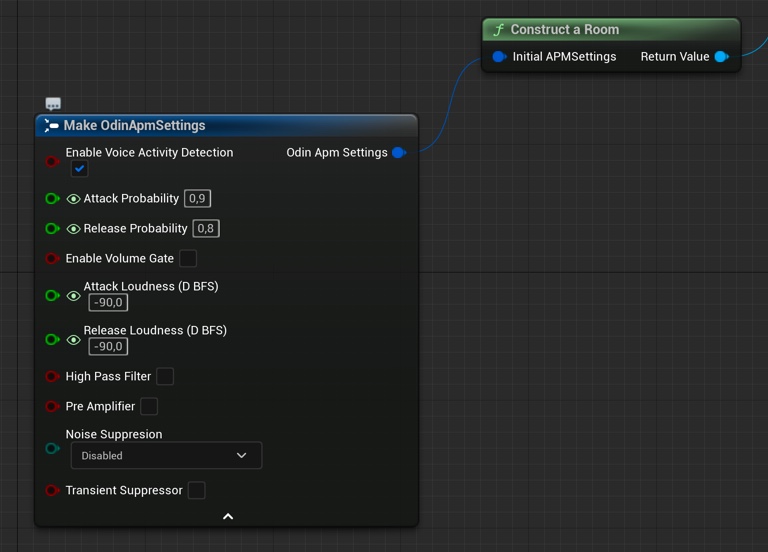
Configure the room access
ODIN supports various settings when joining a room (APM settings). Here you can set features like “Voice Activity Detection” and many other features.
Create a new Construct local room handle
node and drag out from Initial APM Settings. Choose Make Odin APM Settings
from the list. This will add the node to your canvas and connect both.
You can play around with APM settings to work out good values for your type of game.
It should look like this:
Preparing a room
Event Flow
Once you are connected to the ODIN server, a couple of events will be fired that allow you to setup your scene and connecting audio output to your player objects in the scene.
Have a look at this application flow of a very basic lobby application. Events that you need to implement are highlighted in red.
Adding a Peer Joined Event
To create event handling, create a new delegate Bind to On Peer Joined node.
Unreal does not list the Bind to On Peer Joined option without dragging off of an Odin Room variable. If you want to have that option shown in any case, disable the Context Sensitive checkbox on the top right corner. Then you should find the event in the
Odin/Events folder.
You’ll need to connect the Room object reference that you created earlier with the Construct local room handle
node. This way, you can easily handle events differently for different rooms you connect. You can even connect
multiple rooms at the same time, but handle them differently in your code.
Now, that you have created that node, drag out from the Events slot until you see a red line. Next, release the
mouse cursor and Unreal will automatically create the correct event node which will handle this event.
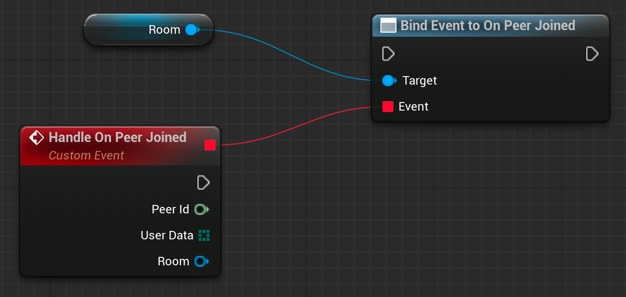
The wired up peer joined event handler
Don’t forget to connect the Exec slot with the process flow of your application. You should always setup event
handling before joining a room.
The On Media Added Event
The On Media Added event is triggered whenever a user connected to the room activates their microphone, or directly after joining a room you’ll get these events for all active users in that room.
You’ll get a Media object that represents the microphone input for the peer (i.e. connected user) that this media
belongs to. The Media object is a real-time representation which is basically just a number of floats that
represent the users voice. A node needs to be created that translates that into audio output. This is the Odin Synth Component. You use the Odin Assign Synth to Media
node that will connect both and actually
activates the audio.
The easiest way is to add the Odin Synth Component to your player asset and place it somewhere near the head. Then,
in your blueprint you can use the Get Component By Class node to get the Odin Synth Component from the player
actor.
Instead of adding the Odin Synth Component to your player asset, you can also use the
Add Odin Synth Component
to create the component and attach it to the player actor at runtime.
After wiring everything together, it should look something like that:
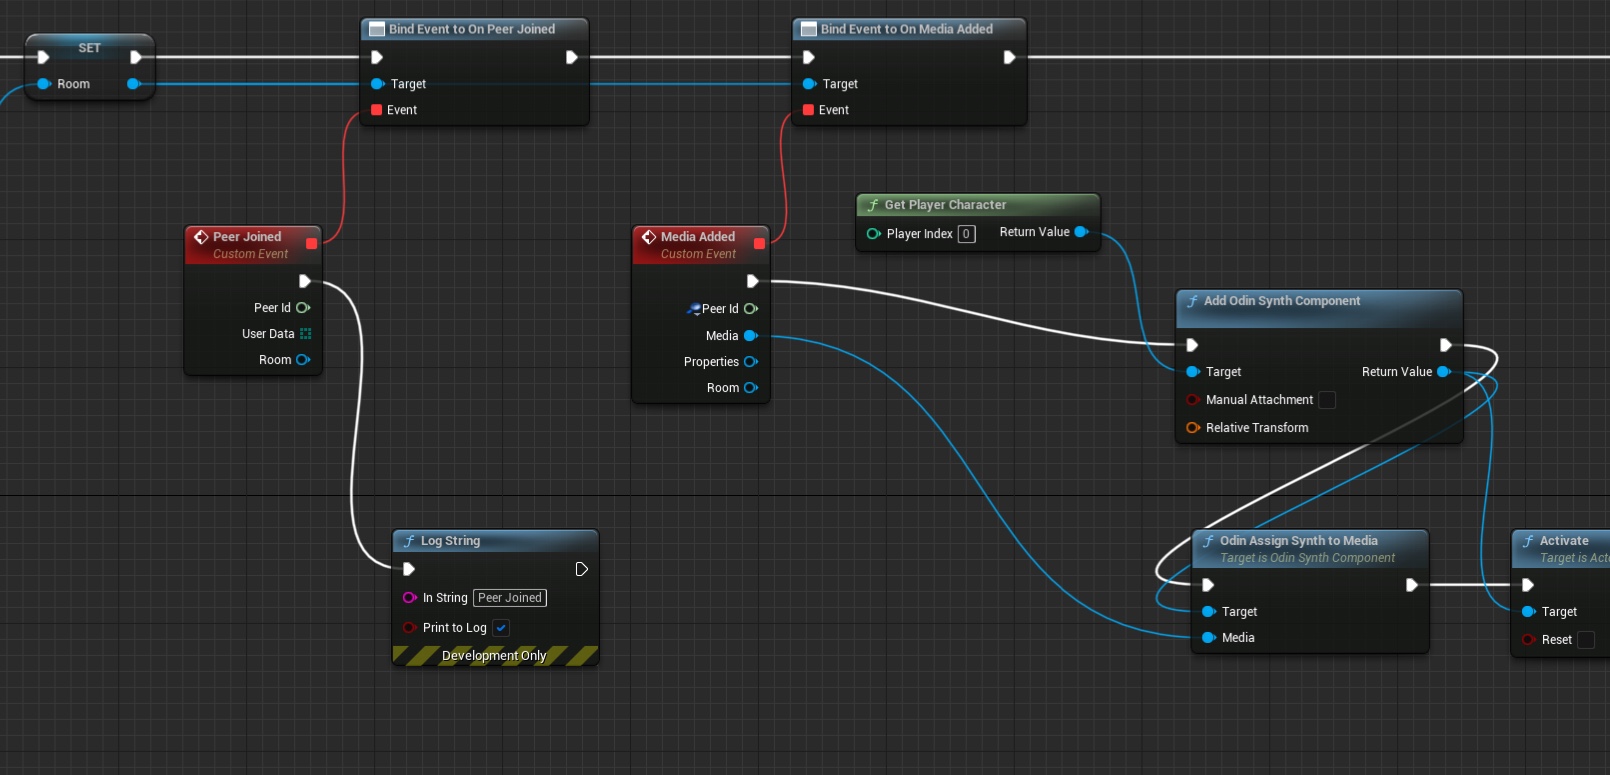
Handling On Media Added events
That’s it. Now, every user connected to the same room will be heard with full volume where the local player is located.
In a real 3D shooter with 3D audio you would not choose the local player, but map the Odin Peer Id with your Unreal Player Id and then assign the Media to the corresponding player character. This way, Unreal will automatically process the audio in its audio engine and apply attenuation, e.g. dampen the volume the farther away the player is from the listener.
Joining a room
Now, we have everything in place to join a room: We have created an access token with the room id “Lobby” and have configured room settings for our client. Now let’s connect them to join a room.
Add a Join Room node to your Blueprint Canvas.
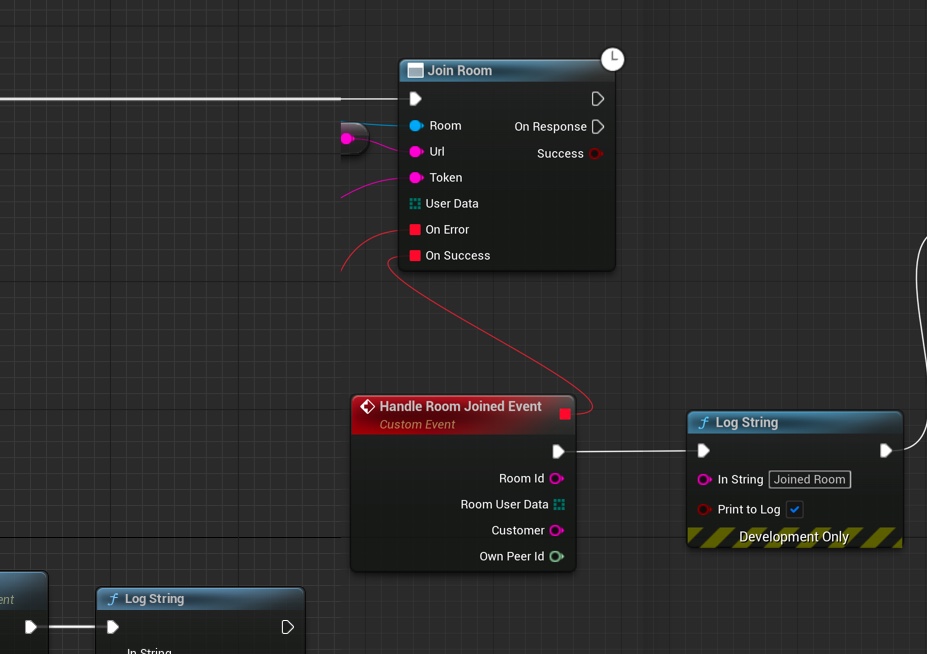
Joining a room
Connect the Return Value from Construct local room handle
with the Room input of the Join Room
node. Next, connect the Return Value of your Generate Room Token
node to the Token input of the
Join Room
node. Next, we need to configure our gateway: Drag out from URL of the Join Room
node and choose Promote to Variable. This variable will hold the gateway. Compile the Blueprint and set
https://gateway.odin.4players.io as the default value. This is our public gateway. You can also launch your own gateway
for maximum privacy, but to get started, our public one is a good option.
As shown in the image above, you can also drag out event handling to get notifications if something went wrong. We just added simple output to the Log to see what happens.
Last but not least, you need to connect the Generate Room Token process flow output to the input of your Join Room node.
Adding a media stream
Now that we have joined a room, we need to add our microphone (at least if users should be able to talk) to the room
so everyone else in the room hears what we are saying. To do that, we create a Create Audio Capture node and connect
it with a new media constructed with Construct Local Media
. Then we connect both with an
Add Media To Room
node as shown in the image below. Since you need to start capturing from the audio
device, we save the Audio Capture object in a variable and use that later to activate the microphone. By stopping the
audio capture you can implement mute very easily later or something like push to talk.
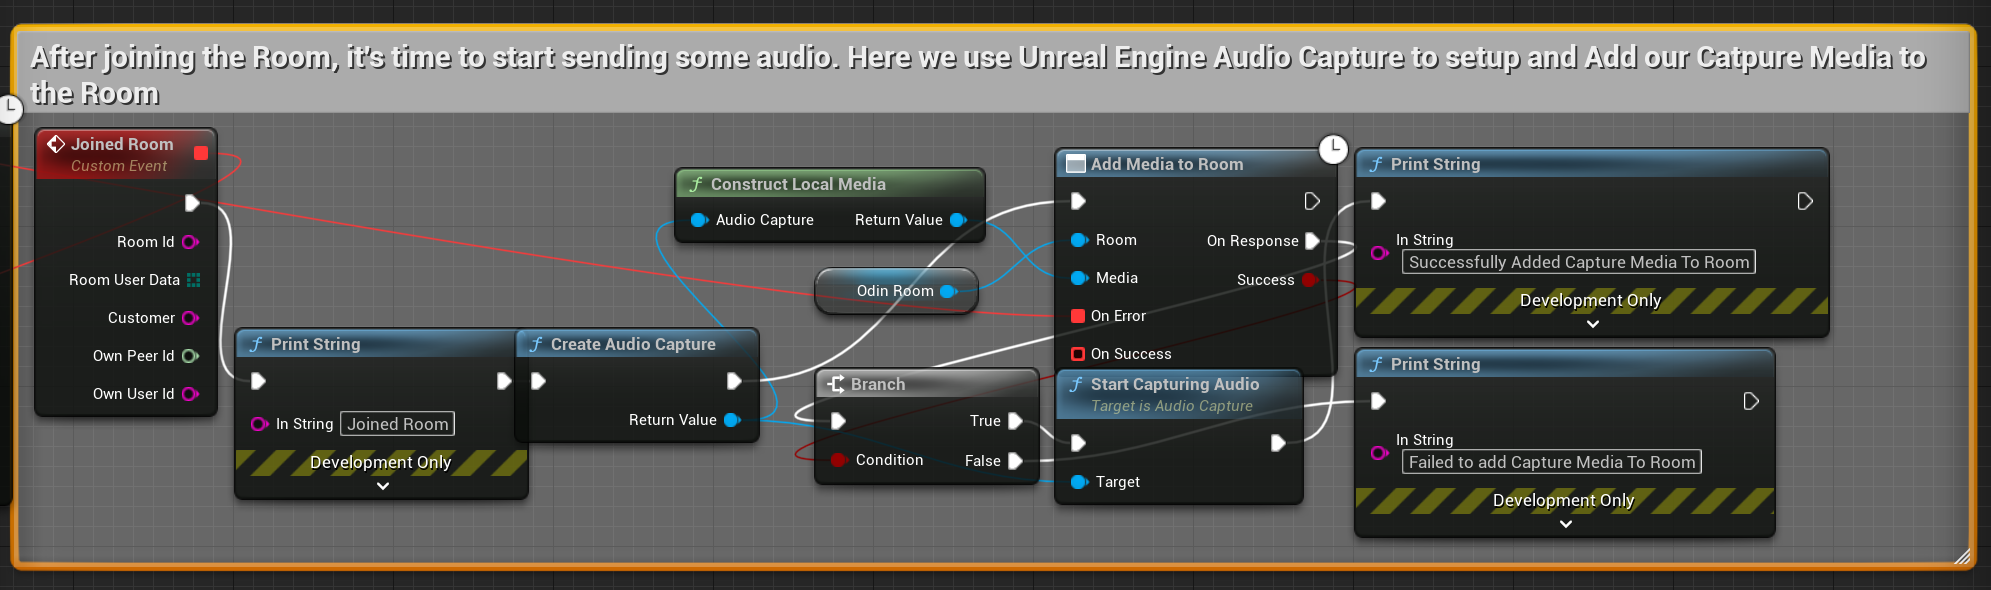
Adding a microphone
You can create event handling for errors as shown before. The process is basically always the same. Odin delivers an error code, and you can use the Format Error node to create an error message that you can place in a log or somewhere else.
If you don’t find the Create Audio Capture and Start Audio Capturenode, please make sure you have the Audio Capture Plugin enabled which is part of the default Unreal installation. See FAQ
for a more detailed description on how to resolve that issue.
Make sure to only execute the Start Audio Capture node after successfully constructing audio capture with Create Audio Capture, constructing the media with Create Media, and finally adding it to the room with Add Media to Room.
Testing with ODIN client
As ODIN is working cross platform, you can use our ODIN client app to connect users to your Unreal based game. There are numerous use cases where this is a great option (see Use Cases Guide) but its also great for development.
Fire up your browser and load our ODIN client: https://app.odin.4players.io/. We
need to configure that client to use the same access key that we use within Unreal. Click on the Gear icon next to
the Connect button. You should see something like this:
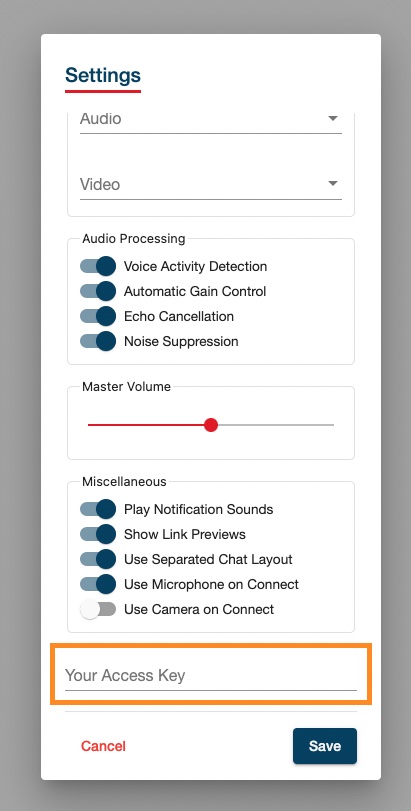
Testing with ODIN client
If you don’t see the Your Access Key option at the end of the dialog, you need to scroll down a bit.
Enter your access key that you have created earlier and that you have set in the Access Key variable exposed in
the Blueprint and click on Save. Now, the ODIN client will use the same access key as your Unreal based game,
connecting both platforms together.
In the connection dialog, set the same room name as you did in Unreal (i.e. Lobby), make sure the same gateway is
set as in Unreal (i.e. https://gateway.odin.4players.io) and enter a name. Then click on Connect.
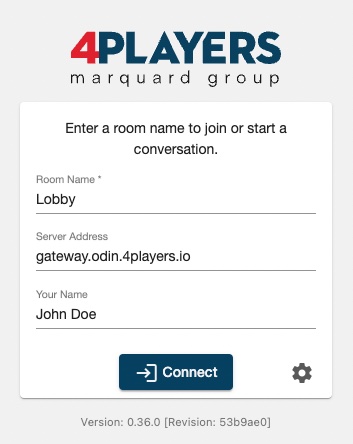
Connecting the room with ODIN client
You should see something like this:
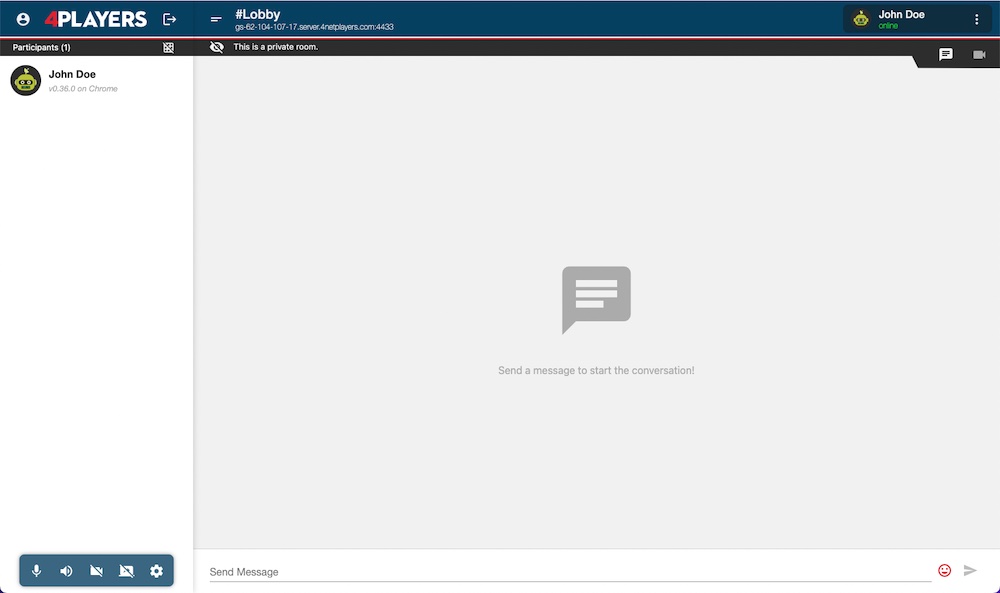
ODIN Client
Now, get back to Unreal and press Play in the editor. Unreal will fire up your game and will join the same room as you have in your browser. You should here a nice sound indicating that another user has joined the room. Navigate to your browse, and now you should see another entry in the users list: “Unknown”. If you talk, you should here yourself.
Ask a colleague or fried to setup the ODIN client with your access key and the same room and you’ll be able to chat together, one inside your game and the other one in their browser. This is a great way of quickly testing if everything works fine and we do that internally at 4Players very often.
Enabling 3D Audio
So far we have enabled the voice chat in your application, but most likely you want to use the 3D Audio Engine of Unreal. This for itself might be a trivial step since you can simply assign proper Attenuation Settings to your Odin Synth Component. But you also need to consider another problem: the positioning of the Odin Synth Components in your scene.
The simplest solution is to attach the Odin Synth Components to the Pawns representing the respective players, but you somehow need to keep track which Odin Peer is associated with which player - so let’s have a look at how to do that.
The implementation in detail depends on your networking and replication system of course, but most of the time you will want to use the native Unreal Engine Networking, so we will assume that you use that. If you use another system you will need to adjust the steps accordingly.
Propagating an Identifier
In order to assign the correct Odin Synth Component to the according Player Controlled Character we will need to do keep track of a unique identifier for each player, their actors and their Odin Peer Ids.
If you have not done that earlier, now is the time to move the logic to your Player Character blueprint or at least a component living there. For this sample we will assume you have created the Odin logic directly on the Player Character class.
With this out of the way we can start. First we need to propagate an identifier of the player for your game session. You can use GUIDs, or your Unique Player Identifiers that you already have due to a login process or something similar. You can set the ID in any event that is called during startup, a good entry point is the Event Possessedof the Character Class - here you can simply check if you are running on the Server and then you set a variable that is replicated across all Clients.
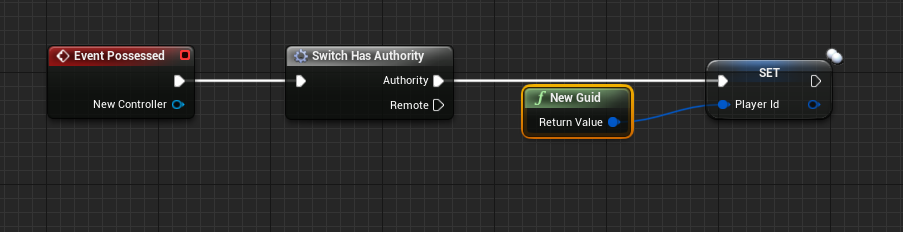
The wired up possessed event
With this done you can continue and use that variable to identify a player on the join call to the Odin room - so from here we can call that routine we already have created earlier in this tutorial.
The variable Player Id’s replication mode is set to RepNotify. So when the variable is set we can add some extra logic to each of the clients receiving the replication notification. Find the OnRepPlayerIdfunction in your character blueprint and here we will add some additional logic.
To your Default Game Instance blueprint add a variable named PlayerCharacters and first make it a GUIDtype - then in its details click the icon (looking somewhat like a pill) next to the variable type and select Map from the drop down menu. Now you can change the second type of the variable to your Default Player Character class. This map will help us keep track of the actors and is able to return an actor when we have an identifier - we will need that later, when we want to add Odin Synth Components to the correct Player Character objects.
So in the OnRepPlayerId function we will now add a new Key Value pair to that new map on the Game Instance - in order to do that we will need to cast the game’s Game Instance accordingly and then add a new element to the Player Characters map. You can see the finished function in the image some paragraphs below.
Joining a Room with the Identifier
To make sure that we already have the identifier on the owning client while joining the Odin room we can call the custom event Join Odin Roomfrom the OnRepPlayerIdfunction as well. If we do this on the Possessed event of the character, we cannot guarantee that the local player id was already set.
This Event will now be connected to our routine that creates an access token and connects to an Odin Room - earlier it was connected to the Begin Playevent of our local player. So in the OnRepPlayerId we will just check if we are on the locally controlling client and then we will call a new custom event.
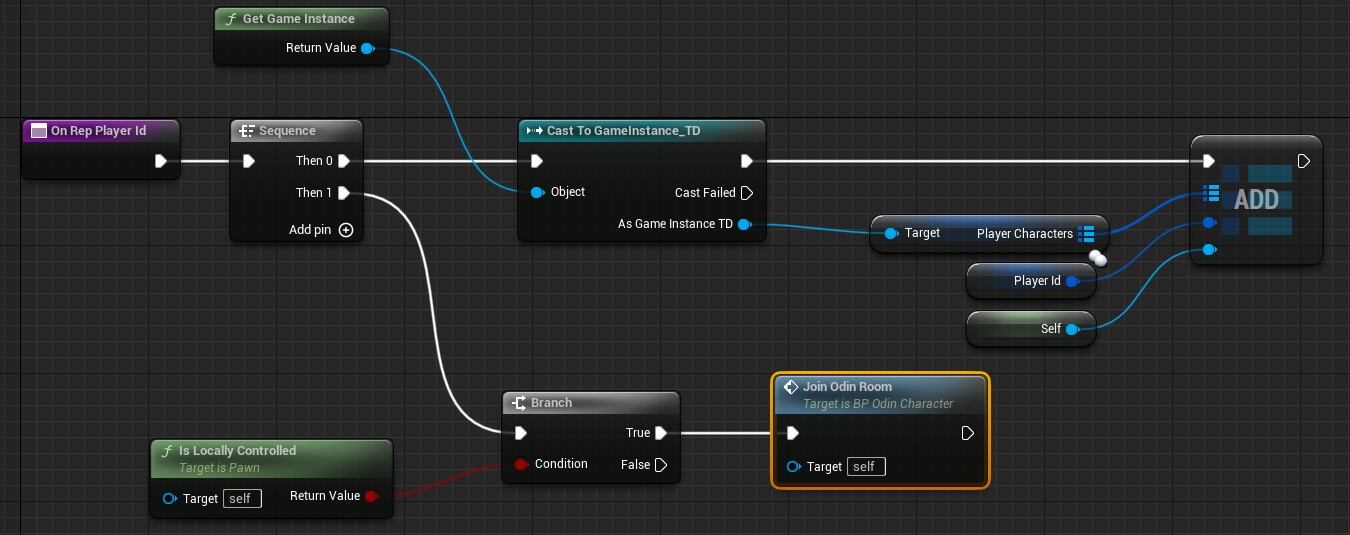
The finished OnRepPlayerId function
The new Join Odin Room event is now connected to our nodes that generate an access token.
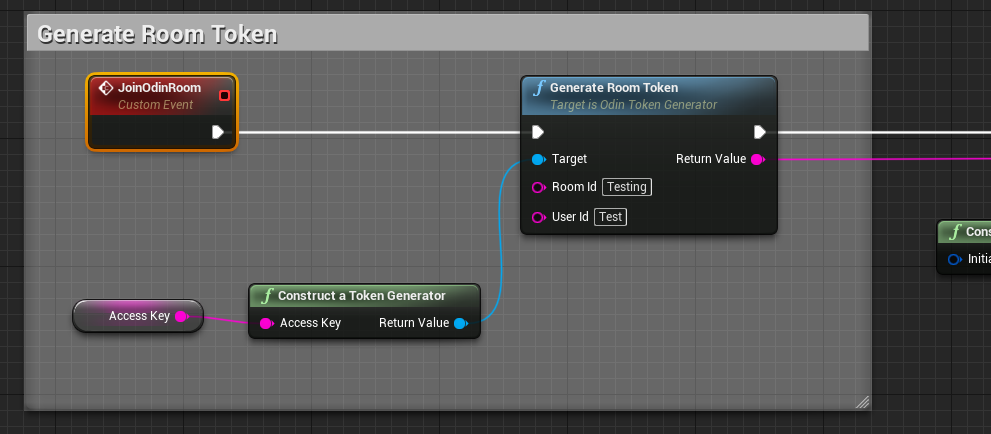
The start of the Join Odin Room custom event
Next we need to pass the identifier to the Join Roomcall as custom user data so that all other Odin clients can associate that identifier with our Odin id. You can use the methods to create a User Data Byte Array for that. First call Construct Json Object and then Set String Field on it and write the GUID to it as a string. Now you can Encode As Bytesthe json object and send it with the join room call.
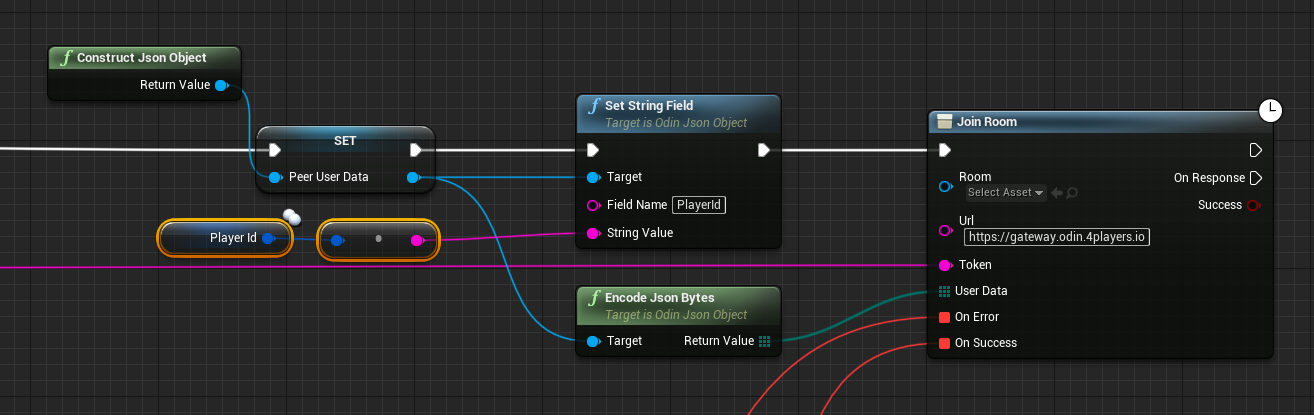
The wired up join odin room call
Handling the Peer Joined Event with an Identifier
Now each other client will receive an event once a player has joined the Odin Room. Here we can extract the given player identifier from the user data. The next problem we will handle here is that once we get the Odin Media object we do not get the user data in the same event, so we need to also map the Odin Peer Id to our Player Characters. To do that now add another map to the Game Instance and this time make it an Integer64 and Player Character map. Now you can find the correct player character and add it to the new map using the passed Peer Id. This is what the finished function will look like:
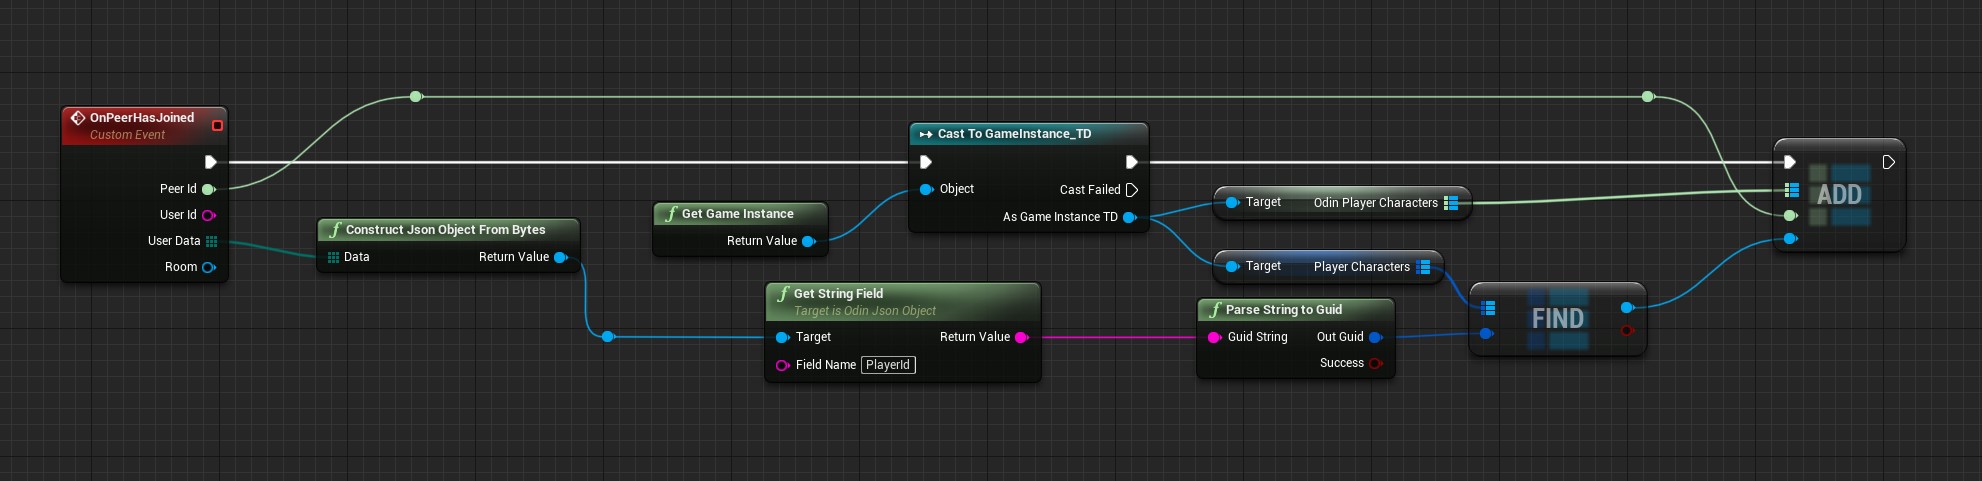
The wired up join odin room call
Handling the Media Added Event with an Identifier
Now we can finally add the Odin Synth Component to the correct player character. Find your event or function that handles the Media Added event and now instead of simply adding an Odin Synth Component to the local player character we can now actually find the correct character and attach the synth component there.
Use the passed Peer Id to get the correct player character from the Game Instance’s Odin Player Character map and assign the Odin Synth Component there now:
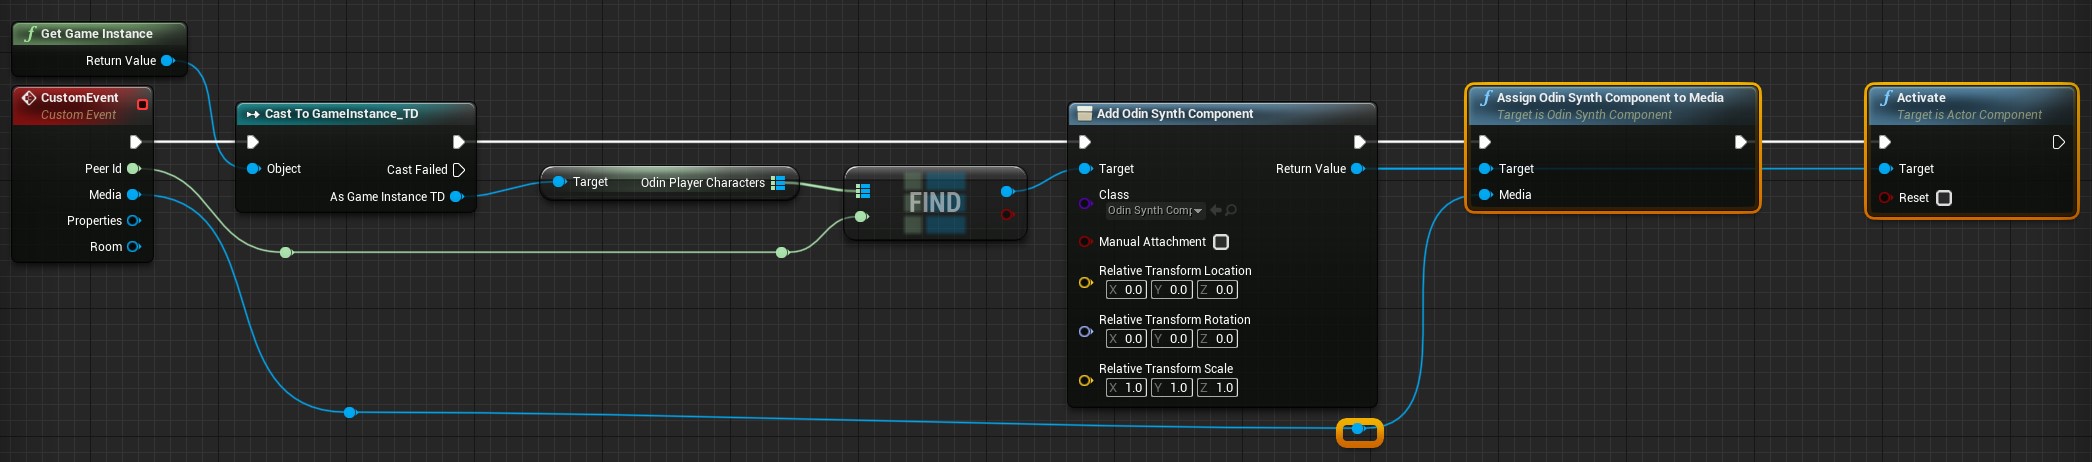
The wired up join odin room call
Conclusion
This is all you need to do for now to add the Odin Synth Components to the correct player characters. Now you can change the attenuation settings to whatever you need for your voice chat to work in your 3D world - from what we have now it is the most straight forward to simply drag off of the Create Odin Synth Component node and call the Set Attenuation Settings node and assign it a new Attenuation Settings asset that you can create in the Content Browser like any other asset before.
Odin is agnostic of the audio engine, so you can really just use any engine you like, be it the native Unreal Audio Engine, or a 3rd Party Engine, like Steam Audio, Microsoft Audio, FMOD and so on. It is all possible simply by changing the project settings and the attenuation settings of the Odin Synth Component accordingly.