Multiplayer with Photon
David Liebemann at SciCode Studio created a sample game with Unity and Photon PUN 2 that showcases all features of ODIN in a simple example.
It’s open source and available in our Github repository. You can download the binaries to test it here:
In this guide we’ll walk you through the basic concepts of integrating ODIN into a multiplayer game. This demo will use the Photon PUN 2 multiplayer framework, but ODIN can be integrated into your game using any multiplayer solution or even without multiplayer. The ODIN-Demo itself also allows us to easily switch out Photon for another framework.
If you are unsure why you should use ODIN for that, learn more about our features and what makes us special in our introduction.
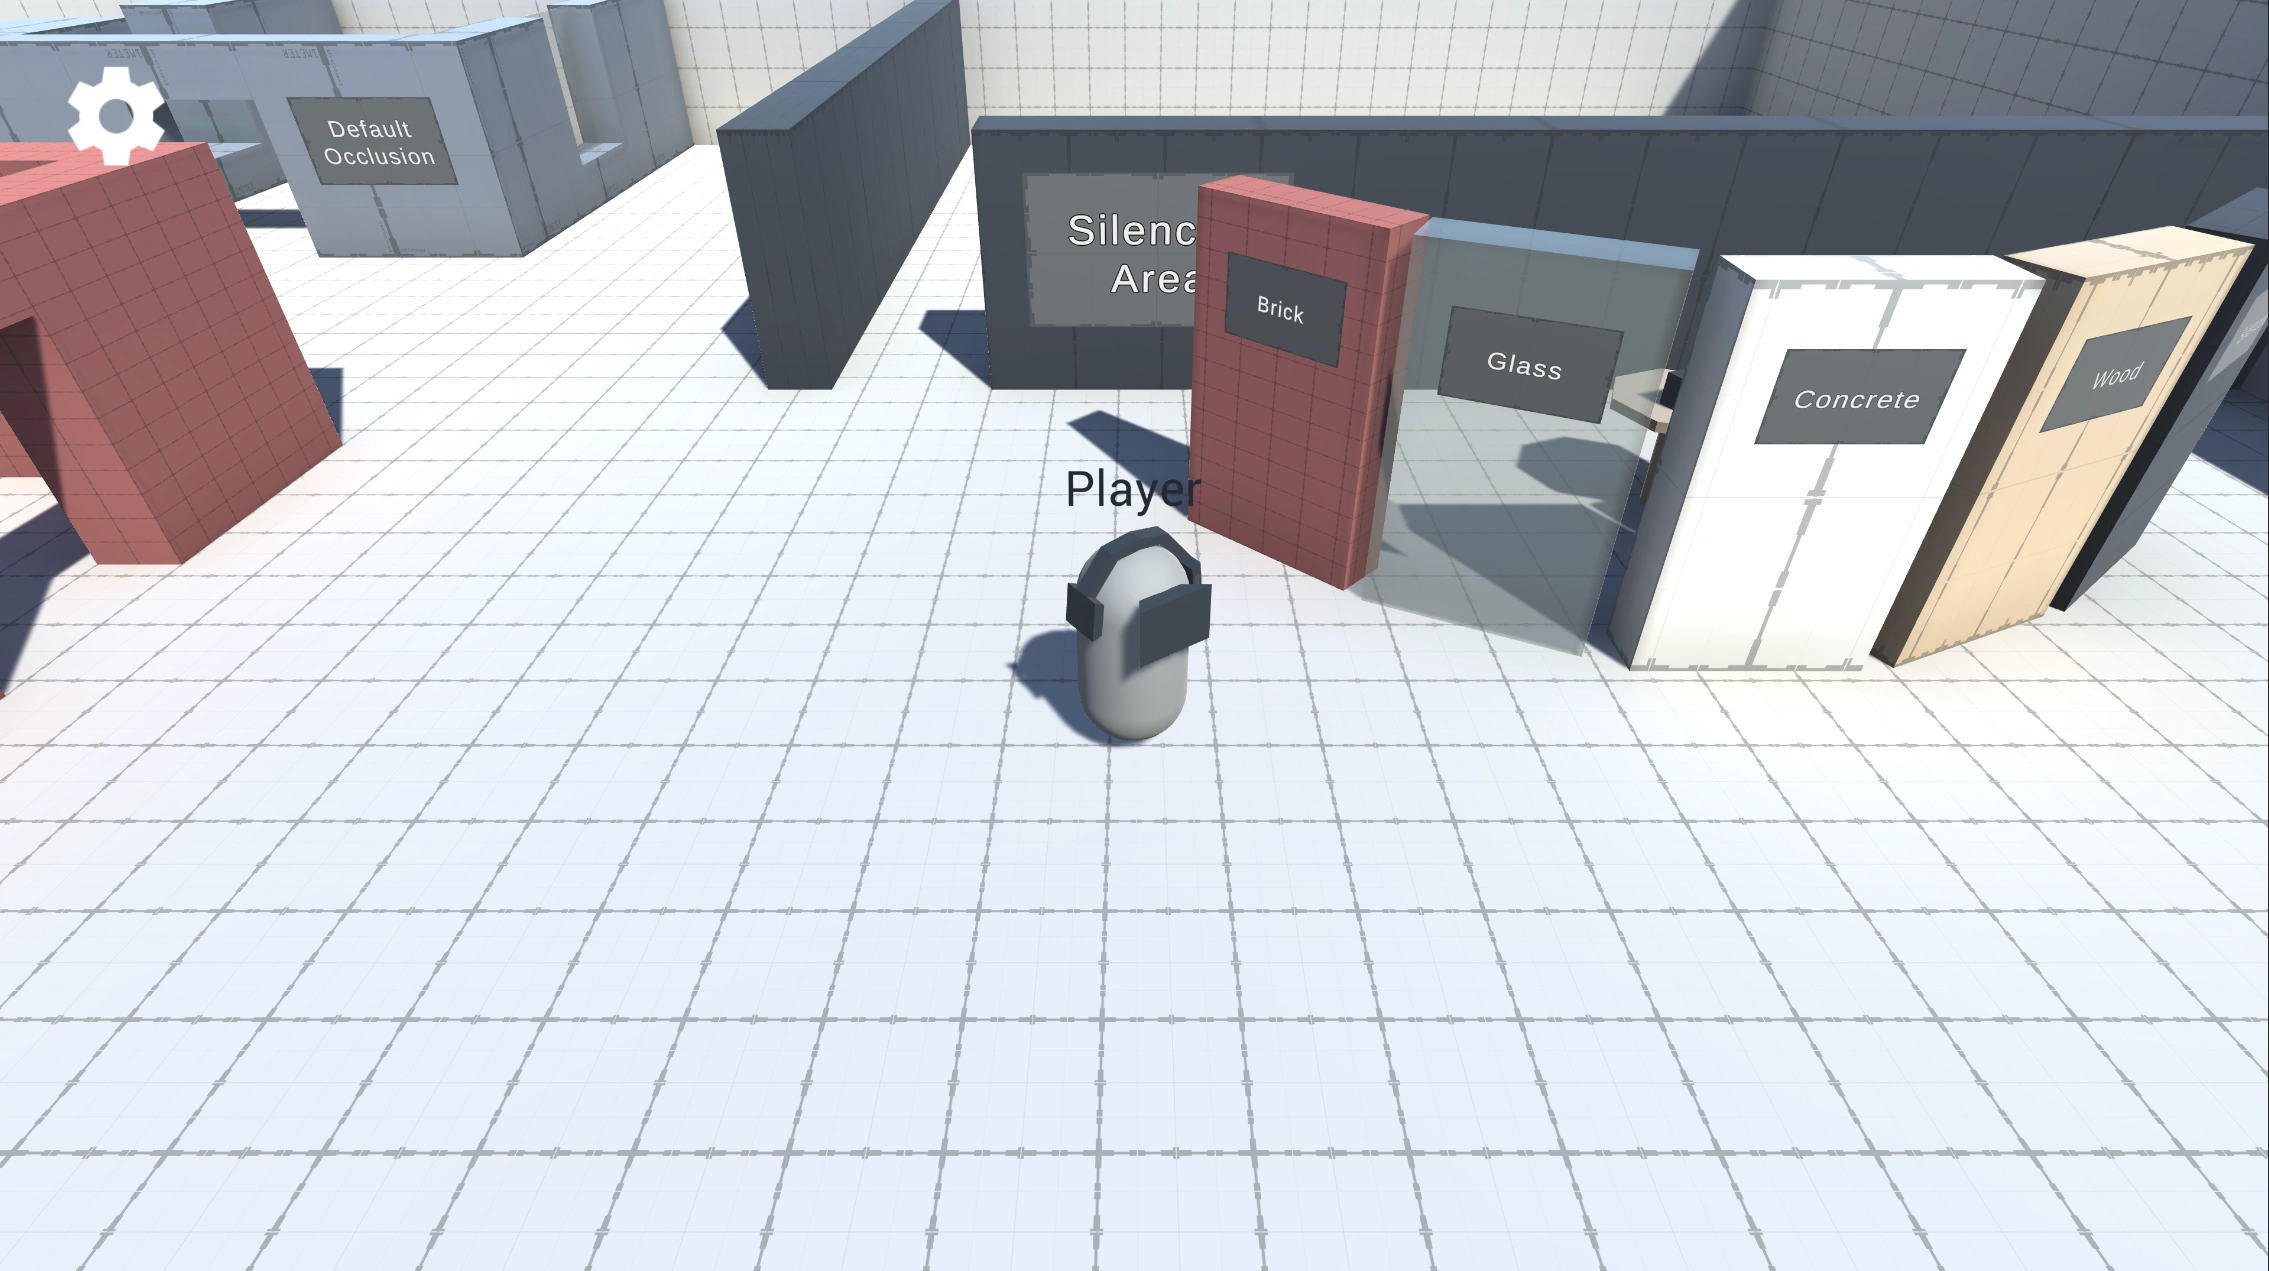
Screenshot from the sample project
How does it work?
The basic network topology looks like this:
graph LR
  subgraph ODIN Server
    OR[Odin Room]
  end
  subgraph Photon Cloud
    GS[Gameserver]
  end
  subgraph Game
    GS[Game Server] --> ClientA[Player A] --> OR[ODIN Room]
    GS[Game Server] --> ClientB[Player B] --> OR[ODIN Room]
    GS[Game Server] --> ClientC[Player C] --> OR[ODIN Room]
  end
Players connect to the Photon PUN 2 cloud and use that to sync the players position, name and colors. Every player is also connected to the same ODIN room - therefore all players that see each other also hear each other - of course only if they are close enough to each other and there is no wall between them.
In other voice SDKs you would need to transfer a lot of information to the voice cloud or you would need to process the game world to set the volume and balance of players. We can improve a lot on this process.
In ODIN, nothing like that is required. There is one place where all information comes together: Within the player’s Unity game client. Therefore, ODIN just uses the game engines audio features. You only need to map the corresponding player media stream coming from the ODIN server to the correct GameObject representing the player and use AddPlaybackComponent to attach it. That’s it.
The sample comes with the AOdinMultiplayerAdapter class - it’s an abstract base class that you can use to implement a mapping solution for any multiplayer framework. If you are using Photon PUN2, you can just use our implementation for that adapter for PUN 2: PhotonToOdinAdapter .
Cloning the repository
Please note: The repository uses LFS. You need to clone this repo with LFS enabled. Downloading the ZIP file via Githubs Download ZIP functionality does not work!
To enable git lfs, enter git lfs install in your git bash in your local repository.
Project Structure
The ODIN-Demo project’s scripts are split up into the categories:
- Audio: Scripts in here handle the custom Audio System behaviour like directional audio and occlusion effects.
- ODIN: Handles anything related to core ODIN-features, without external dependencies. If you’d like to use a multiplayer framework other than Photon, you can safely reuse the files contained in this assembly.
- Photon: Anything Photon specific is contained in here, like joining Photon Rooms or synchronizing Player Position.
- GameLogic: Anything else required for the demo, like the player’s movement or view state (1st-person or 3rd-person).
You can find demo settings in the Assets > ODIN-Demo > Settings directory, e.g. settings for the occlusion effects, ODIN room names, Push-To-Talk settings and Input definitions. Any prefabs used in the demo can be found in the Assets > ODIN-Demo > Prefabs directory, with the player prefab being located in the Resources.
The demo scene’s hierarchy contains three root game objects used for categorizing behaviours:
- Environment: Contains all visible objects or lights that contain the scene’s visuals.
- Gamelogic: Behaviours like the
PhotonPlayerSpawneror the ODIN room join logic are placed here. - UI: The root object for in-game UI, like the settings menu or the radio room’s active user display.
ODIN terms and behaviours
This is a short introduction into the most important ODIN terms - for more in-depth information please take a look at the ODIN documentation.
Rooms, Peers and Media
Every client connects to an ODIN server, authenticates with an access token and joins a room. Once the client has joined a room, they are a peer inside the ODIN room. Every peer can add media to that room, linked to a physical device like a microphone. Clients can join multiple rooms at the same time and can add multiple media streams at the same time.
To find more information on the basic ODIN topology, please take a look at the Basic Concepts documentation.
OdinHandler
The OdinHandler script is a singleton behaviour, wrapping the functionality of the native ODIN SDK for use in Unity. You can access the script via OdinHandler.Instance.
The most important use-cases are the OdinHandler.Instance.JoinRoom method for joining ODIN rooms and the events for listening for ODIN events, like OnRoomJoin, OnPeerJoined and OnMediaAdded. To use the OdinHandler, make sure to add a variant of the OdinManager prefab into your project. The prefab also contains the OdinEditorConfig script, which allows us to set the Access Key and Room Audio Processing settings in the inspector.
If you don’t yet have an ODIN subscription and just want to test out ODIN’s functionality, you can use a generated key by pressing the Manage Access Button and then selecting Generate Access Key. The resulting access keys can be used to access the ODIN network with up to 25 concurrently connected users free of charge.
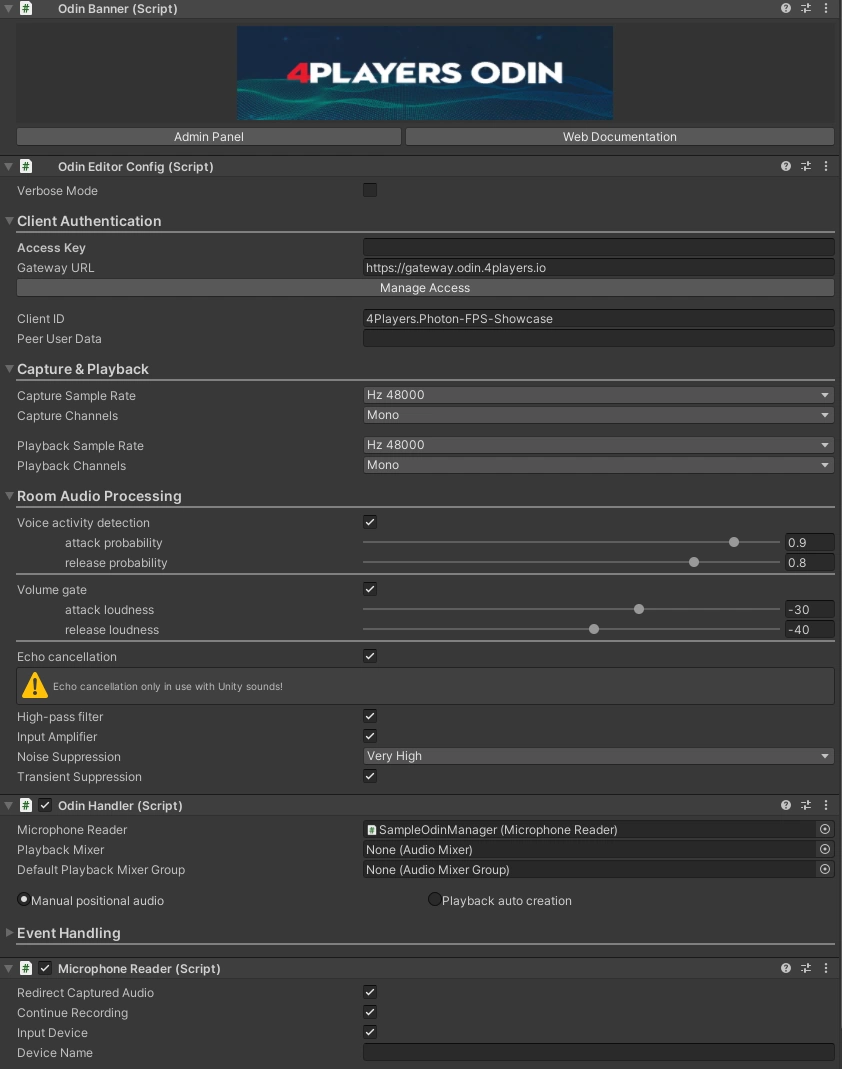
The OdinManager prefab in the inspector view.
PlaybackComponent
The ODIN SDK provides the PlaybackComponent script to easily play back audio data received from
the ODIN server. Each PlaybackComponent represents one media stream and is identified by a media id, a
peer id and a room name.
User Data
Every peer in Unity can store arbitrary information as user data. When local user data is updated, the server updates user data on all clients. Read more about user data in the guide: Understanding User Data.
Multiplayer
Lobby
Because ODIN works framework independent, we won’t go too much into detail on how to set up Photon - for an in-depth explanation, please take a look at Photon’s starter guide.
Note: When first entering the Unity project, Photon will require you to add an App Id - simply follow the instructions to add or create your own App Id.

The Lobby Scene.
We wait for a connection to the photon network, before allowing users to join a Photon room. In the demo we’ll simply add all players to the same room. We also use the PhotonNetwork.AutomaticallySyncScene = true option to automatically load the correct scene for each player joining.
After pressing the Join Button, the player will either connect to an existing Photon room or create a new Photon room as a Master Client. As a master client, we’ll use the call:
PhotonNetwork.LoadLevel(sceneToLoad);
Otherwise Photon will automatically load the correct scene.
Demo Level
When entering the Demo Level scene, two things happen:
We instantiate the player over the Photon network using
PhotonNetwork.Instantiateand theODINPlayerprefab. This is kicked off by thePhotonPlayerSpawnerscript on Start. Note: The player prefab needs to be located in aResourcessubdirectory, in order for Photon to be able to instantiate the player correctly.We automatically connect to two ODIN rooms (Voice and Radio) with
OdinSampleUserData userData = new OdinSampleUserData(refPlayerName.Value);
OdinHandler.Instance.JoinRoom(refRoomName.Value, userData);
We don’t have to send user data when joining an ODIN room, but in this case we already have access to the player name from the value entered in the Lobby scene, so it makes sense to supply it while joining.
OdinSampleUserData is a serializable C# class which implements the IUserData interface. This is a requirement for any userdata transmitted using ODIN. The interface member function ToBytes() simply provides an UTF8 encoding of a JSON representation of the class. The class contains app specific properties like the player’s name, his capsule color and a unique user id. The unique user id is used to connect an ODIN media stream to a Photon View - specifically the unique user id is equal to the photon view id - and therefore required for the proximity chat.
ODIN
Global Voice Chat - Radio transmissions
In the demo project, users automatically join the ODIN room named Radio, in
which players can communicate as if using radio transmitters - when pressing down the V key, the microphone input
can be heard by all players in the room independent of their position.
For this scenario, the demo project provides the OdinDefaultUser script, which uses the
OdinHandler.Instance.OnMediaAdded Event to spawn an instance of a prefab with a PlaybackComponent for
each media stream in the ODIN room. The event provides the room name, peer id and media id required
for the PlaybackComponent to work.
We added the OdinDefaultUser script as a local-player-only behaviour - so it will only spawn Playbacks as children of the Player.
This doesn’t matter for our radio transmissions, because they can be heard globally and shouldn’t react to the distance between the
local Player and remote Players. It also ensures, that each radio stream will only be spawned once for the player. But it also
entails that the OdinDefaultUser script should only be used for ODIN rooms which do not make use of proximity voice chat.
In the next paragraph we’ll take a look at how the Tech Demo implements a Proximity Chat which reacts to the distance between local Player and remote Players. We’ll also take a look at how to create the “Radio Crackling” Effect in paragraph Playback Settings.
Proximity Chat - connecting ODIN to the multiplayer framework
In a multiplayer scenario, we encounter the issue of connecting a user’s ODIN media stream to the user’s avatar in the game, e.g. in our demo project we’d want a player’s voice in the proximity chat to come from the player’s capsule. But because ODIN and the multiplayer framework don’t know of each other’s existence, we first have to logically connect the two concepts.
The abstract AOdinMultiplayerAdapter script gives access to the methods string GetUniqueUserId() and
bool IsLocalUser(). This adapter is used to connect the player’s representation in the multiplayer
framework (using the framework’s equivalent of an unique user id) to an ODIN peer. On ODIN’s side we use
custom user data to keep track of that id. When joining an ODIN room, the AOdinMultiplayerAdapter
automatically sets the uniqueUserId of our custom ODIN user data for the current peer and sends an
update to the other peers in the room. On receiving the update, those clients then use a reference to AOdinMultiplayerAdapter
to compare the remote peer’s uniqueUserId to the id supplied by the remote adapter’s GetUniqueUserId().
If both ids are equal,we know that an ODIN peer is represented by the referenced AOdinMultiplayerAdapter.

Diagram showcasing the adapter pattern for connecting ODIN to a multiplayer framework.
In the demo project
we use this information to correctly play black the proximity chat audio at a player’s location -
specifically using the Odin3dAudioVoiceUser, which automatically creates a PlaybackComponent for each remote user.
The demo project utilizes Photon as a multiplayer framework, so we add the
PhotonToOdinAdapter to our player. The adapter uses PhotonView.ViewID as a unique user id and
PhotonView.IsMine
to determine whether the adapter represents a local or a remote player. To switch out Photon for another
multiplayer framework, simply provide your own class extending AOdinMultiplayerAdapter.
Playback Settings - Distance and Radio Effects
ODIN relies on Unity’s AudioSource Components to play Media Streams. We can therefore just use the built in functionality of Audio Sources to adjust the distance at which players can hear each other. For any AOdinUser implementation (i.e. OdinDefaultUser for Radio transmissions and Odin3dAudioVoiceUser for Proximity Voice Chat) we can reference a prefab that will be spawned for each
Media Stream. These Prefabs not only have a PlaybackComponent on them, but also contain an AudioSource. So, to change the Playback Behaviour of Media Streams in-game, we have to change the AudioSource Settings on the prefab. The Tech Demo uses the prefabs OdinRadioAudioSource and OdinVoiceAudioSource in the ODIN-Sample > Prefabs folder.
The OdinRadioAudioSource prefab simply has a full 2D Spatial Blend setting and the Bypass Reverb Zone enabled. The latter lets us avoid Unity’s Reverb Zones, e.g. Echo effects in large rooms. The most interesting setting can be found in the Output option - here we reference an Audio Mixer Group Controller. The Radio Group Controller defines the list of effects that the incoming Radio room Media Streams go through, before being output to the User. The combination of these effects creates the Radio’s crackling effect, giving Players a more immersive experience.

The Radio Mixer Settings for creating the crackling effect.
The OdinVoiceAudioSource prefab on the other hand has a full 3D Spatial Blend setting and does not bypass reverb zones - we want this AudioSource to simulate a human voice in the real world, which is naturally affected by the environment. The prefab uses the 3D Sound Settings of the AudioSource component to further specify this effect - the Min Distance value defines the distance at which the voice will be heared at full volume and the Max Distance defines the distance at which we won’t hear the voice anymore.
Additionally we can see the Volume Rolloff set to Logarithmic Rolloff - this best approximates a real world setting. If required, the rolloff can easily be customized by choosing a linear or custom setting.
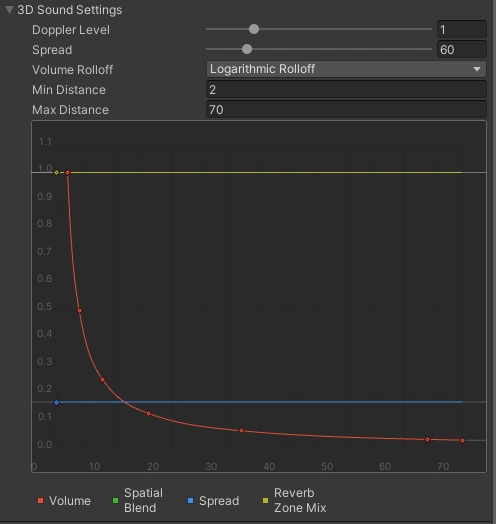
The AudioSource component’s 3D sound settings.
These three options majorly define the fading behaviour of a player’s voice in the distance - at least when there aren’t any objects between the audio source and listener. Occlusion effects are not part of Unity’s Audio System, but we’ve included our own, custom solution for this in the Tech Demo, which is explained in-depth in the Audio Occlusion paragraph.
Proximity Chat - Room Optimization
Another feature of ODIN is, that the ODIN servers can automatically stop the transmission of Media Streams based on the spatial distance between the local player and other players in the ODIN room. This allows us to optimize the bandwidth required for each player, avoiding unnecessary downstreams for voice transmissions that can’t be heard by the player due to distance anyway! Of course, we only want to use this for proximity-based ODIN rooms, not for global rooms like the Radio Chat.
To enable this feature, we use the methods
room.SetPositionScale(scale);
and
room.UpdatePosition(position.x, position.y);
As ODIN is not aware of the scale your game is operating at, it initially uses a Unit Circle as the cutoff radius. If we use the previously mentioned Max Distance to calculate scale as
float scale = 1.0f / MaxVoiceDistance;
we can automatically disable streams that wouldn’t be transmitted by the Audio Source due to distance anyway.
Note: The position scale should be set to the same value for all Peers in the ODIN room. The scale value also has to be set individually for each room that will utilize ODIN’s optimization feature.
Invoking room.UpdatePosition too frequently can lead to operational issues where the optimization of audio streams may not function correctly. Limit the frequency of calling room.UpdatePosition to a maximum of 10 times per second. This equates to one update every 100 milliseconds. We recommend using a Unity Coroutine to update the position in Odin rooms.
For ODIN to be able to use the distance values for optimization, we have to transmit player positions at regular intervals. The function room.UpdatePosition lets us define the client’s current position in the room. If we define the correct room scale, we can simply use the player’s transform.position x and z values.
Note: For now, we can only transmit 2D positions with this method. But as most games have a wide horizon and aren’t scaled vertically, this is not a real drawback.
In the Tech Demo, the OdinPositionUpdate component regularly updates the player’s position. Using entries to the Room Settings array on the OdinPositionUpdateSettings scriptable object, we can define the activation status and the cutoff radius for each ODIN room individually.
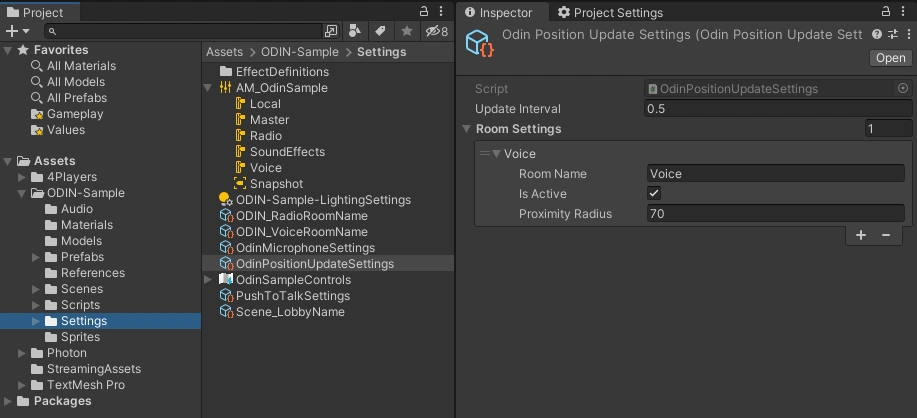
The ODIN room optimization and position update settings.
Push-To-Talk
Push-To-Talk is handled by the OdinPushToTalk script using settings defined in a OdinPushToTalkSettings scriptable object. If the push-to-talk button for a specific room is pressed, the script will access the user’s mediastream and set a user’s mute status using targetRoom.MicrophoneMedia.SetMute().
The OdinPushToTalkSettings scriptable object allows rooms to be either be voice-activated or require a button press to talk - if you’d like to make this available as a user-setting, you can use the OdinPushToTalkSettingsController, which automatically sets the room’s activation method based on a Unity Toggle. Take a look at the Tech Demo’s Settings prefab (found in ODIN-Sample > Prefabs > UI) for more information.
Audio Filter Settings
The ODIN SDK provides quite a few Room Audio Processing settings, like Voice Activity Detection, Echo Cancellation, Noise Suppression levels and more. If you’re content with using the same settings for all users, you can simply adjust the values on the OdinManager prefab (as shown here).
The Tech Demo has a sample implementation on how to allow users to adjust these settings in the game. The Settings prefab (found in ODIN-Sample > Prefabs > UI) uses Unity’s Toggle, Slider and Dropdown UI components to adjust the Audio Settings. The OdinAudioFilterSetingsController script contains entries that map the UI component’s input to ODIN’s filter values and even stores the changes to file. For a fast integration into your game, you can use the Tech Demo implementation and adjust the UI graphics to your liking.
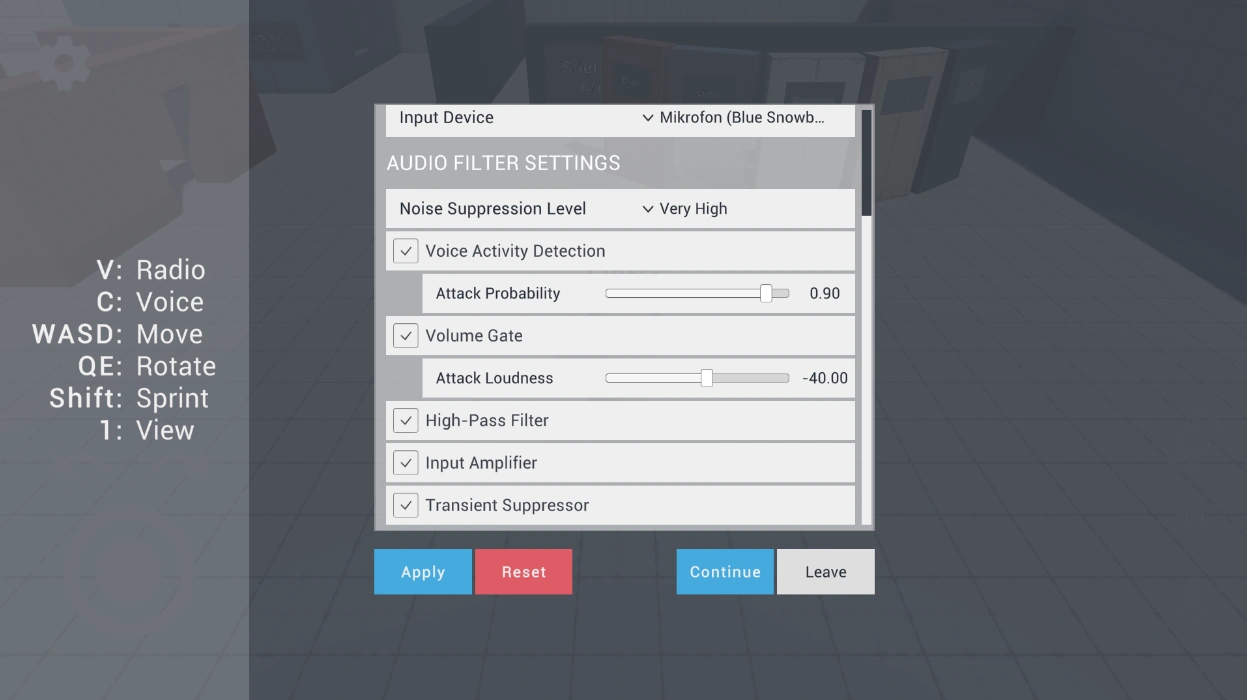
The UI for adjusting the Audio Filter Settings.
Choosing an Input Device
The previously mentioned Settings prefab also allows players to choose their input device. The options that are available are based on Unity’s Microphone.devices ouput and displayed in the dropdown component. Updating the input device used by ODIN is then as simple as calling
MicrophoneReader microphoneReader = OdinHandler.Instance.Microphone;
microphoneReader.StopListen();
microphoneReader.CustomInputDevice = true;
microphoneReader.InputDevice = selectedDevice;
microphoneReader.StartListen();
where the selectedDevice is one of the string options listed in the Microphone.devices array. The Tech Demo uses the implementation in the OdinMicrophoneController script, which also handles saving and loading the users selection in previous game sessions.
Audio
To better showcase the capabilities of ODIN in apps and games, we’ve implemented some audio
features that are often used in games, but not included in Unity’s Audio System: Audio Occlusion and Directional Audio. Because we want to keep things simple and performant, we’re going to approximate those effects, using Unity’s AudioLowPassFilter component
and by adjusting the volume of individual audio sources.
Audio Occlusion
Audio Occlusion should occur when an object is placed between the audio listener (our player) and audio sources in the scene - e.g.
hearing the muffled sounds of an enemy approaching from behind a wall.
Unity does not have any kind of built-in audio occlusion, so we need to implement our own system.
The OcclusionAudioListener script contains most of the occlusion logic and is placed, together with the AudioListener script,
on our local player object. The OcclusionAudioListener registers objects with colliders, that enter the detection range and have at least one AudioSource script attached in the transform hierarchy. By default the detection range
is set to 100 meters - Audio Sources that are farther away than that are usually
not loud enough to be affected meaningfully by our occlusion system.
We then apply the occlusion effects to each of the registered Audio Sources in every frame.
Our occlusion effects have the parameters
Volume, Cutoff Frequency and Lowpass Resonance Q:
- Volume: Multiplier for the audio source’s volume.
- Cutoff Frequency: Removes all frequencies above this value from the output of the Audio Source. This value is probably the most important for our occlusion effect, as is makes the audio sound muffled. The cutoff frequency can range from 0 to 22.000 Hz.
- Lowpass Resonance Q: This value determines how much the filter dampens self-resonance. This basically means, the
higher the value, the better sound is transmitted through the material the filter is representing. E.g. for imitating an iron
door, the
Lowpass Resonance Qvalue should be higher than for imitating a wooden door.
The occlusion effect is based on the thickness of objects between our
AudioListener and the AudioSource. For each audio source we check for colliders placed between the listener and the source using raycasts and
determine the thickness of the collider. This thickness value is then used to look
up the final effect values from an AudioEffectDefinition ScriptableObject. For each of
the three parameters Volume, Cutoff Frequency and Lowpass Resonance Q the ScriptableObject
contains a curve, which maps from the collider’s thickness on the x-Axis to the parameter value
on the y-Axis.
The image below shows an Audio Effect Definition Scriptable Object for the Concrete material. When selecting the Cutoff Frequency Curve, Unity’s Curve Editor window shows up to allow finetuning the settings. The x-axis displays the thickness of an occluding object in meters. The curve then maps to the cutoff frequency displayed on the y-axis.
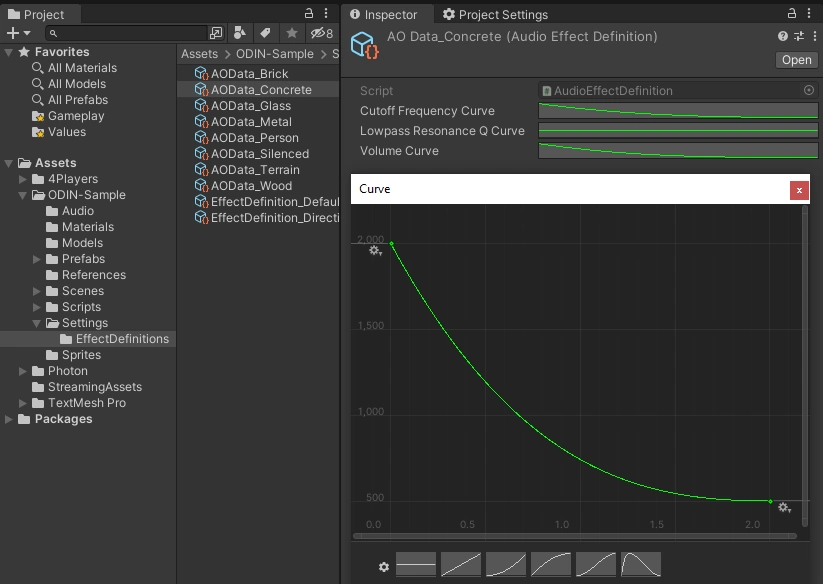
The Audio Effect Definition Scriptable Object.
The AudioEffectDefinition is retrieved using one of two options:
- By placing an
AudioObstaclescript on the collider’s gameobject. This can be used to customize a collider’s occlusion effect and give it a certain material’s damping behaviour. The demo uses theAudioObstacleto define the occlusion effect of a brick wall, a wooden door, a glass pane or even a 100% soundproof barrier. - By falling back to the default
AudioEffectDefinition- this option is used, if noAudioObstacleis attached to the collider.
You can create your own AudioEffectDefinition by using the Create > Odin-Sample > AudioEffectDefinition
menu in your project hierarchy.
Directional Audio
Unity’s built in audio system allows us to hear differences between sounds coming from left
or right, but not whether the object is in front or behind us. The DirectionalAudioListener script will take care
of this using basically the same effects as the audio occlusion system.
Similar to the OcclusionAudioListener, we apply an effect to each Audio Source in
the detection range - but instead of using the thickness of objects between source and listener,
we interpolate the effect based on the angle between the listener’s forward vector and a vector
pointing from the listener to the audio source.
Note: The implementation currently won’t let us differentiate between sound coming from above or below. To implement this behaviour, please take a look at the implementation of Head Related Transfer Functions (HRTF).
Environmental Effects
The Tech Demo Level contains a few rooms, that highlight the Audio Occlusion effect for different materials. Additionally, we’ve used Unity’s AudioReverbZone components to add environmental effects to these rooms, to further increase the players immersion. Unity provides a few presets which simulate different environments - e.g. the Demo Level’s “Brick Room” uses the Stone Corridor preset - but also allows to be set to a custom arrangement. The effect will start to be heared at MaxDistance and is at full force inside of the MinDistance radius.
While the Voice transmissions are affected by the reverb zones, the Radio transmissions are not, due to the Bypass Reverb Zone setting on the Playback Prefab - as described here.
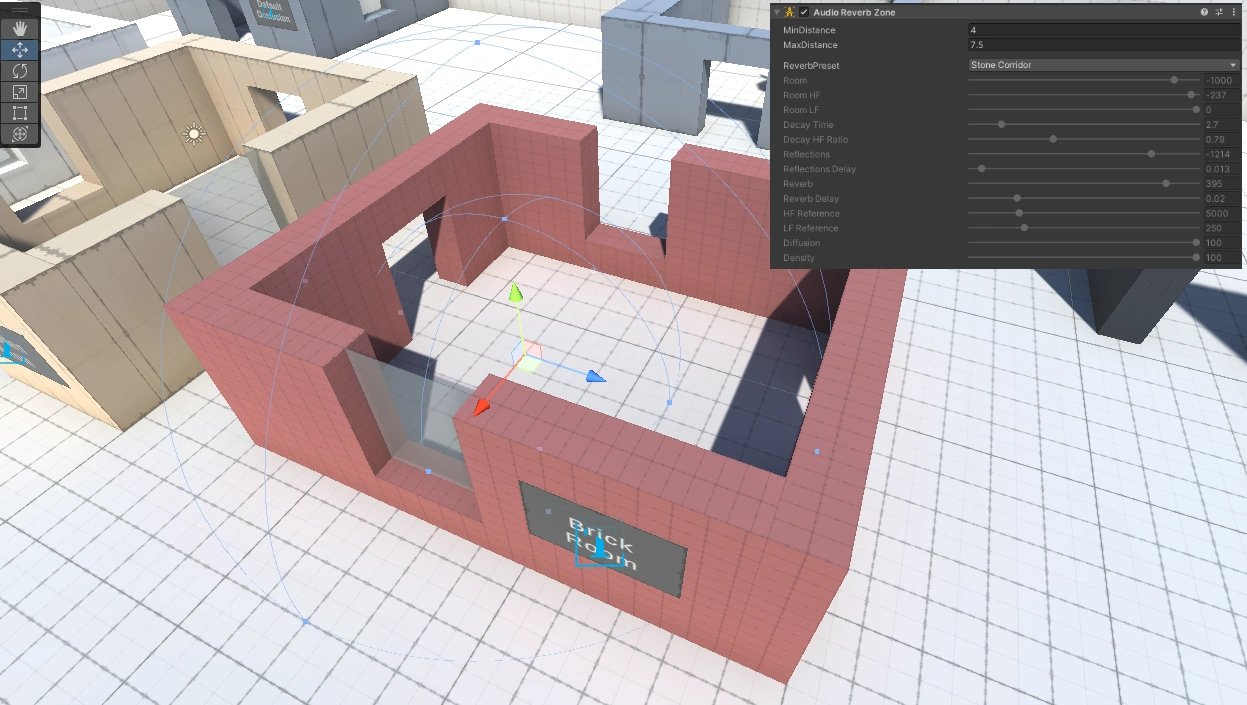
The Brick Room with the highlighted Audio Reverb Zone.
Game Logic
Player Name and Color Synchronization
The OdinNameDisplay and OdinSyncedColor scripts use the ODIN’s custom User Data to synchronize the player’s name and avatar color. With OdinHandler.Instance.OnPeerUserDataChanged.AddListener() we listen to any changes on a remote peers User Data - if the peer’s UniqueUserId equals the Multiplayer Adapter’s GetUniqueUserId(), we read the name and display it above the peer’s avatar using a world-space canvas and display the color on the avatar’s mesh.
Mobile Controls
Because ODIN works on mobile platforms, we’ve added mobile controls to the Tech Demo. The implementation is based on Unity’s new Input System and allows players to move, rotate, use Push-To-Talk and switch from 3rd to 1st-person view with On-Screen controls. Take a look at the UI > MobileControlsCanvas in the DemoLevel scene’s hierarchy for implementation details. The mobile controls can be simulated in Editor by selecting the Enable in Editor option on the ActivateIfMobile script.
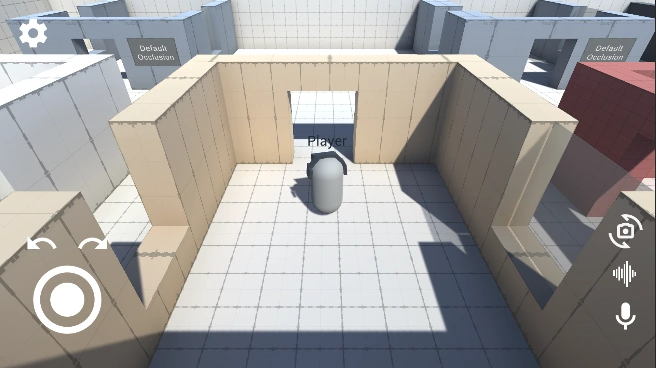
Activated mobile controls in the Tech Demo.
Toggling the in-game radio objects
The ToggleRadioBehaviour script implements the basic behaviour for turning the in-game radio sources on and off - if an avatar enters the detection radio, the controlling player will be able to toggle the radio status with a button press. The status then gets synchronized with the PhotonRadioSynchronization behaviour, which listens to the toggle’s onRadioToggled UnityEvent.
If you’d like to implement another multiplayer framework, simply replace the PhotonRadioSynchronization with your own synchronization behaviour.
Switching Player Views
Users can switch from 3rd-person to 1st-person view on button press - this is implemented in the ToggleViews script by toggling game objects found in the ODINPlayer > LocalPlayerBehaviours > ControllerState hierarchy of the ODINPlayer prefab. The FirstPersonBehavior object contains the camera and behaviours for 1st-person controls, the ThirdPersonBehavior contains everything for 3rd-person controls.