Getting Started with Unity
At the end of this guide, you’ll be able to chat with friends and colleagues with realtime voice positioned in 3D. It will take around 20 minutes of your time to finish this guide.
Please note: Although it’s not required to understand the basic concepts of ODIN to follow this guide, it’s definitely helpful. We try our best to give some explanation in this guide, however, if you are not in a hurry, we recommend reading through the introduction first.
Requirements
Supported platforms
- Windows (x64)
- MacOS (Universal)
- iOS (Universal)
- Android (ARM64)
For additional platform support, please contact us!
Create an empty Unity project
First, you’ll need to create an empty Unity project. Please note that ODIN requires Unity version 2019.4 and later. In this guide we used version 2020.3.17f1, but feel free to use what you have installed. We also used the Unity Hub version 3.0.0 - if you are using an earlier version of the hub your screen might look a bit different, but the steps are basically the same.
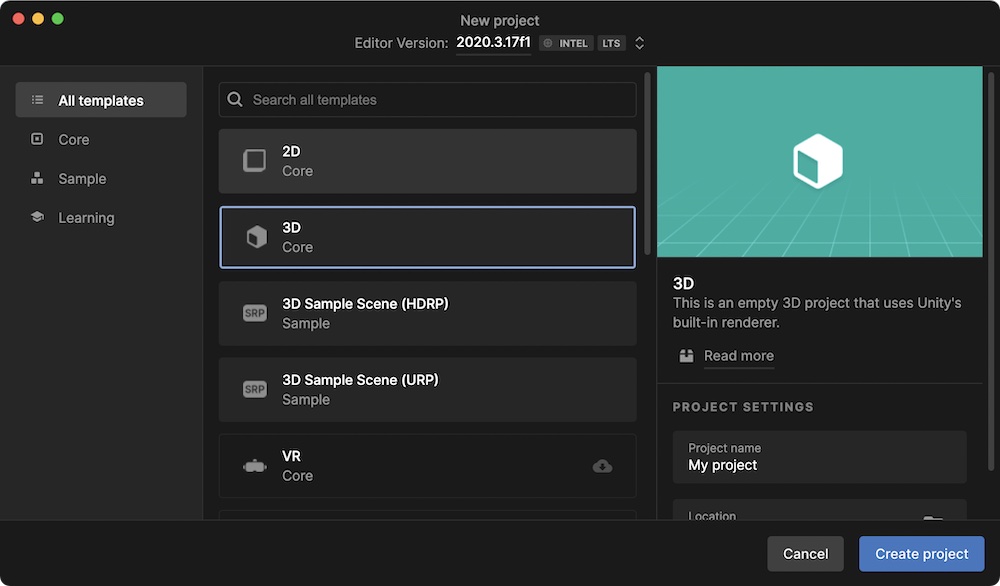
Creating a new 3D project in Unity with the Unity Hub.
Please choose the 3D template, choose a folder on your hard disk and click on Create Project. After a few moments the Unity Editor will start, presenting an empty scene in a new project.
Install ODIN SDK
Next step is to install the ODIN Unity SDK in the new project.
4Players ODIN supports Unity 2019.4 or any later version. The latest version is always available in our GitHub
repository or in the
Unity Asset Store.
There are numerous ways to install ODIN into your project. We recommend using Package Manager.
Install via Asset Store
We are currently working with Unity to get approved as a Verified Solutions Partner. In the meantime, please manually install the ODIN SDK using the Package Manager. We apologize for any inconvenience. If you encounter any issues with the installation, please contact our support.
Install via Unity Package
Please download the latest version of the ODIN Unity SDK as a .unitypackage from the [Github releases page]
(https://github.com/4Players/odin-sdk-unity/releases). Just double-click the .unitypackage to import it into your
current Unity editor project.
Package Manager
Using the Package Manager will ensure that all dependencies are set up correctly and that you will have the most up-to- date version of the SDK. In most cases, using the Package Manager is the way to go.
To open the Package Manager, navigate to Window and then click Package Manager in your Unity Editor menu bar.
Using our Git Repository
Click the + button in the upper left and select Add package from git URL. Next, enter this URL and hit enter to import the package:
https://github.com/4Players/odin-sdk-unity.git
Using a Tarball Archive
Click the + button in the upper left and select Add package from tarball. Next, select the odin.tgz archive you’ve downloaded from the GitHub releases page to import the package.
Install the samples
In the next step, we need to install the samples, so we can use them directly in the Unity editor. Open the Package Manager. Click on the menu Window and then Package Manager. A new window will pop up:
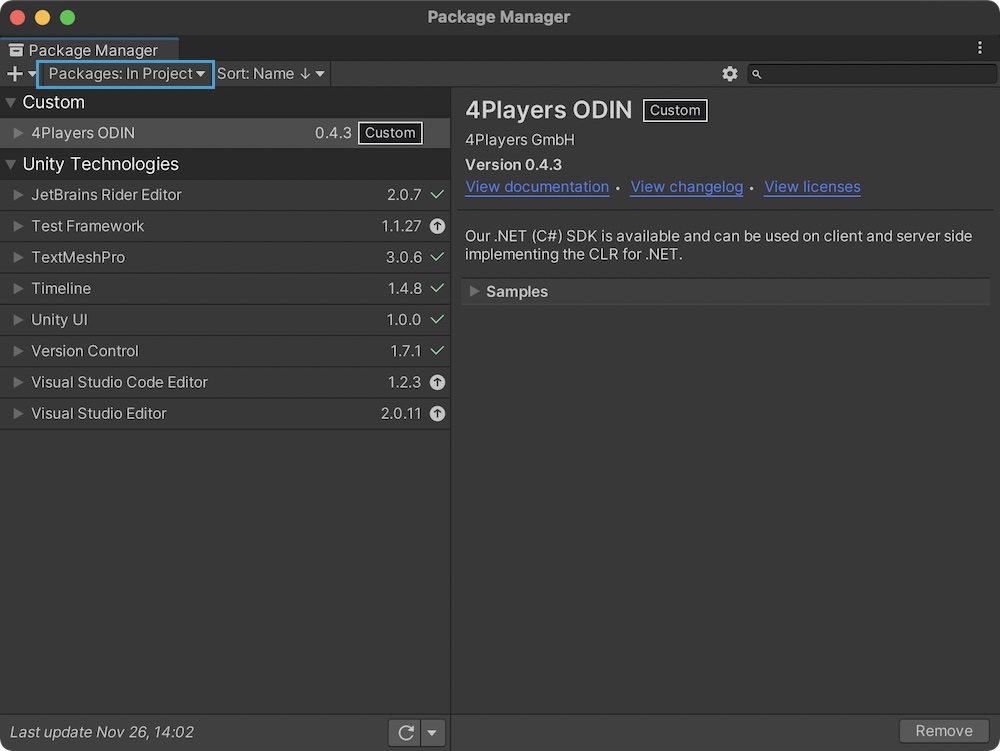
The Package Manager
Make sure that Packages: In Project is selected in the dropdown (see highlighted box in screenshot above),
otherwise click on it and choose Packages: In Project to show all packages installed in this project. In the list,
you should see 4Players ODIN.
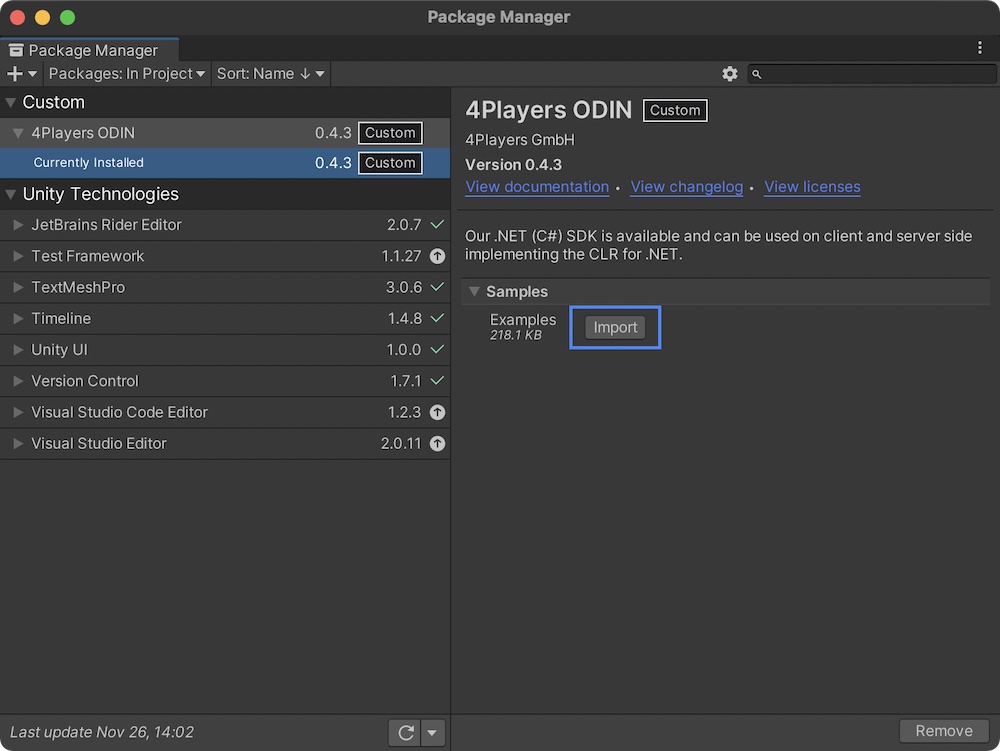
Importing the samples
Click on the 4Players ODIN item in the list on the left side. You’ll see some package details. Expand the Samples collapsible section to reveal available examples and click on the Import button to install the samples.
Loading the sample scene
After a couple of seconds, the samples will be installed in your Assets folder as you can see in this screenshot:
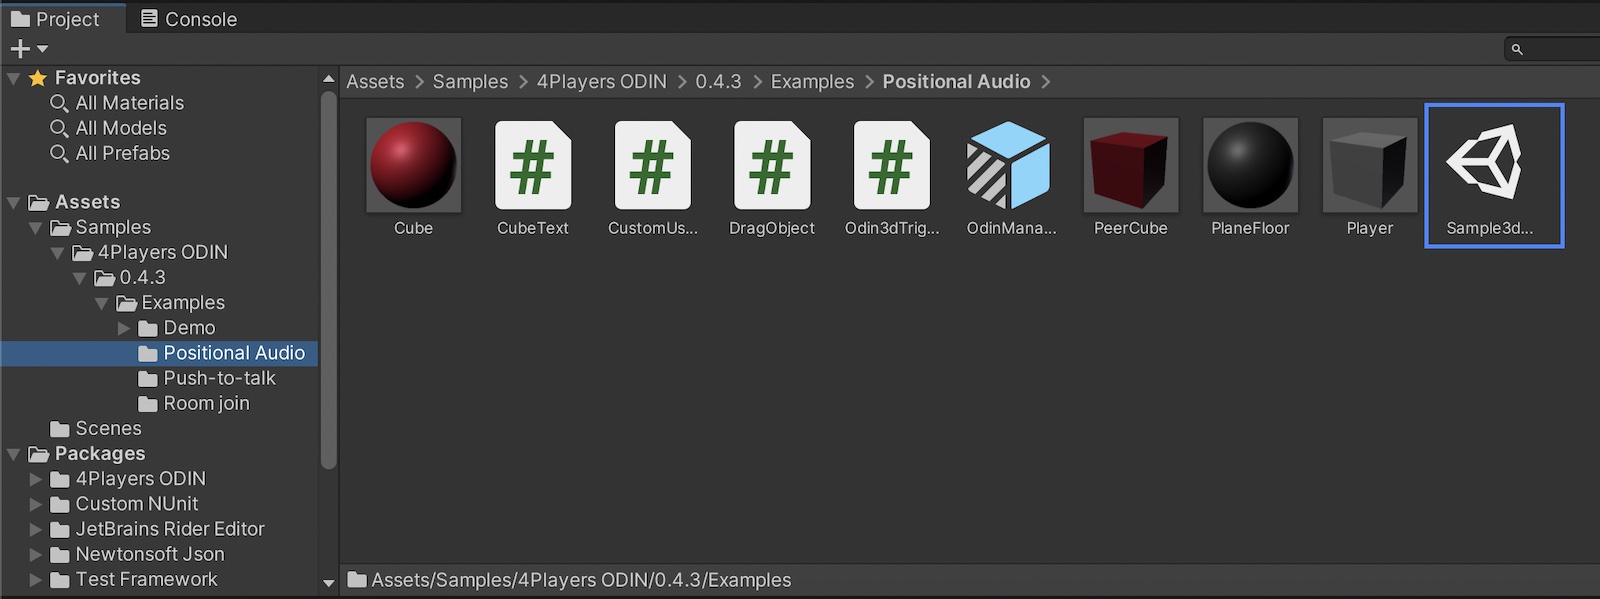
ODIN sample
Navigate to the Assets/Samples/4Players ODIN/__VERSION__/Examples/Positional Audio folder in your asset browser.
Please note, __VERSION__ stands for the current version number of the ODIN SDK. As you can see in the screenshot above, the latest version number was 0.4.3 when this guide has been written.
Double-click on the sample scene Sample3dScene to load the scene (highlighted in the screenshot) in the Unity editor.
Understanding the scene
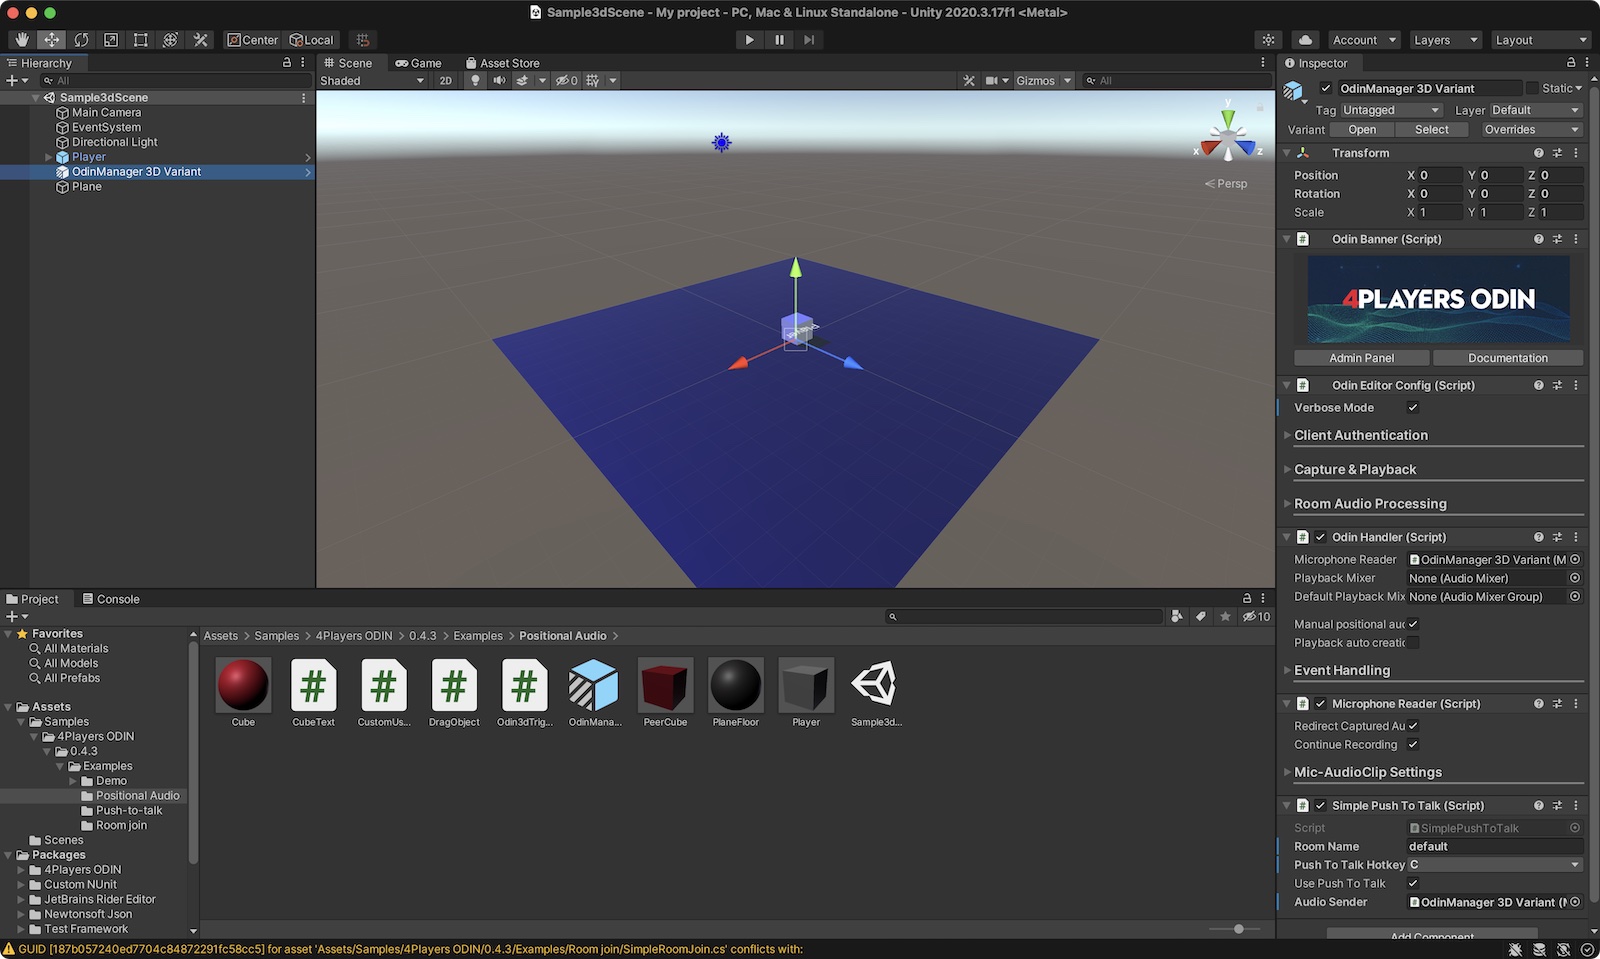
The sample scene loaded in the editor
The scene has a couple of Game Objects. Let’s explore them one after the other:
- Main Camera
- This is the main camera of the scene.
- Event System
- This sample requires an EventSystem (you can create it in your own project in the menu GameObject -> UI -> Event System)
- Directional Light
- A light, otherwise it’s kind of dark
- Player
- An instance of the Player prefab. You can find the prefab in the Assets/Samples/4Players ODIN/__VERSION__/Examples/Positional Audio/Player.prefab file. This object represents the player in this scene, i.e. the person sitting in front of the device. We’ll have a closer look at this object later in this guide.
- ODIN Manager 3D Variant
- This object manages communication with ODIN servers and allows you to set up various settings. If you are curious, you can find a manual of all those settings here
- Plane
- The plane that acts as a simple “floor” in this scene.
Setting an ODIN access key
Select the ODIN Manager 3D Variant GameObject in the hierarchy. The inspector on the right side will reveal all ODIN settings. We now need to set an access key that will allow the client (in this case the Unity Editor) to connect to ODIN servers.
This is an important topic, that we don’t want to dive in deeper right now, but you’ll have to take a minute to understand that later. Check out our guide on this topic here: Understanding Access Keys.
As we want to keep things simple, you can generate an access key right from Unity. Expand the Client Authorization collapsible to reveal the authorization settings:
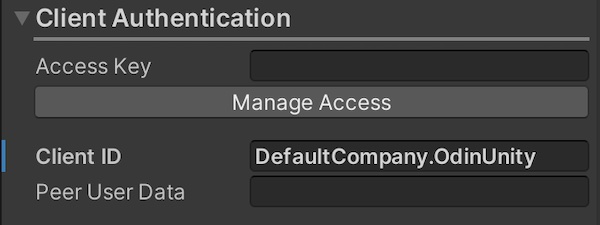
The client authentication settings
Click on the Manage Access . You’ll see a dialog like this:
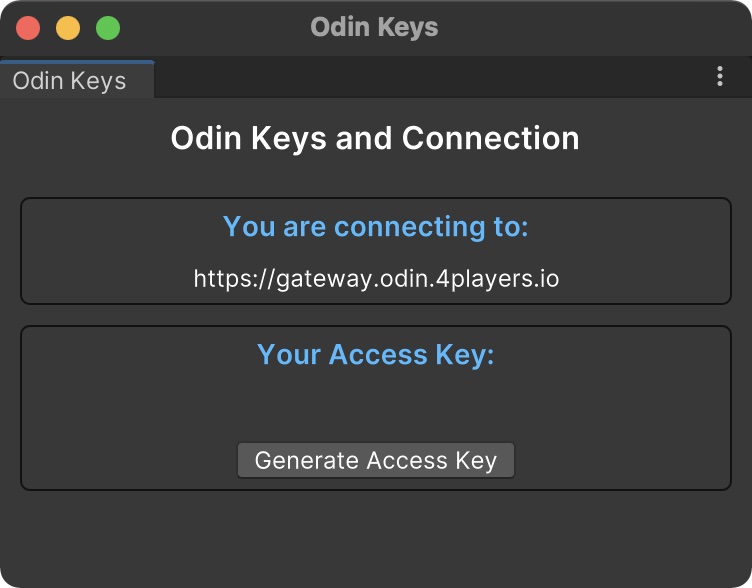
Generate an access token within Unity
Click on the Generate Access Key to generate an access key for free. This will allow you to connect with up
to 25 users. Don’t use this access key in production!
Close the Access Key Manager window. Now you should see the access key set in the Client Authorization inspector.
Some users reported that the generated access key is deleted by the Unity editor after navigating around. This seems to be a Unity bug. As a work-around, after pressing the “Generate Access Key”, copy the Access key from the inspector field, empty it with DELETE and copy it in again. This way the access key is stored by the inspector.
Running the sample
Congratulations. Let’s test the sample scene. Press the Play button in the Unity Editor. You should see something like this:
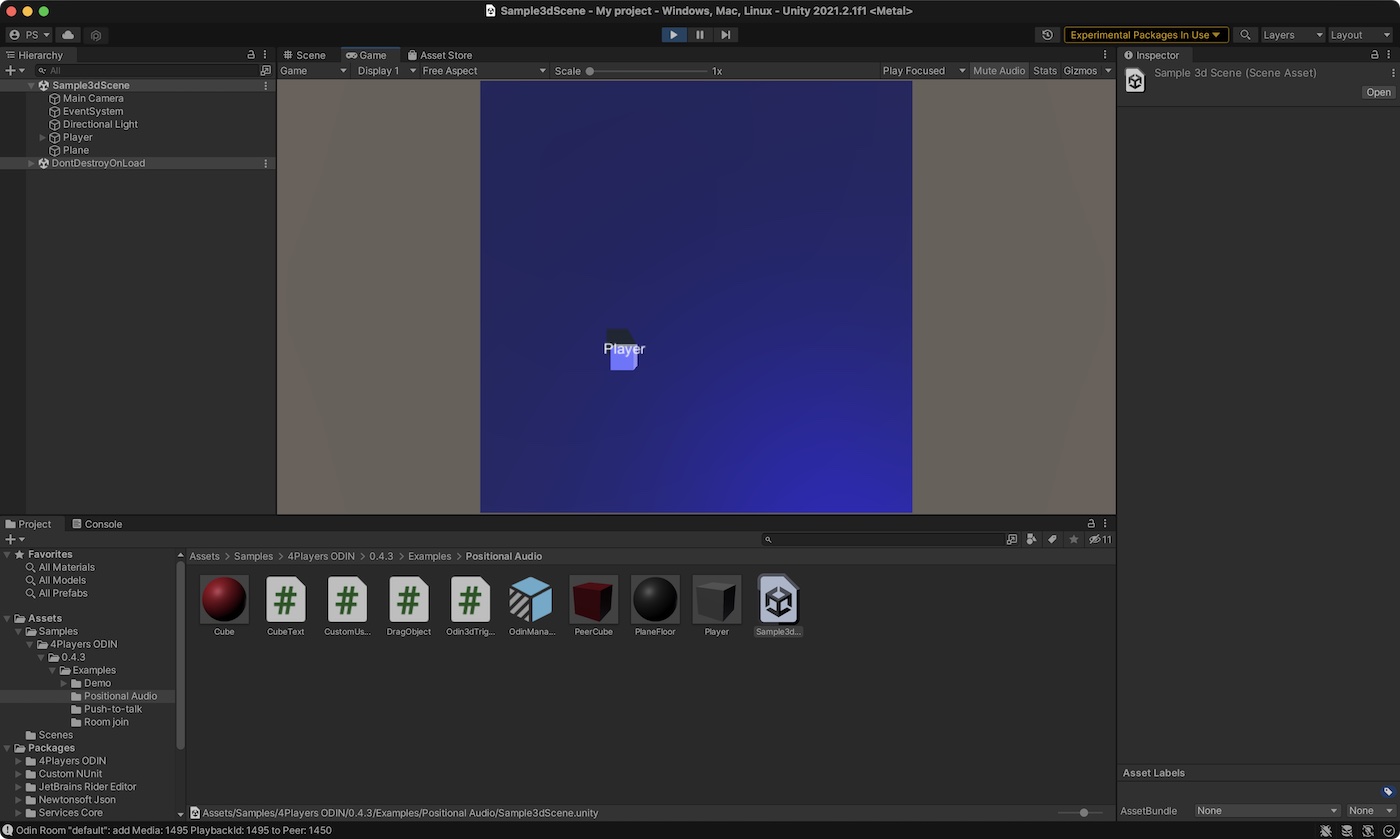
The example scene in Play mode
You’ll see the Player GameObject from a top-down view. You’ll notice that the microphone is active and recording. On platforms like macOS, iOS, or Android, you may need to grant Unity permission to access your microphone beforehand.
You can drag & drop the Player cube with your mouse to position it somewhere else on the scene. That will become important later to experience 3D audio.
As always with voice chat, it’s boring if you are alone. So let’s get some other guys in the room.
Building the project
To get in more users, we’ll need to build the project, so we can share the binary with friends or colleagues. Open the build settings window by navigation to the menu File -> Build Settings.
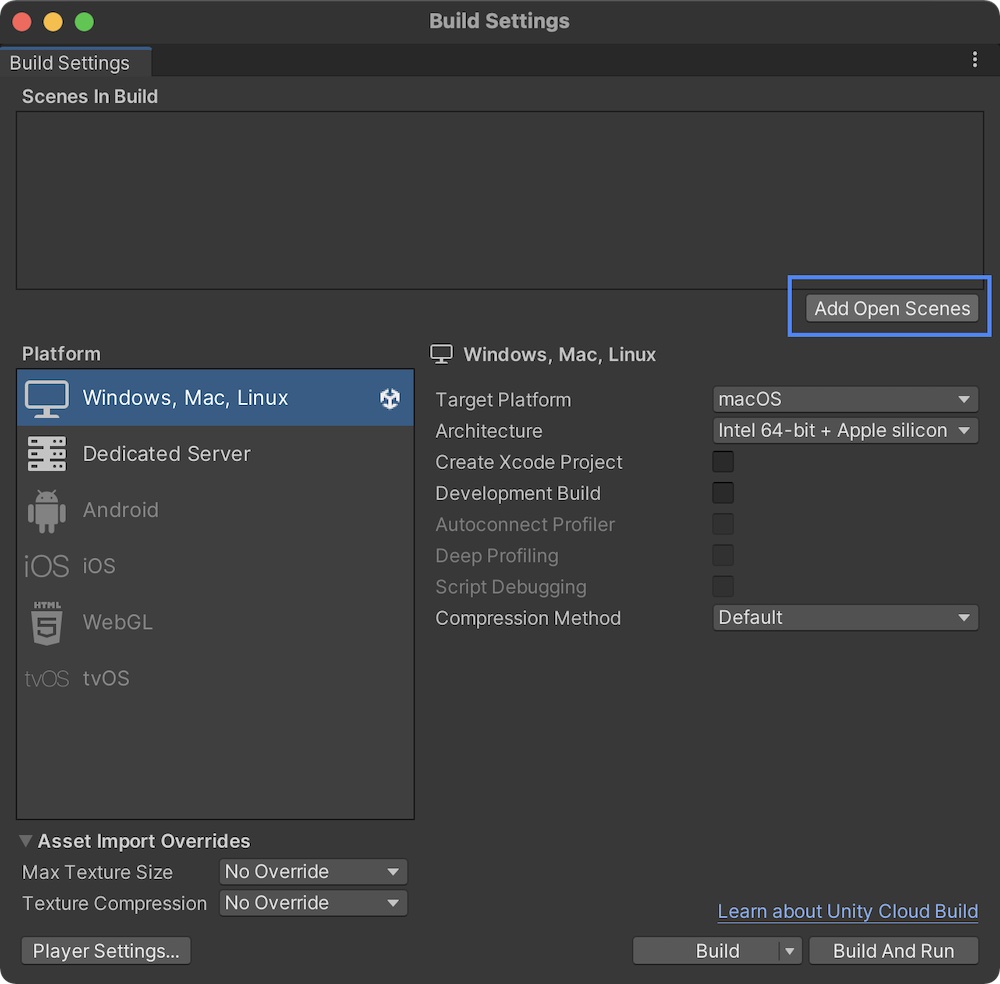
Unity Build Settings
Click on the Add Open Scenes button to add the current scene to the list.
Very important for Mac users: If you want to build for macOS or iOS, you need to set a string for microphone usage in the player settings. Otherwise, Unity editor will fail to build the target with obscure error messages. We have compiled a guide how to set that, and you can find it here.
Click on the Build and Run button to build the current scene and running it on your own machine. You’ll need to provide a folder on your hard disk where the binary will be created.
After some time, you should see the application running fullscreen on your machine. Unity typically defaults to running things in fullscreen. It’s a bit easier to test with multiple instances of the app if they run in windowed mode. Let’s change that setting.
Navigate to the menu Edit -> Project Settings. The Project Settings Window will appear. Choose Player Settings on the left side and expand the Resolution and Presentation collapsible.
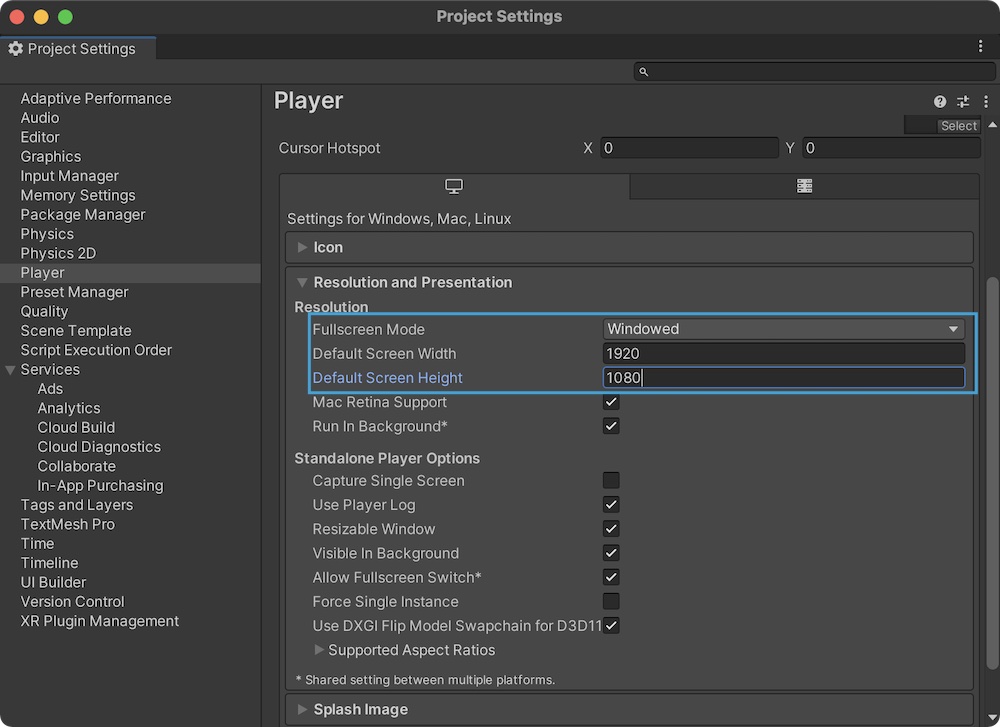
Setting windowed mode
Testing ODIN
Ok, now that we optimized our app settings, let’s build and run the app again. Choose File -> Build and Run. The app should run in windowed mode now.
Now, get back into the Unity Editor and click on Play.
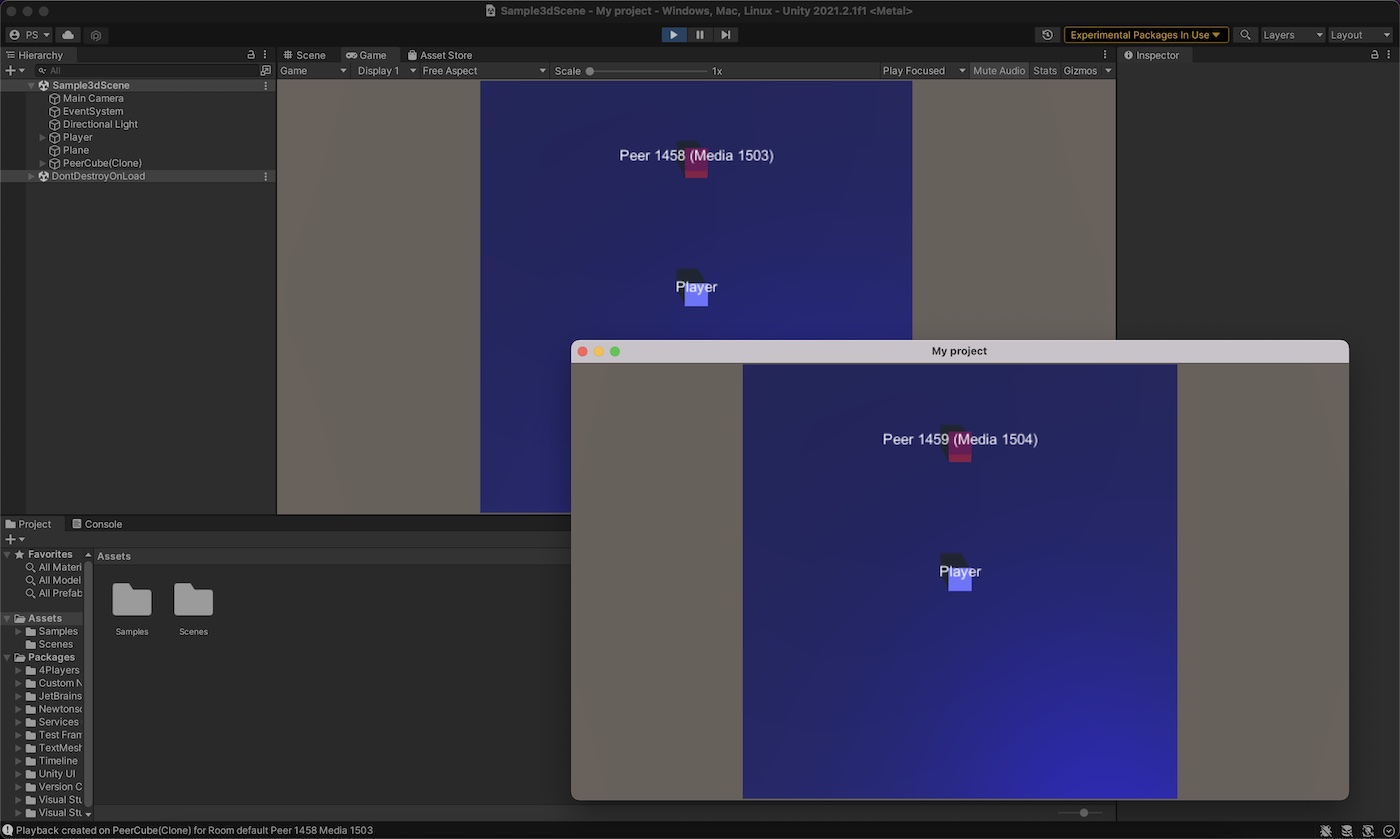
Sample app running as app and in the editor
Now, finally, something interesting happens: You see another cube in the scene. If your volume is too high, or your mic is too sensitive, you might hear an echo: That is, because both peers are running on the same machine with the same input - which does not make much sense but for testing it is ok.
If you say something, you’ll hear your own voice. Now, begin to drag & drop the cubes around and notice how the direction changes depending on the relative position each cube has to each other.
You can send the binary to your friend or colleague to test ODIN in a more realistic scenario.
Please note: The position of the cubes is not synced over the network, as we want to keep things as simple as possible in this example. So, every peer can drag & drop the boxes around and will hear the voices from a direction that he has set up on screen! Please keep that in mind when testing, e.g. if you ask your colleague: “Do you hear me from the right”, they might hear you from the front or from the left, as they might have different cube positions on their screen. That shows, that ODIN is a pure client side and deep engine integration - and thus very flexible and easy to use.
How does it work?
Congratulations, you now have a working example of ODIN integrated with 3D audio. Let’s have a deeper look at it to understand how everything works.
These days, everyone is talking about 3D spatial audio (for example Apple Airpods use this technology). What that means is, that the audio solutions tries to replicate how things work in the real world. Humans know from which direction sound comes from, and they can even estimate the distance because sound is louder if closer and more quiet if far away.
The opposite would be a phone call with headphones on your ears. It does not make any difference how far the other person on the line (i.e. in the same room in ODIN terminology) is, it’s always coming from the same “direction” it sounds like right in front of you and the volume is the same.
ODIN is deeply integrated into the game engine instead of being a layer above. ODIN therefore uses core Unity technology:
- AudioListener : This is the players ear within the scene. The position of the GameObject is important if you are using 3D spatial (positional) audio. Typically, this is attached to the player GameObject or the camera if you are not using 3D audio for voice.
- AudioSource
: An
AudioSourcein Unity acts as the ‘speaker’ that generates sound within the scene. TheAudioSourcecomponent has a setting called spatialBlend , which determines whether the sound is spatial (3D) or non-spatial (2D). If you want the sound to be part of the 3D environment (i.e., affected by the object’s position relative to the listener), setspatialBlendto1.0. On the other hand, if you want the sound to be heard at a constant volume regardless of the object’s position (e.g., for sounds like collecting a coin), set it to0.0.
Every peer and attached media on ODIN servers need to be replicated within Unity at runtime as shown in the diagram below. Every peer in ODIN is typically replicated (depending on the use case) in Unity as a GameObject, this can be just a player name in a list in a chat application or a Player object in a multiplayer game. Every media (i.e. microphone) attached to a peer within an ODIN room is replicated in Unity with a PlaybackComponent which is typically a child of the player object being the AudioSource of the microphone linked to that peer.
graph LR;
    subgraph Unity Scene
        subgraph Player1 [Player 1]
            PBC1[PlaybackComponent]-->GO1[GameObject]
        end
        subgraph Player2 [Player 2]
            PBC2[PlaybackComponent]-->GO2[GameObject]
        end

    end
    subgraph ODIN Server
        subgraph ODIN Room
            Peer1[Peer 1] --> Media11[Media 1]--> PBC1
            Peer2[Peer 2] --> Media21[Media 2]--> PBC2
        end
    end
    classDef blue fill:#DDFAFF
    class Player1,Player2 blue
To build this hierarchy we need to listen to certain events and handle them. Don’t worry, it’s super easy and just requires a couple lines of code.
In the next section we’ll have a closer look at how this is done:
The ODIN Manager Object
The first object that we’ll have a closer look is the OdinManager 3D Variant object. You already know this Game Object
as you used it to set up your access key.

The scripts attached to the Player object
If you look closer, you’ll notice there are a couple of scripts attached to this GameObject:
- Odin Editor Config
- The Odin Editor Config script allows you to set up ODIN within your game and handles client authorization and is part of the ODIN SDK.
- Odin Handler
- This script does all the event handling and exposes various settings for the microphone and audio effects. See the manual of Odin Handler for a documentation of all the settings available and how to use the API. This class is also part of the ODIN SDK.
- Microphone Reader
- This class is part of the ODIN SDK and captures the audio input from the microphone connected to the players PC and sends it to ODIN servers once the client joined an ODIN room. See the Microphone Reader for more info on this component.
- Simple Push To Talk
- This script is part of the sample code and uses the ODIN SDK to implements joining a room and “Push to Talk” (i.e. the microphone is always muted, and you need to press a button to unmute while talking). We’ll have a closer look at this script in the next paragraph.
Simple Push To Talk
Let’s have a look at the SimplePushToTalk.cs script provided with the sample. It uses various APIs provided by the
ODIN SDK to join a room and to implement push to talk logic.
using System;
using System.Collections;
using System.Collections.Generic;
using UnityEngine;

using OdinNative.Unity.Audio;

namespace OdinNative.Unity.Samples
{
    public class SimplePushToTalk : MonoBehaviour
    {
        public string RoomName;
        [SerializeField]
        public KeyCode PushToTalkHotkey;
        public bool UsePushToTalk = true;
        public MicrophoneReader AudioSender;

        private void Reset()
        {
            RoomName = "default";
            PushToTalkHotkey = KeyCode.C;
            UsePushToTalk = true;
        }

        // Start is called before the first frame update
        void Start()
        {
            if (AudioSender == null)
                AudioSender = FindObjectOfType<MicrophoneReader>();

            OdinHandler.Instance.JoinRoom(RoomName);
        }

        // Update is called once per frame
        void Update()
        {
            if (AudioSender)
                AudioSender.RedirectCapturedAudio = UsePushToTalk ? Input.GetKey(PushToTalkHotkey) : true;
        }
    }
}
We need to join a room so that we can chat with other peers in that same room. To do this, the
SimplePushToTalk script takes the RoomName parameter given in the Inspector and connects to that room with the
JoinRoom
function of the instance of the Odin Handler
.
The OdinManager 3d Variant also has a Microphone Reader
script attached. This script handles microphone
input and sends it to all ODIN rooms that the player has joined. But, as we only want to send audio input when a
specific button is pressed, we’ll get a reference to the MicrophoneReader instance in the Start function and
set the RedirectCapturedAudio
to true if audio should be sent (i.e. if Push to Talk is activated
and selected button is pressed) or false if no audio should be sent to the server.
So, that’s it. As you can see, the ODIN 3D Manager handles a couple of settings like client authorization (access key), handles microphone input and sends data to the server if the user has pressed a button.
The Player Object
The second Game Object, that we want to take a close look at is the Player object in the scene. Select it, and you’ll notice a
couple of scripts attached to this object:
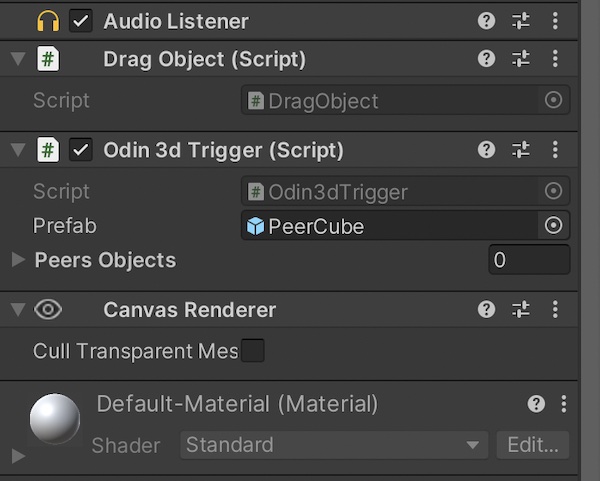
The scripts attached to the Player object
- Audio Listener
- In many games, the audio listener is attached to the camera. In this case, we want the player’s “ears” to be positioned at the player’s location, which is important because we want Unity to calculate audio from other sources relative to the player’s position, not the stationary camera above the scene. Please note that the AudioListener is a standard Unity component.
- Drag Object
- This is just a simple script that allows you to drag & drop the cube. We won’t go into detail on how this is implemented, but feel free to have a look at the script in your preferred IDE.
- Odin 3d Trigger
- This script handles some ODIN events and creates the peer cubes. We’ll dive into this script in a minute.
Odin 3d Trigger
The Odin3dTrigger.cs script is handling a couple of ODIN events and creates the peers whenever a peer connects.
It’s a bit longer, so we go through it step, by step.
In the Start function, we’ll listen to some ODIN events. In this example we do it by code, but please feel free to
connect them via the Unity Inspector (see Odin Handler
manual for more info on that).
void Start()
{
    OdinHandler.Instance.OnCreatedMediaObject.AddListener(Instance_OnCreatedMediaObject);
    OdinHandler.Instance.OnDeleteMediaObject.AddListener(Instance_OnDeleteMediaObject);
    OdinHandler.Instance.OnRoomLeft.AddListener(Instance_OnRoomLeft);

    var SelfData = OdinHandler.Instance.GetUserData();
    //Set Player
    GameObject player = GameObject.FindGameObjectsWithTag("Player").FirstOrDefault();
    if (player != null)
    {
        TextMesh label = player.GetComponentInChildren<TextMesh>();
        label.text = CustomUserDataJsonFormat.FromUserData(SelfData)?.name ?? player.name;
    }
}
So, we listen to the OnCreatedMediaObject , OnDeleteMediaObject and OnRoomLeft events:
- OnCreatedMediaObject: Triggered whenever a peer started sending audio data
- OnDeleteMediaObject: Triggered whenever a peer stopped sending audio data
- OnRoomLeft: Triggered when a peer left a room.
We also get the User Data of the user and set the text label of the player object to the player name (if available).
Now, as you can see, we need to have some callback methods for these events, let’s have a look step by step:
Handling On Media Created Events
This event is triggered whenever a peer joined a room and started to send audio data. There is a difference between a peer joining a room and media added to that room for that peer, because peers may only join a room without sending their own data (i.e. spectators). So, to simplify things we just handle the case when a player joined to the room starts sending audio (which is the OnCreatedMediaObject event):
GameObject CreateObject()
{
    return Instantiate(prefab, new Vector3(0, 0.5f, 6), Quaternion.identity);
}

private void Instance_OnCreatedMediaObject(string roomName, ulong peerId, int mediaId)
{
    Room room = OdinHandler.Instance.Rooms[roomName];
    if (room == null || room.Self == null || room.Self.Id == peerId) return;

    var peerContainer = CreateObject();

    //Add PlaybackComponent to new dummy PeerCube
    PlaybackComponent playback = OdinHandler.Instance.AddPlaybackComponent(peerContainer, room.Config.Name, peerId, mediaId);

    //Some AudioSource test settings
    playback.PlaybackSource.spatialBlend = 1.0f;
    playback.PlaybackSource.rolloffMode = AudioRolloffMode.Linear;
    playback.PlaybackSource.minDistance = 1;
    playback.PlaybackSource.maxDistance = 10;

    //set dummy PeerCube label
    var data = CustomUserDataJsonFormat.FromUserData(room.RemotePeers[peerId]?.UserData);
    playback.gameObject.GetComponentInChildren<TextMesh>().text = data == null ?
        $"Peer {peerId} (Media {mediaId})" :
        $"{data.name} (Peer {peerId} Media {mediaId})";

    PeersObjects.Add(playback.gameObject);
}
This callback does four things:
- Instantiate a peer cube (from the peer prefab) which represents the peer in the scene as a cube with the
CreateObjectfunction. - Attach the audio source for that peer to the instantiated peer GameObject. ODIN SDK provides a function AddPlaybackComponent for that. It creates a PlaybackComponent and attached it to the peer cube GameObject. The function also returns the PlaybackComponent instance so that we can customize it in the next step.
- The PlaybackComponent
uses a Unity AudioSource
for “sending” audio into
the scene. You can get your hands to that audio source using the
PlaybackSourceproperty. In this sample, the spatialBlend value is set to1.0to activate 3D spatial audio for peers and a couple of other settings like the volume attenuation is set. - Use the User Data of the peer to get its name and set the label of that peer to that name. This allows us to identify the peers in the scene.
Some experiments
Let’s do some experiments with the sample that we have right now to showcase the power of ODIN and to give you an idea what you can do with it in your game.
In the Odin3dTrigger.cs script, in the Instance_OnCreatedMediaObject function adjust some settings made to the
PlaybackComponent.PlaybackSource. As this is a standard Unity AudioSource
object, you’ll find the
component in the Unity documentation. Here are a couple of things you can try:
Switching to “gods voice”
Change the line where spatialBlend is set into this:
playback.PlaybackSource.spatialBlend = 0.0f; //Disable 3D audio
This just disables 3D audio and every ODIN AudioSource in the scene will always have the same volume. That is
basically the same experience as if all players would use an external voice chat solution like TeamSpeak or Discord.
The voice is “decoupled” completely from the Gameplay. It may be useful if you want to replicate phone calls or CB
communication between team members.
Please note, that spatialBlend is a float value. You can also set it to 0.5f to have something in between.
Adjusting voice attenuation
Right now, peers can only be heard up to 10 units. Reduce that to 2 and you’ll only hear peers that are very close to you. You can use these properties to implement “sound damping” dependent on the current location of the peer relative to the player.
playback.PlaybackSource.minDistance = 1;
playback.PlaybackSource.maxDistance = 2;
Summary
| 1 | ODIN SDK | Install the ODIN SDK into your project. |
| 2 | Add ODIN Manager | Drag & Drop the ODIN Manager Prefab into your scene. |
| 3 | Access Key | Create and set an access key in the Unity inspector. |
| 4 | Handle ODIN events | Handle some ODIN events like shown above or described in the Event Handling guide and use AddPlaybackComponent to create the other players audio sources and attaching them to player objects in your scene. |
That’s it! There’s not much more to do to integrate ODIN into your project. Of course, there are plenty of APIs available to customize the experience to suit your needs. Keep in mind that ODIN integration is fully native to Unity—you’re working with Unity as usual, without the need for unfamiliar APIs or sending additional data to external servers.
Of course, if you are working on a multiplayer game, things are a little bit more complex, but just a little bit. We have created a guide where you create a complete multiplayer game with Mirror Networking and add ODIN to it. After a couple of minutes you’ll have the same example as this one, but player positions will be synced between all peers.
Next steps
Now that you have a working example find out more about the components ODIN has to offer.
- Read our Event Handling guide to learn which events you need to implement. It shows an example of basic walkie-talkie like voice combined with 3D positional audio.
- Check out the Unity manual with more info on the components and what the various settings are for.
- Check out the API Reference with a comprehensive documentation on all classes and interfaces exposed by the ODIN SDK.
- Follow our guide on how to add Unity to a Mirror Networking based multiplayer game. After 20 minutes you’ll have a fully working multiplayer game with 3D positional voice chat and synced player positions
- In our Photon open-source sample you can download and play around with a working example based on Photon Pun.