Unreal Tech Demo
This is a simple demonstration of the usage of the Unreal SDK of 4Player’s ODIN, a Voice Chat full service solution. The SDK provides an audio stream that can be processed in the audio engine of Unreal to add spatialization or audio effects.
This version is built upon the free tier of the Photon Networking Engine. The audio stream is processed with the help of Steam Audio, which is delivered together with the Unreal Engine.
Download links
Grab the latest version of the demo from our Github repository:
Download the runnable also from Github right here :
Features
The Demo showcases the usage of ODIN together with Unreal’s Audio Engine. The example uses two Odin voice chat rooms - one for spatialized (proximity) chat, and one for a radio simulation with audio effects applied. It shows:
- how to connect to an ODIN voice chat room with an acquired room token generated from your access key
- how to attach the incoming audio stream to an ODIN synth component, adding spatialization (3D / proximity)
- how to connect an additional audio engine plugin like Steam Audio and use it together with ODIN
- how to increase immersion by adding audio occlusion effects through collision rays
- how to send the voice chat audio stream to audio effect processors, e.g. for environmental effects that also apply to voice
- how to use a second ODIN room for simulating 2D radio communication (press and hold R key while talking)
- how to activate different filters (APMs) to improve the audio capture quality
Getting Started
In the releases you can find a pre-built game executable and the current project’s code base. The pre-built game can likely be executed without any installations required - if you do not have the redistributable packages of C++ installed, that Unreal needs, you can find it in the \Engine\Extras\Redist\en-usfolder of the pre-built game.
To open the project in the Unreal Editor you need to install the Unreal Engine 4.26*, 4.27 or 5.0. You can open the source code with UE5.0 easily. If you need to open it with a 4.26 or 4.27 build of the Unreal Engine you can right-click the OdinUnrealSample.uproject file and Switch Unreal Engine version ... to the Engine version you have installed that you want the project to open with. If the Editor fails to launch, rebuild the project from Visual Studio. You might also need to exchange the Odin Plugin to the corresponding version, downloadable e.g. in its Github Repository.
Although the Unreal SDK itself is fully compatible with UE 4.26, there are some issues right now when compiling the demo with that version. We recommend using UE 4.27 or UE 5.0 right now.
Dependencies
- The sample is built with the Unreal Engine version 5.0. Alternatively you need UE4.26* or UE4.27.
- Although it builts upon Photon’s networking engine, you do not need to install anything, since the sample delivers all needed libraries for that
- The sample depends on Steam Audio, which is delivered together with the Unreal Engine so you do not need to install the plugin manually, if you have installed plugins with your Unreal Engine version
Version History
- 0.2
- Extended Documentation
- Small changes to tidy up blueprints
- 0.1
- Initial Release
Sample Map
Below you can see an overview of the map, its areas and what they show:
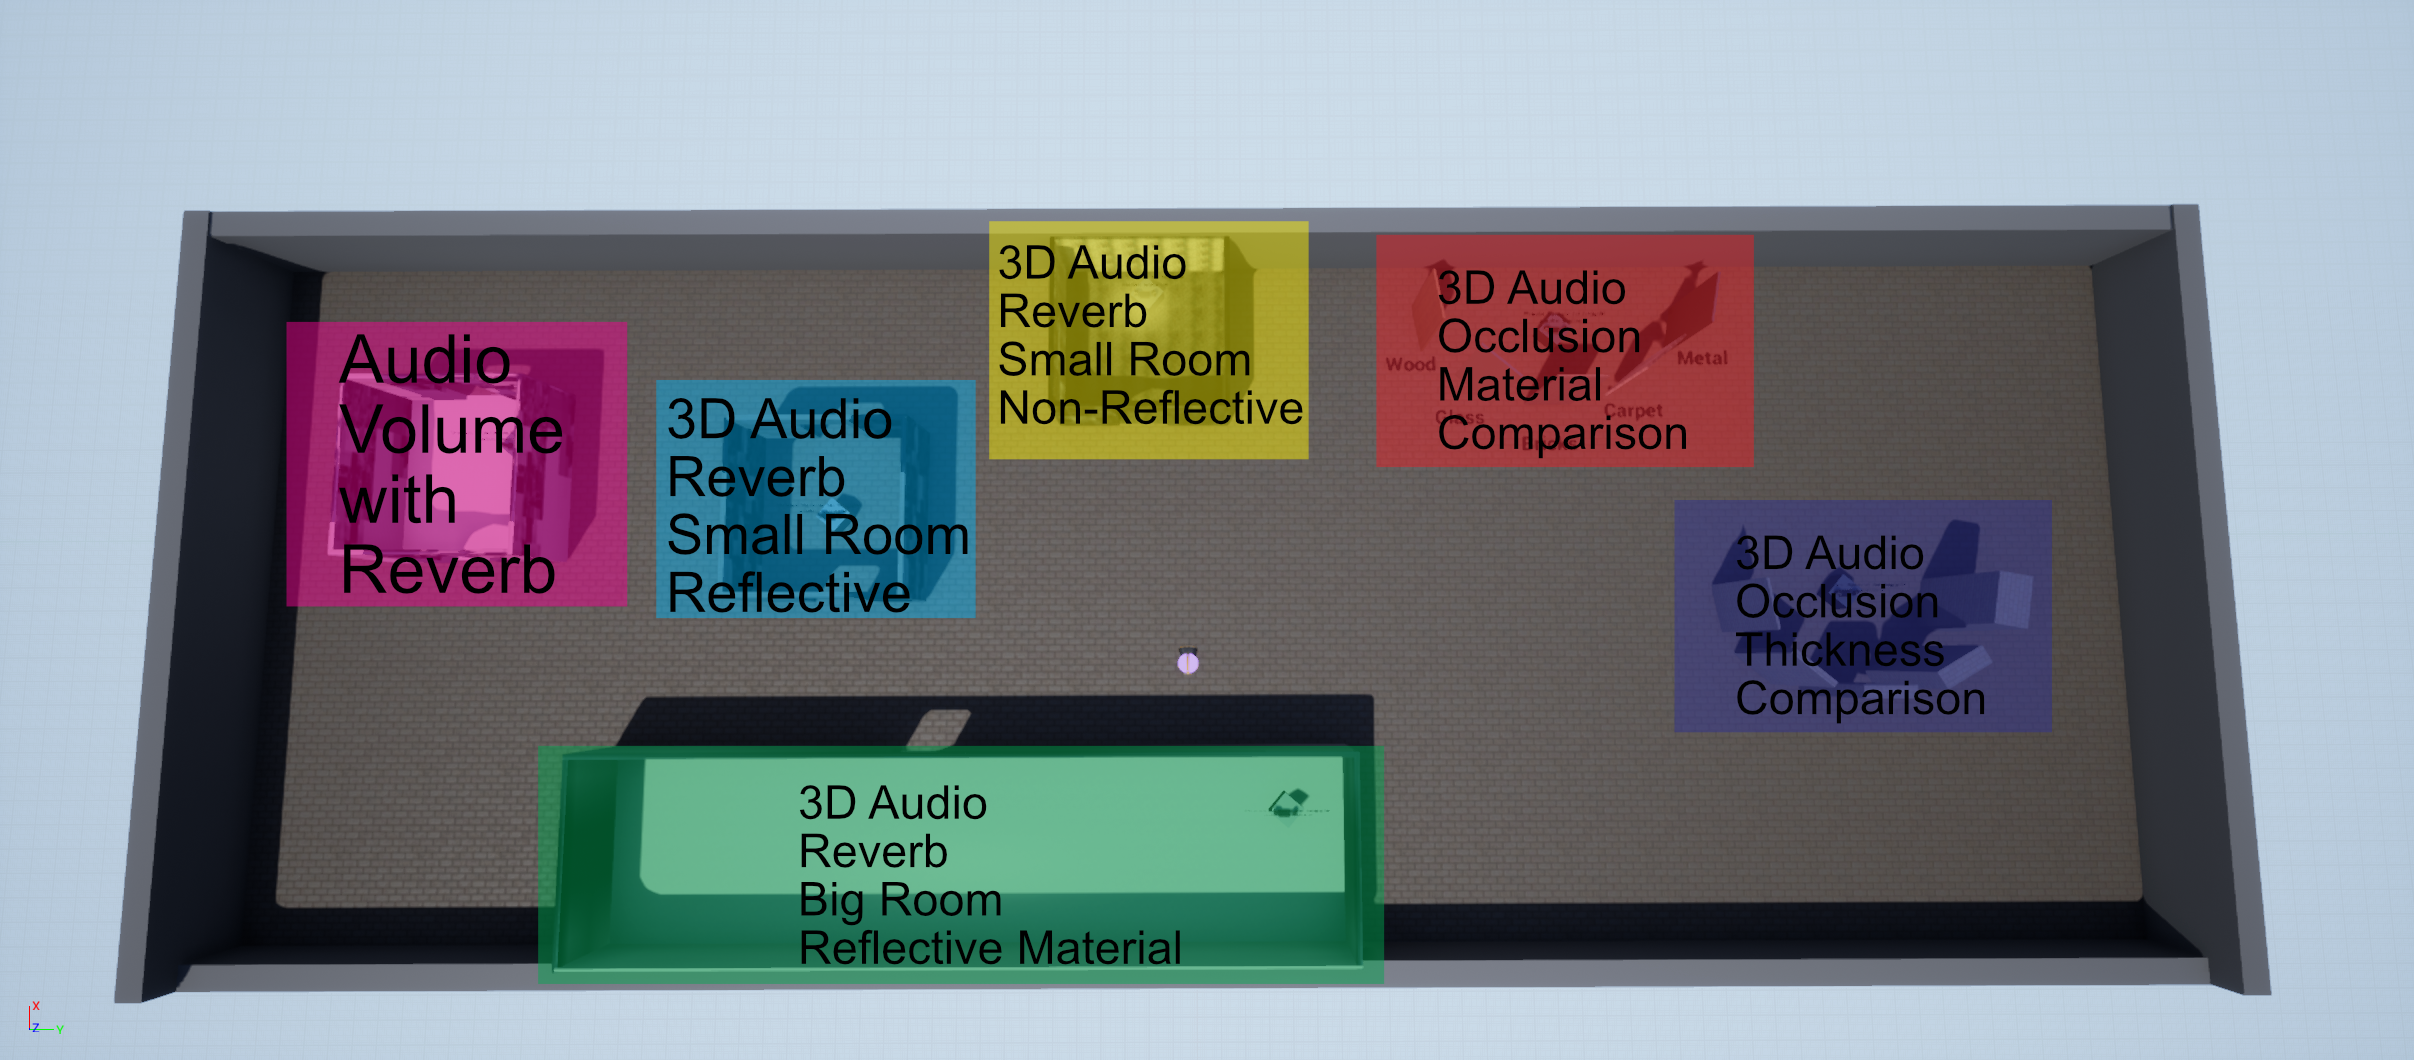
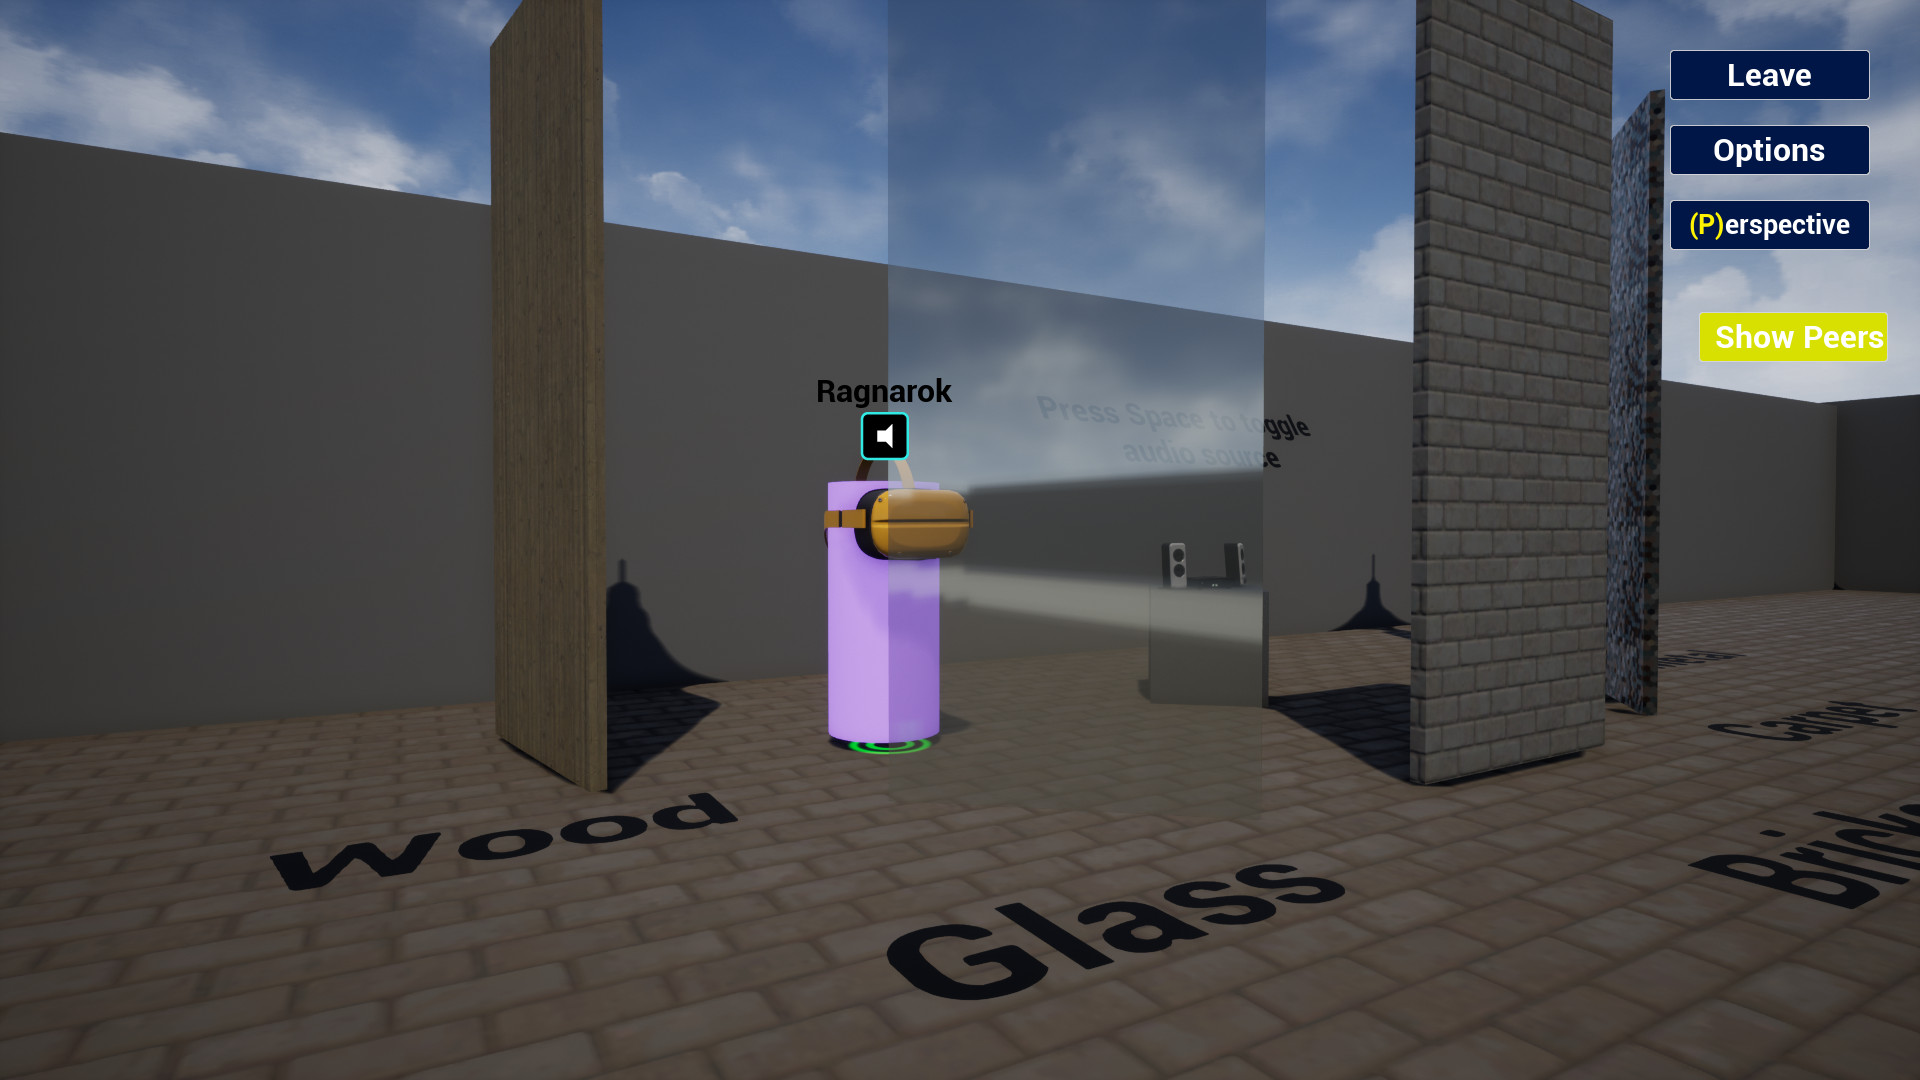
The audio sources in the level have the same attenuation settings as the voice chat and so you can use them to get an idea of what the level does without having to invite someone else to test with you. To turn an audio source on, go near it and then press space on your keyboard.
Project Structure
This guide is written for Unreal Engine version 4.27 as the project is targeted for this version of the engine. You will need to adjust for Unreal Engine 5.0 and above accordingly.
The project is based on the Top Down Example by Epic Games, so most of its structure can be found in this project as well. The code is based on the Unreal Example of Photon with adjustments so that it works for a 3D Game with continuous movement and integrates in the project structure properly.
This document outlines the structure of this sample project and describes how you can achieve similar results in your Unreal project. First we will have a look at the overall folder structure of the project so you can find every asset. Next we will outline the Game Mode, Game Instance and Player Controller classes to create the basic game rules and input methods. After that we describe the Photon Networking of this project and how it replicates the player characters’ positions to all clients before we look at how we incorporate Odin here so that each character gets the correct Odin Media assigned. Lastly we look at the map and see what features of the Unreal Audio Engine are show cased here in which way.
Source Code
As stated, the source code is mostly based on the Unreal Photon Example. To get a basic understanding of what they did to integrate Photon, check out their documentation on the sample. We have integrated the Content of the Top Down Example by Epic Games and made some minor adjustments to the Photon Code.
Firstly, we have changed the UPhotonLBClient - the heart and meat of the Photon integration - to a UActorComponent instead of an AActor. As a consequence we have changed some overridden functions: Tick becomes TickComponent and needs some additional parameters. Additionally, in the constructor we set PrimaryComponentTick.bCanEverTick = true;. Once this is done, we can inherit an Actor Component from this class to more easily integrate it in our Project Structure.
Secondly, we have changed the SetLocalPlayerPos to take 6 instead of 2 floats as inputs. We adjusted the LoadBalancingListener::setLocalPlayerPos() accordingly to send these floats as well and the LoadBalancingListener::customEventAction() function needs to handle the new kind of object as well. Have a look at the LoadBalancingListener.cpp and the PhotonLBClient.h and PhotonLBClient.cpp files in the project to get the complete source code of these adjustments. The rest of the source code stayed as it was in the example.
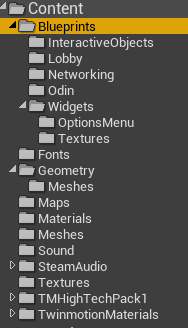
Content Directory
Most of the project’s logic is located inside the Blueprints folder. Other folders hold the needed fonts for texts, meshes, materials and so on. In the Sound folder you can find the used attenuation settings and sound effect assets. Depending on which audio engine you whish to use they may differ from what you need in your project. In order to get an idea of what they do and how the settings affect the audio output of the project you can check out the documentation on Sound in General in the Unreal Engine, and Sound Attenuation in the Unreal Engine specifically as well as Submixes. The Steam Audio Unreal Engine Integration has a pretty helpful documentation on their SDK as well.
The Maps folder holds both the map for the Lobby UI and the default map of the project. The Lobby map simply overrides the standard Game Mode with a Lobby Game Mode that opens the needed UI. The main map is the TopDownExampleMap in here.
In the Blueprint Folder you can find the Game Instance, Game Mode, Player Controller and Player Character Classes - these are the entry points for the engine to our game logic, so we will have a look at them in the next paragraph of this guide.
Next to them you can find folders for each different kind of objects in the project - Interactive Objects holds an Actor for the playback of a simple sound that uses the same attenuation settings as the Odin integration so that you can compare the Odin Audio to the internal sounds directly produced in the engine. In Lobby you can find an additional Game Mode for the Lobby Menu that simply loads the corresponding UI. In Networking you can find everything related to Photon. Odin holds the custom Actor Component we have built for this project as well as some helper classes. Lastly, in the Widgets folder you can find any widget that is used in the project - they are built in a way that they do not need to know of the Odin SDK, so that you do not have to look into these classes. Of course it can make sense for you to copy and paste widgets from the Options Menu for use in your own game as the needed UI for the Odin Options stays the same for each application.
Now that you have an overview of the Project in general, we can have a look at the Standard Game Mode and its related classes.
Game Mode, Game Instance and Player Controller
The Game Mode Top Down Game Mode used in the games main map has almost no logic in it and only defines the used default classes - we have changed the default player controller to the TopDownController class and the default pawn class to TopDownCharacter.
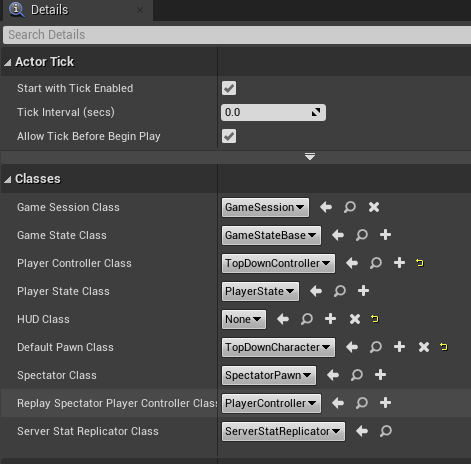
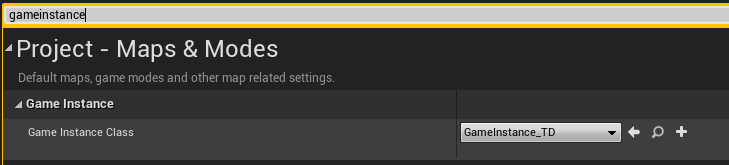
In the project settings (in the main menu bar go to Edit and then Project Settings...) then we needed to change the game instance class to GameInstance_TD in the Maps&Modes category.
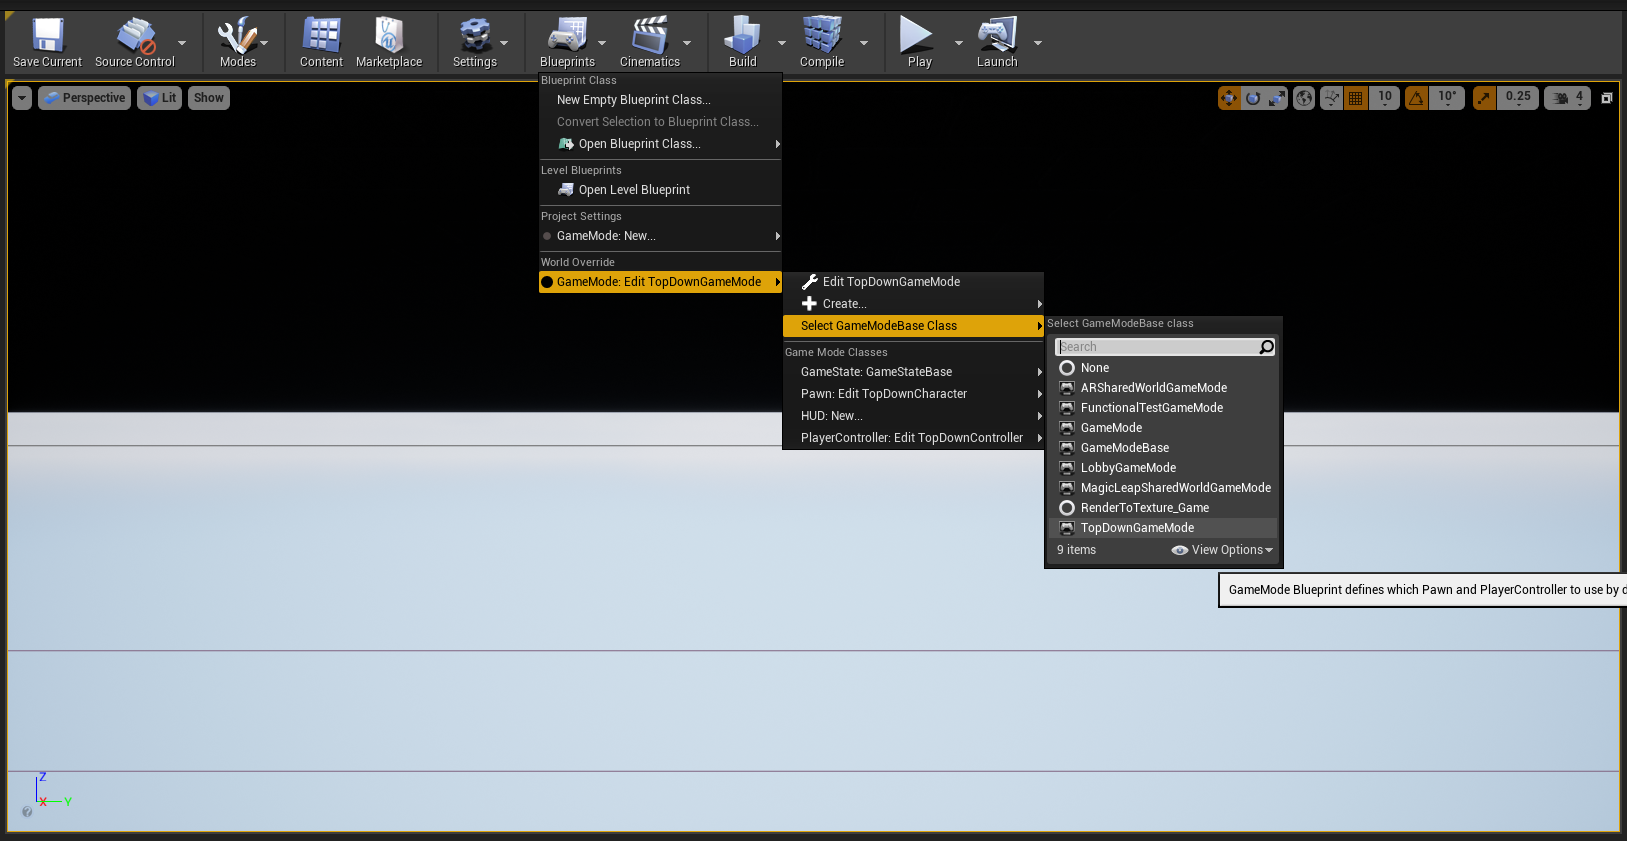
You can also just change your default GameMode here or you can define it on a per-map basis which we did in this project. To do so, open the map, go to Blueprints above the renderer panel and select your game mode under World Overrides -> Game Mode.
The Game Instance has no logic as well - it just holds a string variable Player Name that the player may choose in the Lobby and that needs to be saved when loading the main map. Here it is used to identify a player’s character on other clients - so we will just copy the player name and replicate it to the other clients. We will do so in a minute.
But first we will have a look at the Top Down Controller. The logic in here fully relates to inputs - they allow switching between a top down paradigm to first person perspective and back at any time to help play around with the immersion coming from the 3D Audio.
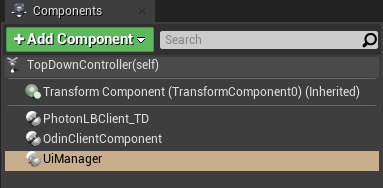
More important for the Controller are the assigned Components. The PhotonLBClient_TD is our networking component that we will use to replicate player’s movements, OdinClientComponent is the custom Component handling all the logic for the communication with Odin and UiManager simply handles some of the UI shown on screen - in our case it just adds and removes widgets reflecting connected players.
In the next part we will now look at what the Networking Component does exactly.
Photon Component and Networking
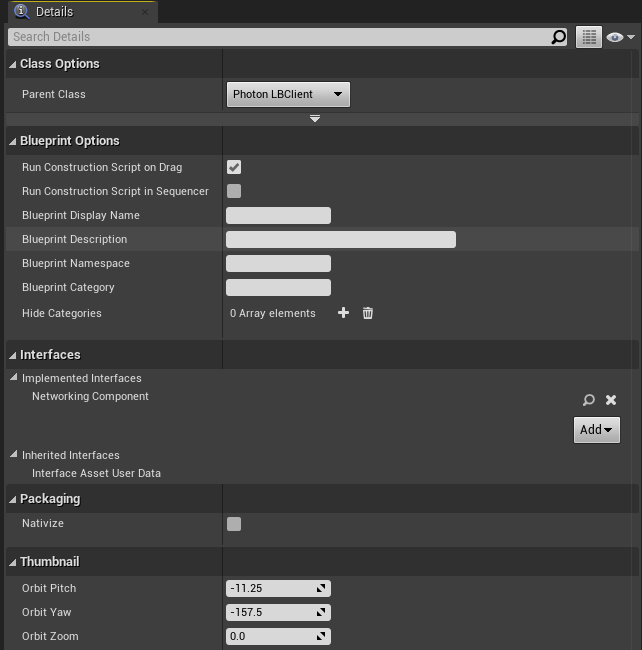
The PhotonLBClient_TD class can be found in the Blueprints/Networking folder. It inherits from the UPhotonLBClient Actor Component from the C++ Source Code and thus already has most functionality to communicate with the Photon framework. The Component extends the class to handle our use case - yet it is still agnostic to the Odin Framework and thus implements the Networking Component Blueprint Interface so that other Components can communicate with the implemented networking framework without knowing which one is used exactly. You can easily extend or exchange this component for anything you would like to use in your application.
The Networking Component interface has 4 functions:
Get Own Network Id: Returns an integer representing a unique identifier for the client in the network.Replicate Transform: Takes a transformation (of the local player character) and sends it over the network to all other clients.Leave Network Session: Leaves the current network session and stops replication.Get Actors Map: The Networking Component needs to track references to each actor owned by a client so that you can get an actor of a client by its unique identifier.
Just like the Source Code of the project, the blueprints of this class are based on the sample blueprints of the Photon sample for the Unreal Engine. It has Events that are called from the C++ parent class when a player joins the Photon room, when one player leaves it and when a player changes their position.
Add Player: This is called whenever any client is added. With theLocalflag we can decide what to do with the event. If it is local we just prepare our existing local player character and also start the connection to ODIN from theOdinClientComponent. If it is a non-local client the blueprint creates a player character for that client and assigns it the given photon id and sets it up.Remove Player: This is called whenever any client leaves the session. Here we search the according player character and delete it.Change Player Pos: Retrieves positional and rotational values that we apply to the correct player character.
If you want to exchange the Photon Networking for e.g. the Unreal Networking System you can easily do so by implementing a component that uses corresponding RPC Calls - just have in mind that you will not use advanced systems, like the Networked Movement in the Character Movement Component.
Odin Client Component
The Odin Client Component is the meat and bone of this sample so we will have a detailed look at what it does.
It derives directly from Actor Component and does not implement any interfaces. It has two sets of functions - one for each ODIN room it connects to - remember that we have a proximity chat and a radio chat so that we need to join two ODIN rooms in total. You can either connect to them in the same function and then decide how to handle the different events with the passed Room parameter, or do it like in this sample and break them into two parts.
The Start Connect Custom Event is called once the local player is connected to the Photon room. It is mainly taken from the ODIN Unreal SDK Manual. In summary, we generate a room token with our access key, a room id and a user id. Note, that the Access Key should not be known to the client normally and you should do this on a trusted Web Server instead. For the simplicity of this sample we kept the call on the client though.
Then we construct a local room handle and bind all needed events to appropriate Custom Events (we go through them in a bit). Then we create some User Data - they contain the chosen User Name from the Login Screen and the Network Id from our Photon Component. The Network Id is needed by the other clients so that they can get the correct Player Character from the Photon Component to assign it an Odin Synth Component with the correct Media Stream. Once that is done, we will call the Join Room function and are done with the event. We do this two times in total, once for each Odin Room.
We handle the Room Events in different events:
Peer Joined: This event is called before the media of the other peer is added to the room, so we can setup the player character - we use the network id in the user data and the passed ODIN peer id to create a map on this component, so once we get the media stream with the ODIN id we can get the correct network id and thus correct actor to assign it the stream.Joined Room: This event is called once we join the room ourselves. Here we can create an Audio Capture and from it an ODIN Media Stream that we add to the room afterwards via theAdd Medianode. We also save the Audio Captures of both rooms in a variable to reference them later.Peer Left: This is called when another peer leaves. Here we just print a message in this sample.Media Added: This Event is called when the media stream of another peer is added to the room. It grabs the actors map from our Networking Component and adds anOdin Synth Componentto it, activates it and assigns it the given media stream.
Additionally we have some functionality to adjust the APM Settings of the rooms - this is done in the SetApmSettings event. Also we can open the APM Settings menu with the OpenOptions event and close them with CloseOptions.
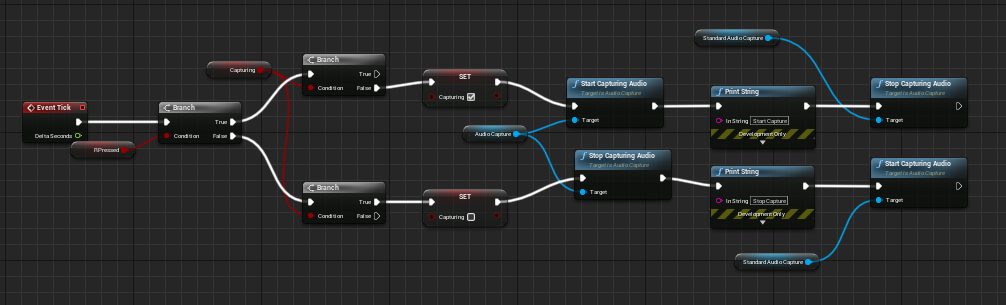
Lastly, in the Tick Event we start and stop the Capturing of the Proximity Chat and Radio Chat Audio Captures - depending on whether we press the R Key or not. The RPressed variable is set from the player controller class.
Conclusion
This was a rough rundown of the demo project - to get started in your own project with ODIN you can copy and paste any portions of the project. Also have a look at the ODIN Unreal SDK Manual. Here you have a step by step guide on how to implement the ODIN SDK in your application. On the 4Players Website you get all information on how to integrate ODIN properly.