ODIN Unreal Engine Guides
The Unreal Engine plugin is based on our C/C++ SDK and provides full blueprint support for UE4 and UE5. The latest version can be checked out from our Github repository:
Download Unreal Engine SDK Get from Unreal Marketplace
Sample project
We have compiled a sample project that you can use as a reference to understand how to wire up the blueprints. As a quick tip: Select and copy our blueprints and paste them in into your own project!
Download Unreal Sample ProjectPrerequisites
- Unreal Engine 4.26 or any later version (including 5.x)
Internally, the plugin is built and tested with Unreal Engine 4.27.
Installing the plugin
You can install the plugin manually by downloading the source code from our Github repository or you can download it through the Unreal Marketplace.
Manual installation
To check out the SDK and use it as a project plugin, clone the git repo into a working directory of your choice.
This repository uses LFS (large file storage) to manage pre-compiled binaries. Note that a standard clone of the repository might only retrieve the metadata about these files managed with LFS. In order to retrieve the actual data with LFS, please follow these steps:
Clone the repository:
git clone https://github.com/4Players/odin-sdk-unreal.gitCache the actual LFS data on your local machine:
git lfs fetchReplaces the metadata in the binary files with their actual contents:
git lfs checkout
Next, unzip the files into a new Odin sub-folder under your projects Plugins folder. It should end up looking like /MyProject/Plugins/Odin/.
If you’re new to plugins in UE4, you can find lots of information right here.
When the Odin plugin is installed directly into a Blueprint Only Unreal Engine project, you may encounter an error when trying to run packaged standalone builds. This issue occurs because Unreal Engine processes Blueprint Only projects differently, and fails to correctly package C++ plugins that are installed directly within the project.
To resolve the error, you can either install the Plugin in the Engine’s installation directory (i.e. by using the Unreal Marketplace version), or convert your Blueprint Only Project into a C++ project. If you need assistance performing this step, please take a look at our guidelines for addressing this issue.
Unreal Marketplace
This is the most comfortable solution as you get notified of new versions and installation is as easy as clicking a button.
Get ODIN from Unreal MarketplaceUsing the plugin
Please make sure to read the introduction to have a basic understanding of how the plugin works. We have compiled a couple of use-cases for different types of games that should get you started quickly.
Manual
Implementing ODIN into your game can be done quickly and easily. We have created a manual to show you how to use them and which settings are available and how to use them.
Blueprint Reference
We have an extensive blueprint reference of all our nodes and functions. Check it out here.
Setting Up Android Permissions for ODIN in Unreal
Switching Microphone Input Devices with ODIN in Unreal
Unreal Engine Plugin Manual
The Unreal Engine plugin comes with full blueprint support to make it as easy as possible to use ODIN in your game. Please make sure to have a basic understanding of how ODIN works as this helps a lot understanding the next steps.
This manual highlights the key steps to take to get started with ODIN. For a more detailed implementation please refer to our Unreal Sample project. Select the blueprints in the Unreal Sample Project, Copy them and Paste them in your own project to get started quickly!
Basic Process
If you have read the introduction you have learned that every user connected to the same ODIN room (given by a string of your choice) will be able to exchange data and voice. An ODIN room is automatically created by the ODIN server when the first user joins and is automatically removed once the last user leaves.
To join a room an access token needs to be created. An access token gives access to an ODIN room and can be created within the client. For testing and development purposes that’s fine. In production you should create an access token on server side. We’ll provide various packages for JavaScript (npm) or PHP (Composer) to create access tokens and we also have a complete server ready to go that you can deploy as a cloud function to AWS or Google Cloud.
After the room has been joined, data can be exchanged, i.e. text chat messages or other real-time data. If your user should be able to talk to others, a microphone stream (a so called media) has to be added to the room. Now, every user can talk to every other user in that room. More advanced techniques include 3D audio that allows you to update your position every couple of seconds to the server which then makes sure, that only users nearby hear your voice to reduce traffic bandwidth and CPU usage. But more on that later.
So, to summarize, the basic process is:
- Get an access key
- Create an access token with the access key for a specific room id (just a string identifying the room)
- Join the room with the access token
- Add a media stream to connect the microphone to the room
Implementing with Blueprint
Let’s get started adding ODIN to an existing (or new) Unreal Engine Project. You’ll find all Blueprint nodes in the
root folder Odin.
This is the full blueprint that we are about to create:

The blueprint that we’ll create
You can create the blueprint anywhere in your project - but it makes most sense on your Default Player Character Class - since this is where your Odin Synth Components will live. Just make sure that you have it in a class that exists on each client (for example the Game Mode only exists on the server and therefore is not eligible for this logic).
Creating an access key
First, you need to create an access key. As the access key is used to authenticate your requests to the server and also includes information about your tier, e.g. how many users are able to join the same room and a few other settings. You can create a free access key for up to 25 users right here. If you need more or want to go into production, you need to sign up with one of our tiers. See pricing for more information.
More information about access keys can be found in our Understanding Access Keys guide.
For now, you can use this widget to create a demo access key suitable for up to 25 concurrent users:
Press the Create Access Key button and write the access key down somewhere. We’ll need this access key a bit later
down the road.
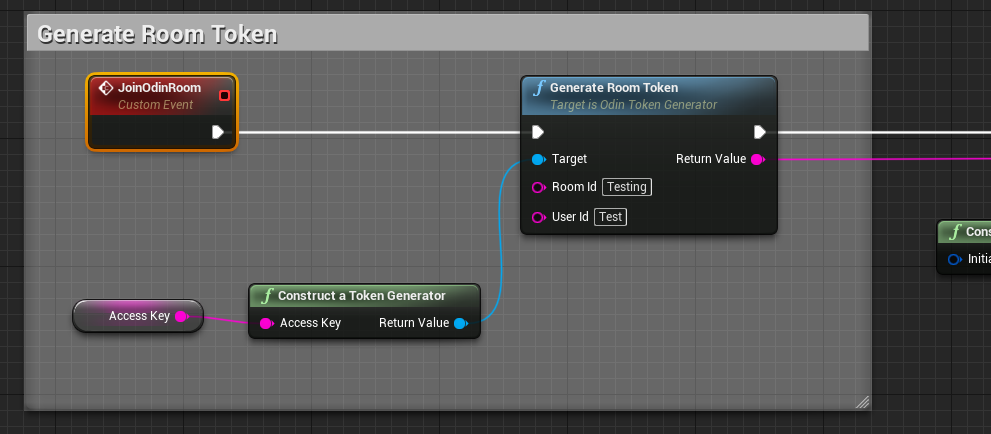
Creating an access token
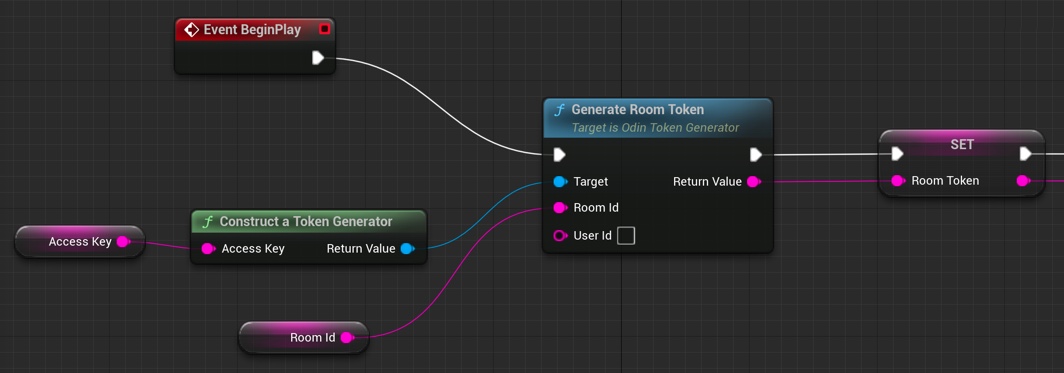
Add a Generate Room Token
node to your Blueprint Canvas. Now, drag out from the left Target and
choose Construct a Token Generator
from the list. This will add the node to your canvas and connect
both. Please note: In production you would load the token from your cloud function (see above) but for now we just
generate a random access token directly in the game.
Now, drag out from “Room Id” and choose Promote to Variable to create a variable for the name of the Room. You’ll
need to compile your Blueprint and then enter Lobby as the default value for the room name or anything else that
makes sense to you.
Next, drag out from Access Key of your Construct a Token Generator
node and choose Promote to Variable. This variable will hold our access key. Compile again and set the default value to the access key you created
above.
Last but not least create an Event Begin Play node and connect it to the Generate Room Token
node. In
most use cases you might not want players to be able to talk to everyone else right from the start. Choose another event
in this case. But for testing purposes this should be fine.
Your blueprint should look like this now.
Creating an Access Token
Configure the room access
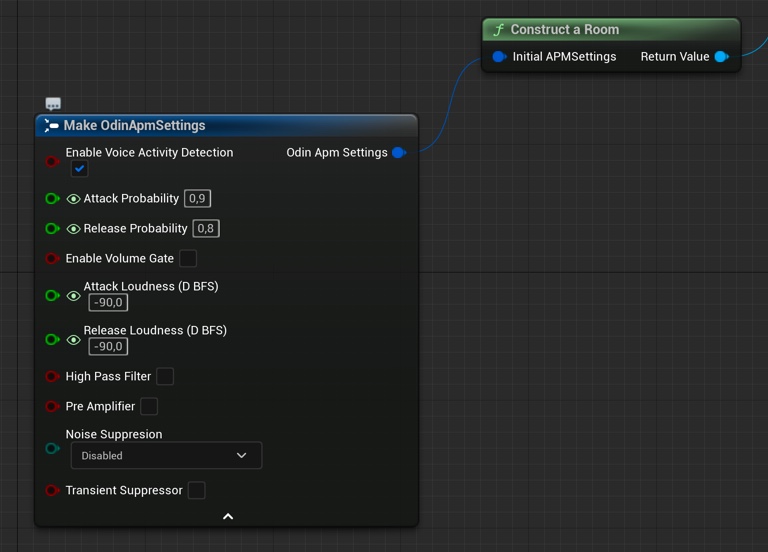
ODIN supports various settings when joining a room (APM settings). Here you can set features like “Voice Activity Detection” and many other features.
Create a new Construct local room handle
node and drag out from Initial APM Settings. Choose Make Odin APM Settings
from the list. This will add the node to your canvas and connect both.
You can play around with APM settings to work out good values for your type of game.
It should look like this:
Preparing a room
Event Flow
Once you are connected to the ODIN server, a couple of events will be fired that allow you to setup your scene and connecting audio output to your player objects in the scene.
Have a look at this application flow of a very basic lobby application. Events that you need to implement are highlighted in red.
Adding a Peer Joined Event
To create event handling, create a new delegate Bind to On Peer Joined node.
Unreal does not list the Bind to On Peer Joined option without dragging off of an Odin Room variable. If you want to have that option shown in any case, disable the Context Sensitive checkbox on the top right corner. Then you should find the event in the
Odin/Events folder.
You’ll need to connect the Room object reference that you created earlier with the Construct local room handle
node. This way, you can easily handle events differently for different rooms you connect. You can even connect
multiple rooms at the same time, but handle them differently in your code.
Now, that you have created that node, drag out from the Events slot until you see a red line. Next, release the
mouse cursor and Unreal will automatically create the correct event node which will handle this event.
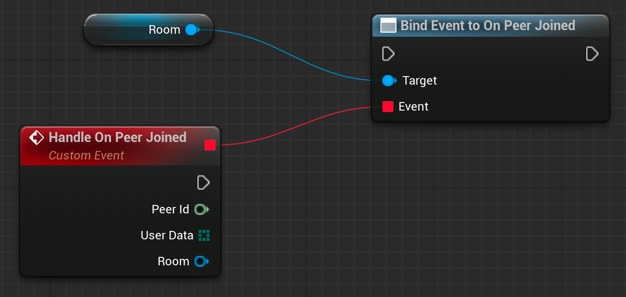
The wired up peer joined event handler
Don’t forget to connect the Exec slot with the process flow of your application. You should always setup event
handling before joining a room.
The On Media Added Event
The On Media Added event is triggered whenever a user connected to the room activates their microphone, or directly after joining a room you’ll get these events for all active users in that room.
You’ll get a Media object that represents the microphone input for the peer (i.e. connected user) that this media
belongs to. The Media object is a real-time representation which is basically just a number of floats that
represent the users voice. A node needs to be created that translates that into audio output. This is the Odin Synth Component. You use the Odin Assign Synth to Media
node that will connect both and actually
activates the audio.
The easiest way is to add the Odin Synth Component to your player asset and place it somewhere near the head. Then,
in your blueprint you can use the Get Component By Class node to get the Odin Synth Component from the player
actor.
Instead of adding the Odin Synth Component to your player asset, you can also use the
Add Odin Synth Component
to create the component and attach it to the player actor at runtime.
After wiring everything together, it should look something like that:
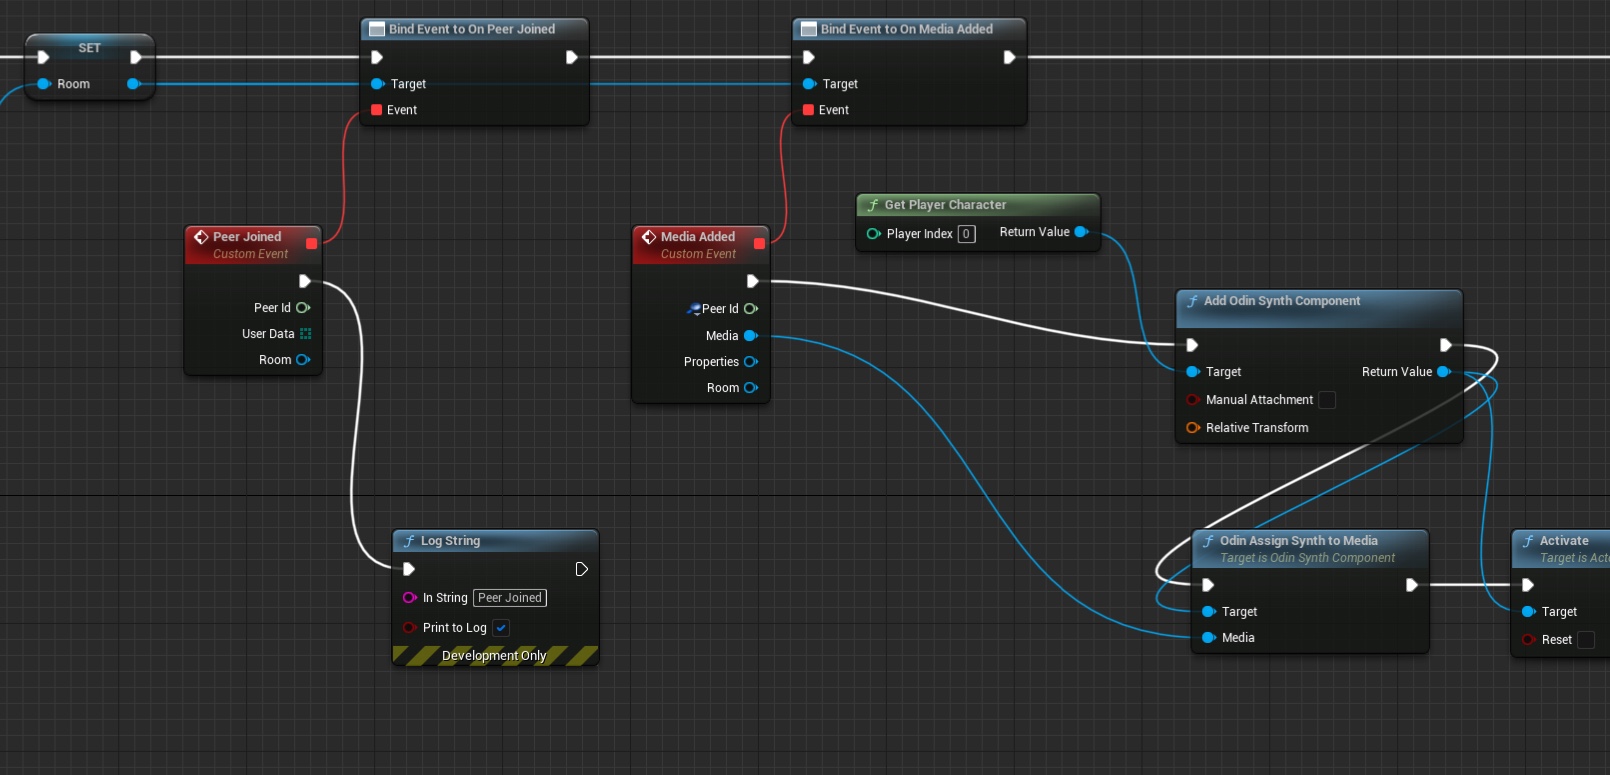
Handling On Media Added events
That’s it. Now, every user connected to the same room will be heard with full volume where the local player is located.
In a real 3D shooter with 3D audio you would not choose the local player, but map the Odin Peer Id with your Unreal Player Id and then assign the Media to the corresponding player character. This way, Unreal will automatically process the audio in its audio engine and apply attenuation, e.g. dampen the volume the farther away the player is from the listener.
Joining a room
Now, we have everything in place to join a room: We have created an access token with the room id “Lobby” and have configured room settings for our client. Now let’s connect them to join a room.
Add a Join Room node to your Blueprint Canvas.
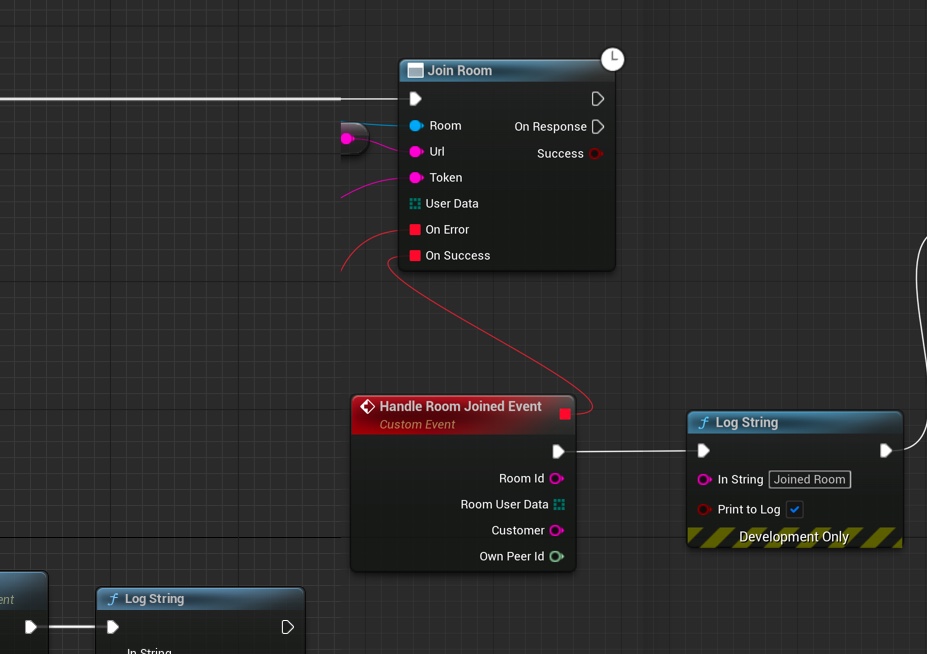
Joining a room
Connect the Return Value from Construct local room handle
with the Room input of the Join Room
node. Next, connect the Return Value of your Generate Room Token
node to the Token input of the
Join Room
node. Next, we need to configure our gateway: Drag out from URL of the Join Room
node and choose Promote to Variable. This variable will hold the gateway. Compile the Blueprint and set
https://gateway.odin.4players.io as the default value. This is our public gateway. You can also launch your own gateway
for maximum privacy, but to get started, our public one is a good option.
As shown in the image above, you can also drag out event handling to get notifications if something went wrong. We just added simple output to the Log to see what happens.
Last but not least, you need to connect the Generate Room Token process flow output to the input of your Join Room node.
Adding a media stream
Now that we have joined a room, we need to add our microphone (at least if users should be able to talk) to the room
so everyone else in the room hears what we are saying. To do that, we create a Create Audio Capture node and connect
it with a new media constructed with Construct Local Media
. Then we connect both with an
Add Media To Room
node as shown in the image below. Since you need to start capturing from the audio
device, we save the Audio Capture object in a variable and use that later to activate the microphone. By stopping the
audio capture you can implement mute very easily later or something like push to talk.
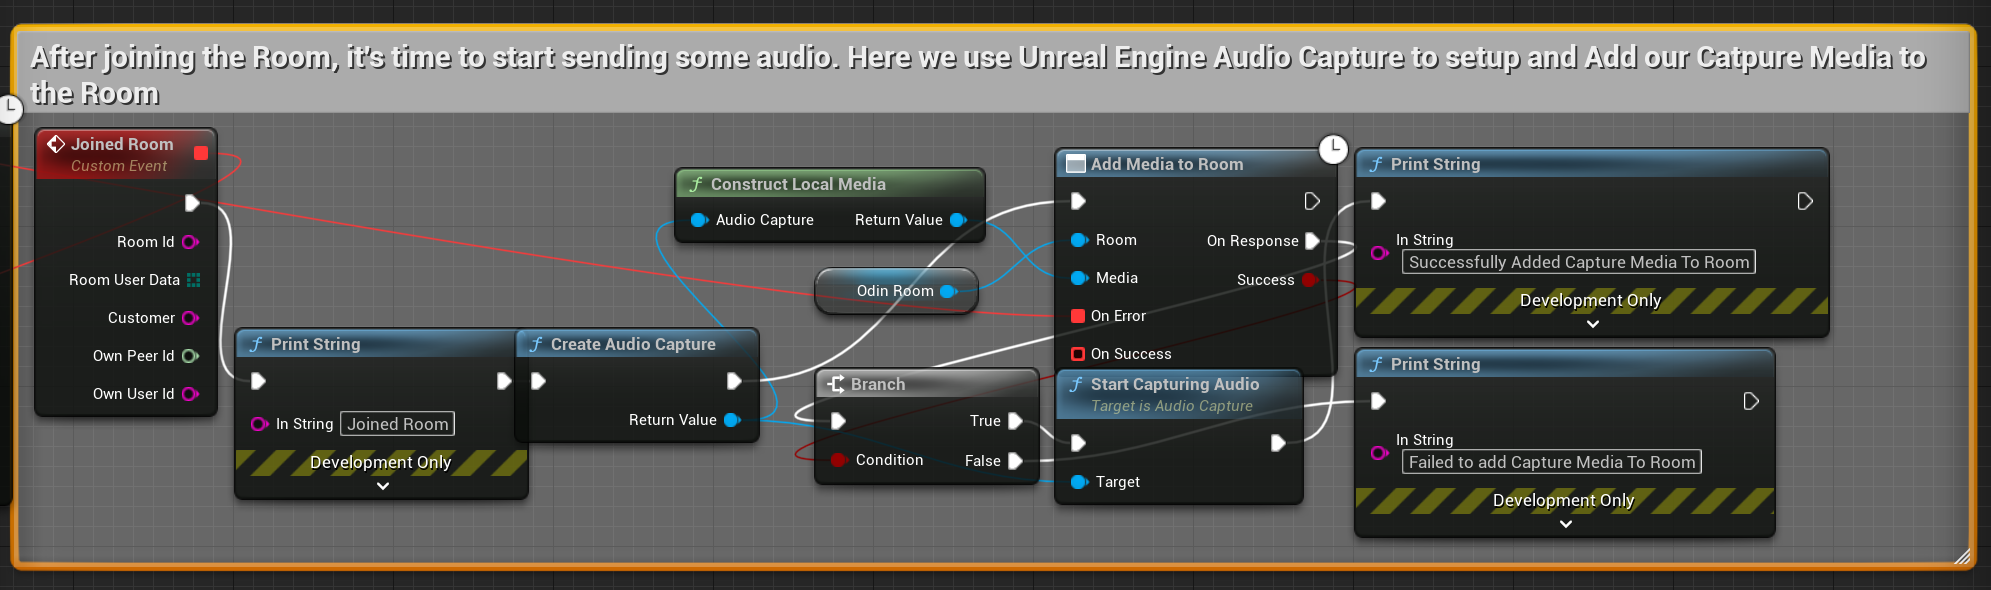
Adding a microphone
You can create event handling for errors as shown before. The process is basically always the same. Odin delivers an error code, and you can use the Format Error node to create an error message that you can place in a log or somewhere else.
If you don’t find the Create Audio Capture and Start Audio Capturenode, please make sure you have the Audio Capture Plugin enabled which is part of the default Unreal installation. See FAQ
for a more detailed description on how to resolve that issue.
Make sure to only execute the Start Audio Capture node after successfully constructing audio capture with Create Audio Capture, constructing the media with Create Media, and finally adding it to the room with Add Media to Room.
Testing with ODIN client
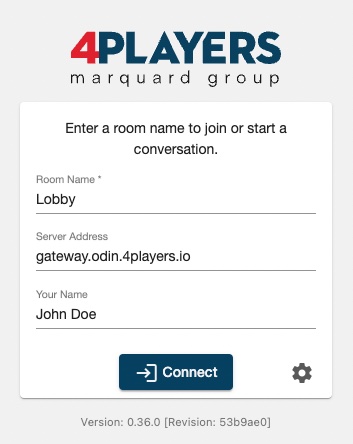
As ODIN is working cross platform, you can use our ODIN client app to connect users to your Unreal based game. There are numerous use cases where this is a great option (see Use Cases Guide) but its also great for development.
Fire up your browser and load our ODIN client: https://app.odin.4players.io/. We
need to configure that client to use the same access key that we use within Unreal. Click on the Gear icon next to
the Connect button. You should see something like this:
Testing with ODIN client
If you don’t see the Your Access Key option at the end of the dialog, you need to scroll down a bit.
Enter your access key that you have created earlier and that you have set in the Access Key variable exposed in
the Blueprint and click on Save. Now, the ODIN client will use the same access key as your Unreal based game,
connecting both platforms together.
In the connection dialog, set the same room name as you did in Unreal (i.e. Lobby), make sure the same gateway is
set as in Unreal (i.e. https://gateway.odin.4players.io) and enter a name. Then click on Connect.
Connecting the room with ODIN client
You should see something like this:
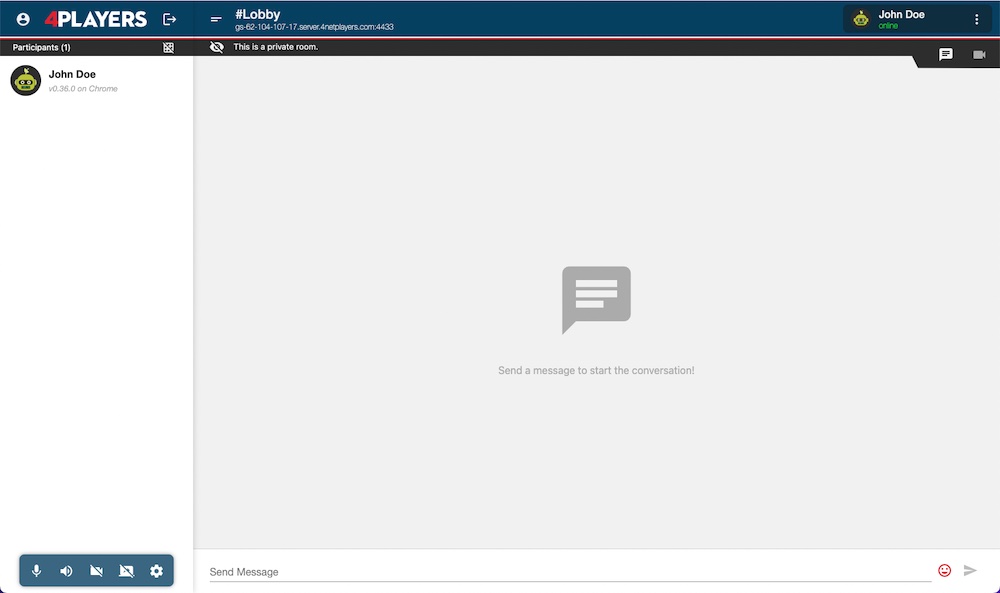
ODIN Client
Now, get back to Unreal and press Play in the editor. Unreal will fire up your game and will join the same room as you have in your browser. You should here a nice sound indicating that another user has joined the room. Navigate to your browse, and now you should see another entry in the users list: “Unknown”. If you talk, you should here yourself.
Ask a colleague or fried to setup the ODIN client with your access key and the same room and you’ll be able to chat together, one inside your game and the other one in their browser. This is a great way of quickly testing if everything works fine and we do that internally at 4Players very often.
Enabling 3D Audio
So far we have enabled the voice chat in your application, but most likely you want to use the 3D Audio Engine of Unreal. This for itself might be a trivial step since you can simply assign proper Attenuation Settings to your Odin Synth Component. But you also need to consider another problem: the positioning of the Odin Synth Components in your scene.
The simplest solution is to attach the Odin Synth Components to the Pawns representing the respective players, but you somehow need to keep track which Odin Peer is associated with which player - so let’s have a look at how to do that.
The implementation in detail depends on your networking and replication system of course, but most of the time you will want to use the native Unreal Engine Networking, so we will assume that you use that. If you use another system you will need to adjust the steps accordingly.
Propagating an Identifier
In order to assign the correct Odin Synth Component to the according Player Controlled Character we will need to do keep track of a unique identifier for each player, their actors and their Odin Peer Ids.
If you have not done that earlier, now is the time to move the logic to your Player Character blueprint or at least a component living there. For this sample we will assume you have created the Odin logic directly on the Player Character class.
With this out of the way we can start. First we need to propagate an identifier of the player for your game session. You can use GUIDs, or your Unique Player Identifiers that you already have due to a login process or something similar. You can set the ID in any event that is called during startup, a good entry point is the Event Possessedof the Character Class - here you can simply check if you are running on the Server and then you set a variable that is replicated across all Clients.
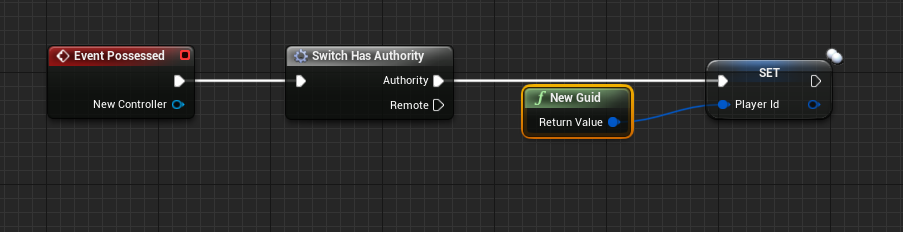
The wired up possessed event
With this done you can continue and use that variable to identify a player on the join call to the Odin room - so from here we can call that routine we already have created earlier in this tutorial.
The variable Player Id’s replication mode is set to RepNotify. So when the variable is set we can add some extra logic to each of the clients receiving the replication notification. Find the OnRepPlayerIdfunction in your character blueprint and here we will add some additional logic.
To your Default Game Instance blueprint add a variable named PlayerCharacters and first make it a GUIDtype - then in its details click the icon (looking somewhat like a pill) next to the variable type and select Map from the drop down menu. Now you can change the second type of the variable to your Default Player Character class. This map will help us keep track of the actors and is able to return an actor when we have an identifier - we will need that later, when we want to add Odin Synth Components to the correct Player Character objects.
So in the OnRepPlayerId function we will now add a new Key Value pair to that new map on the Game Instance - in order to do that we will need to cast the game’s Game Instance accordingly and then add a new element to the Player Characters map. You can see the finished function in the image some paragraphs below.
Joining a Room with the Identifier
To make sure that we already have the identifier on the owning client while joining the Odin room we can call the custom event Join Odin Roomfrom the OnRepPlayerIdfunction as well. If we do this on the Possessed event of the character, we cannot guarantee that the local player id was already set.
This Event will now be connected to our routine that creates an access token and connects to an Odin Room - earlier it was connected to the Begin Playevent of our local player. So in the OnRepPlayerId we will just check if we are on the locally controlling client and then we will call a new custom event.
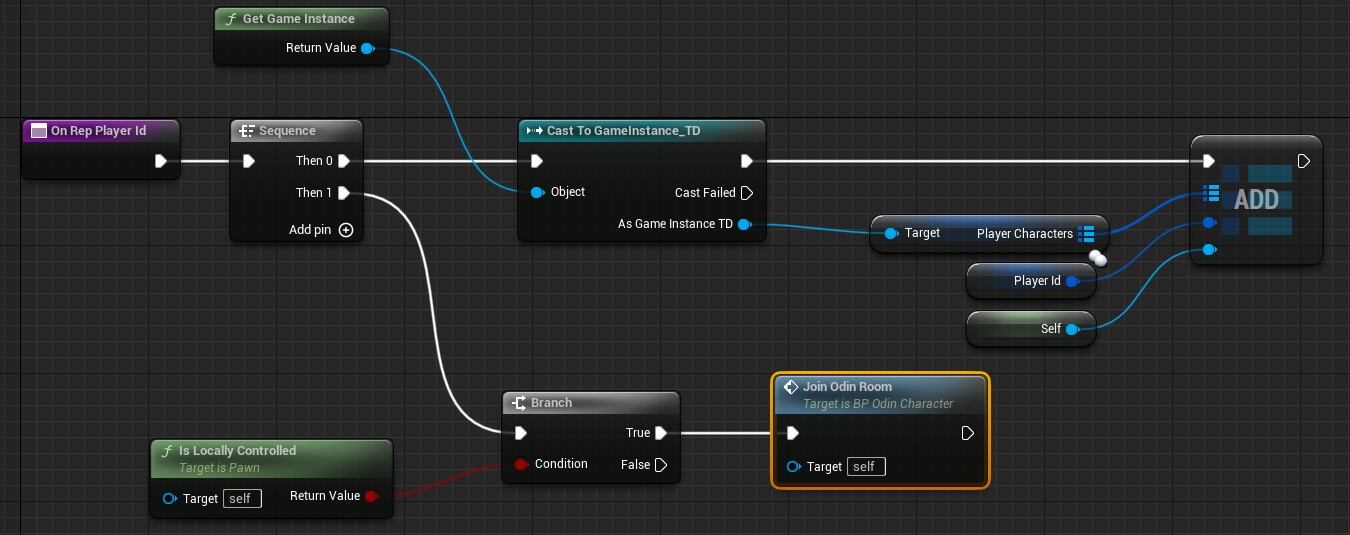
The finished OnRepPlayerId function
The new Join Odin Room event is now connected to our nodes that generate an access token.
The start of the Join Odin Room custom event
Next we need to pass the identifier to the Join Roomcall as custom user data so that all other Odin clients can associate that identifier with our Odin id. You can use the methods to create a User Data Byte Array for that. First call Construct Json Object and then Set String Field on it and write the GUID to it as a string. Now you can Encode As Bytesthe json object and send it with the join room call.
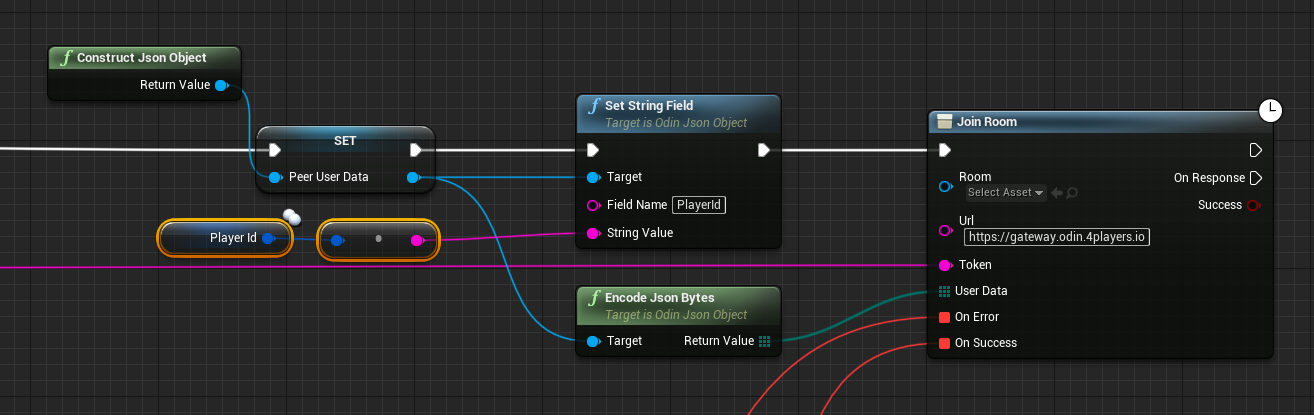
The wired up join odin room call
Handling the Peer Joined Event with an Identifier
Now each other client will receive an event once a player has joined the Odin Room. Here we can extract the given player identifier from the user data. The next problem we will handle here is that once we get the Odin Media object we do not get the user data in the same event, so we need to also map the Odin Peer Id to our Player Characters. To do that now add another map to the Game Instance and this time make it an Integer64 and Player Character map. Now you can find the correct player character and add it to the new map using the passed Peer Id. This is what the finished function will look like:
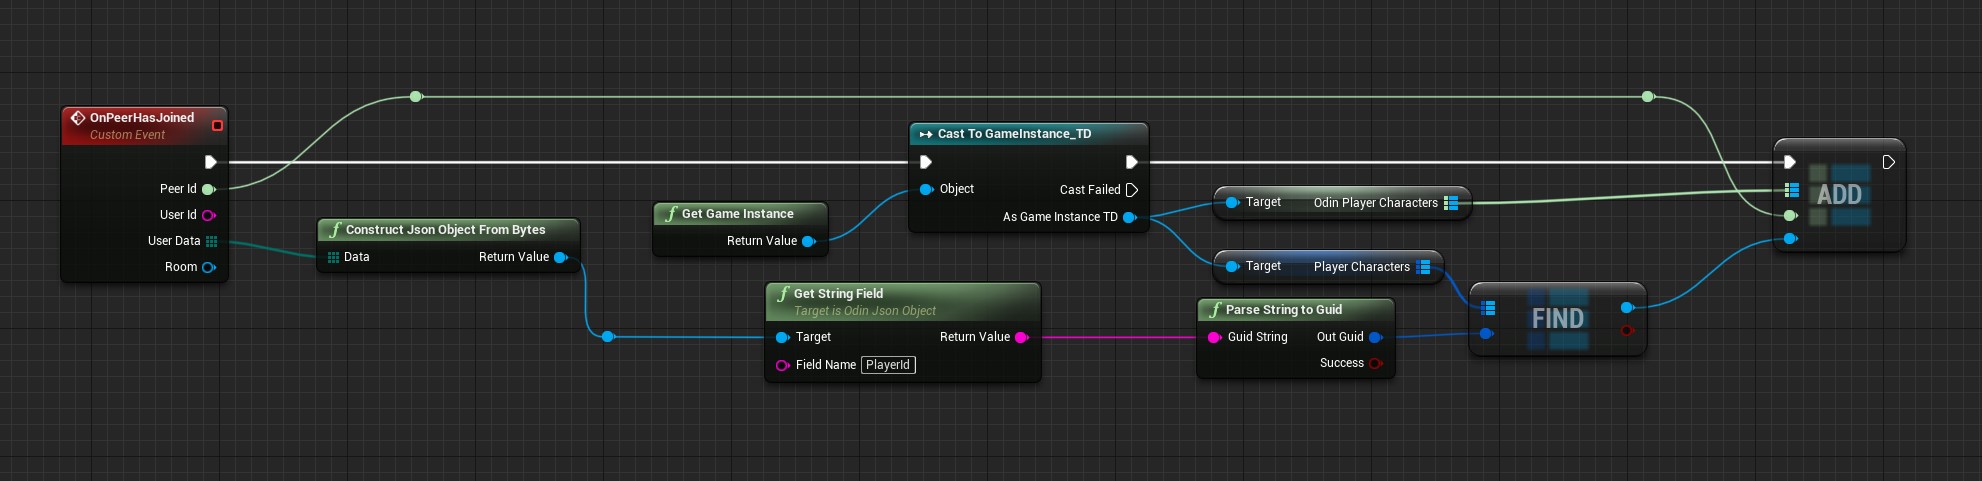
The wired up join odin room call
Handling the Media Added Event with an Identifier
Now we can finally add the Odin Synth Component to the correct player character. Find your event or function that handles the Media Added event and now instead of simply adding an Odin Synth Component to the local player character we can now actually find the correct character and attach the synth component there.
Use the passed Peer Id to get the correct player character from the Game Instance’s Odin Player Character map and assign the Odin Synth Component there now:
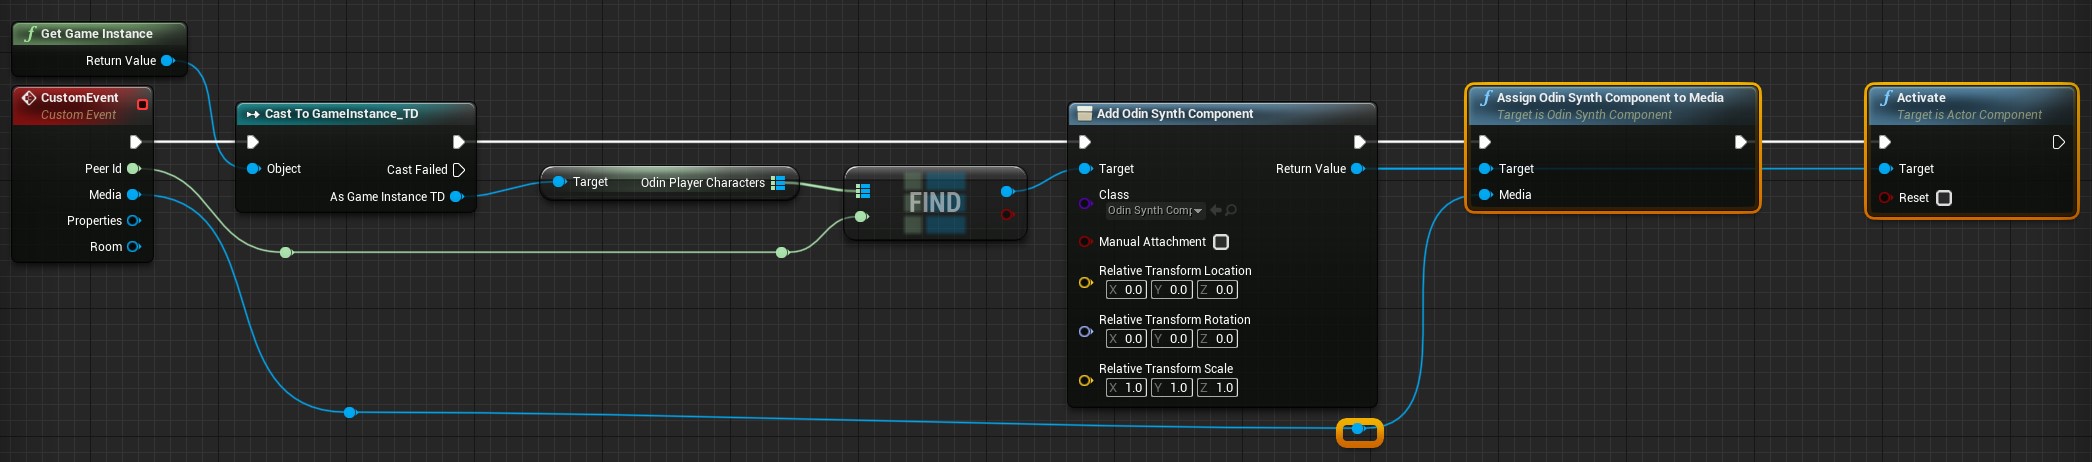
The wired up join odin room call
Conclusion
This is all you need to do for now to add the Odin Synth Components to the correct player characters. Now you can change the attenuation settings to whatever you need for your voice chat to work in your 3D world - from what we have now it is the most straight forward to simply drag off of the Create Odin Synth Component node and call the Set Attenuation Settings node and assign it a new Attenuation Settings asset that you can create in the Content Browser like any other asset before.
Odin is agnostic of the audio engine, so you can really just use any engine you like, be it the native Unreal Audio Engine, or a 3rd Party Engine, like Steam Audio, Microsoft Audio, FMOD and so on. It is all possible simply by changing the project settings and the attenuation settings of the Odin Synth Component accordingly.
Unreal Engine Plugin FAQs
Are there any dependencies to other plugins?
Yes, ODIN uses Epic’s official Audio Capture Plugin to capture audio from input devices, such as microphones. Users have the option to either user the default Audio Capture object provided by the Create Audio Capture method, or the extended Odin Audio Capture object. We recommend using Create Odin Audio Capture due to its superior features, such as the ability to switch capture devices on supported platforms and enhanced Push-To-Talk functionality.
Other than that, ODIN defaults to Unreal’s standard audio playback, meaning any voice data played in-game is managed like any other audio source in Unreal. This makes it possible to implement exciting features like Proximity Voice Chat and manage settings like Volume controls using Unreal’s existing solutions.
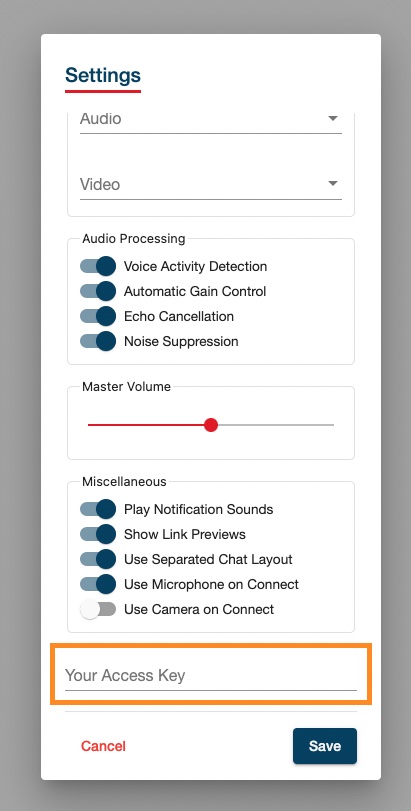
I'm having Issues with Echo Cancellation, what can I do?
If you’re encountering issues with echo cancellation, we recommend a specific Audio Processing Module (APM) setup to optimize your voice chat experience. A good starting point is to refer to the following APM configuration example, which can serve as a guideline:
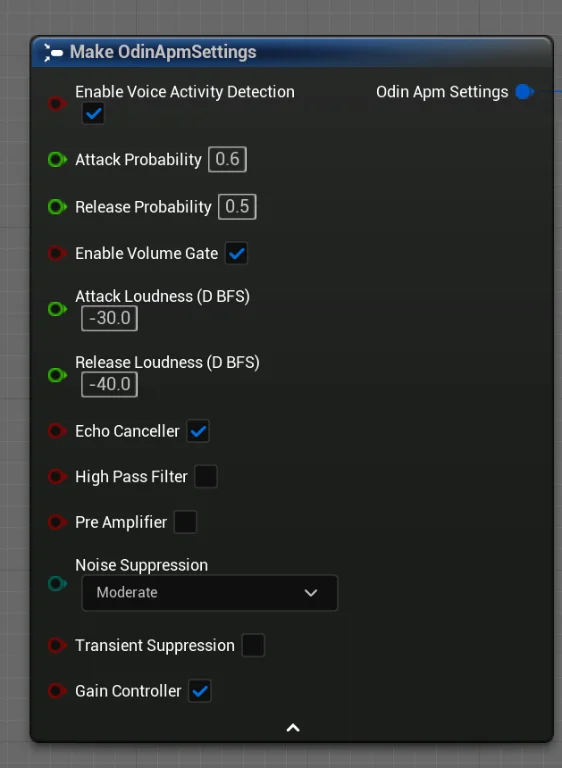
APM configuration for Echo Cancellation
However, since audio performance can vary based on different hardware and environmental conditions, it’s beneficial to experiment with the settings to find what works best for your specific use case.
To enhance user experience, consider allowing players to adjust these settings according to their individual hardware setups. When implementing user-adjustable options, it’s advisable to streamline the number of controls to avoid overwhelming the user. Here are a couple of suggestions:
- Voice Activity Detection (VAD) Adjustments: You can provide a single slider for users to adjust the VAD settings. The Attack and Release probabilities should have an offset of 0.1 (e.g., if the Attack is set to 0.6, then the Release should be 0.5). This single slider approach simplifies the user interaction while effectively managing the VAD parameters behind the scenes.
- Volume Gate Settings: For Volume Gate, ensure that the Attack value has an offset of 10 from the Release value (for example, if the Attack is -30, then the Release should be -40). This method maintains a balanced dynamic between the Attack and Release phases, which is crucial for effective volume gating.
These tailored adjustments can significantly improve the echo cancellation effectiveness, leading to a clearer and more pleasant audio experience for all users.
Do you have sound occlusion built-in?
Yes, the audio is played via a synth component (see Add Odin Synth Component ) and this integrates natively into the entire Unreal Audio Engine with all the features that come with it. This also means that you can use any other 3rd party audio plugin to improve or to add new effects.
Do you support Unreal Engine 5.x?
Yes, we do. Our internal development team uses the latest officially released version of Unreal Engine for development. Testing and packaging are done for versions starting from UE 4.26.
Blueprint Only Projects: My packaged builds crash right after start-up
When the “Odin” plugin is installed directly into a Blueprint Only Unreal Engine project, you may encounter an error when trying to run packaged standalone builds. The error message typically states:
Plugin ‘Odin’ failed to load because module ‘Odin’ could not be found. Please ensure the plugin is properly installed, otherwise consider disabling the plugin for this project.
This issue occurs because Unreal Engine processes Blueprint Only projects differently, and fails to correctly package C++ plugins that are installed directly within the project.
Options for Resolving the Issue:
To resolve this issue, there are two options:
Install the Plugin in the Engine: By installing
Odindirectly into the Unreal Engine’s installation directory, Unreal will use a different method to package theOdinmodule when building a Standalone Version of your project. This method ensures that all required modules are accessible. To install the plugin in the engine you can either:- Use the Marketplace to install the Odin plugin
- Alternatively, download the appropriate version of the
Odinplugin from the Odin SDK Unreal Releases Github page. Extract the plugin into the Engine’s marketplace plugins directory, which is typically located at.../Epic Games/UE_x.xx/Engine/Plugins/Marketplace
Convert Your Blueprint Only Project to a C++ Project: Adding C++ files to your project enables support for C++ based plugins like Odin being directly installed in your project folder. Here’s how to perform this conversion inside the Unreal Engine Editor:
- In the Unreal Editor, navigate to
Tools > New C++ Class > Choose Parent Class None - Give the class a name (e.g.
Empty) and pressCreate Class. - Close down the Editor and open up the newly created
Odin_Minimal.slnin your IDE - Build the project (Visual Studio hotkey is
Ctrl+Shift+B)
- In the Unreal Editor, navigate to
Follow-Up Steps:
After following one of the solutions above, perform the following steps to ensure the Odin plugin loads correctly:
- Open your Unreal project. If prompted, rebuild the missing modules by clicking
Yes. - Go to
Edit > Pluginsin the Unreal Editor, and make sure that theOdinplugin is enabled. - Attempt to package your project again. The standalone version should now launch successfully without errors.
Following these guidelines will help you successfully integrate the Odin plugin into your Blueprint Only project or adjust your project’s setup to meet the plugin’s requirements.
Build-error: building for ... but attempting to link with file built for unknown-unsupported file format
If you encounter the following error:
... ignoring file /PROJECT_NAME/Plugins/Odin/Source/OdinCore/PLATFORM/...,
building for PLATFORM but attempting to link with file built for unknown-unsupported file format
( 0x76 0x65 0x72 0x73 0x69 0x6F 0x6E 0x20 0x68 0x74 0x74 0x70 0x73 0x3A 0x2F 0x2F )
it’s most likely due to issues with git LFS (large file storage). A standard clone of the ODIN-Unreal-SDK repository might only retrieve the metadata about these files managed with LFS. In order to retrieve the actual data with LFS, please follow these steps:
- Clone the repository:
git clone https://github.com/4Players/odin-sdk-unreal.git
- Cache the actual LFS data on your local machine and replace the metadata in the binary files with their actual contents:
git lfs fetch
git lfs checkout
… or if you have a recent LFS version:
git lfs pull
Next, move or copy the files into a new Odin sub-folder under your projects Plugins folder. It should end up looking like /MyProject/Plugins/Odin/.
C++ only: JoinRoom does not trigger callbacks on Android / Meta Quest
This is most likely an issue with using the standard FVector2D() constructor when setting the initialPosition
of UOdinRoomJoin::JoinRoom. The standard FVector2D()
will not explicitely initialize values.
This doesn’t seem to be an issue on Windows, which will simply set the vector’s parameters to zero. Android on the other
hand will require you to explicitely initialize the initialPosition with FVector2D(0,0) (or other explicit values).
This is not an issue when calling the Join Room node in blueprint.
Cross-Platform / Cross-Engine is great. Inside the web client I can hear the UE client, but I cannot hear web clients inside the UE client. Why does it not work?
Each client integrates their own MediaStream into the chat room, as detailed in our Unreal Manual. Once added, these streams are automatically transmitted to the ODIN server and then multicast to every peer in the same room.
By linking the MediaStream of each remote peer to a SynthComponent (for example, on a player character), audio communication is enabled among all participants. This setup allows everyone to hear each other, irrespective of the client type they are using. For more details on this process, refer to the OnMediaAdded event.
Usually, every player character inside UE is spawned as soon as replicated by the network engine, i.e. Unreal networking. When an ODIN peer joins that cannot be replicated, you should either spawn a placeholder object “On Peer Joined” or you can attach the synth component of non-UE clients somewhere else “On Media Added”. For instance, you could attach it to your local player character to hear web clients with 2D audio like they are “on the phone”. Or you can put a virtual radio box inside the level to let web clients speak through that object. It is also possible to create a second ODIN room (e.g. “global chat”) and inside let all players from all client types communicate in 2D - in addition to the in-game (UE-only) spatial audio voice.
Remember to detach / destroy objects from non-UE ODIN peers when they leave the room.
How to address build issues with Odin installed in both the Engine and Project
The Odin plugin can be installed either in the Engine’s Marketplace Plugins directory or in your current Unreal Engine Projet directory. Installing the plugin in both the Engine Marketplace Plugins folder and the Project’s Plugins folder can cause conflicts with the UnrealBuildTool. Follow these steps to make sure the plugin is installed correctly and to resolve build issues:
Installation and Troubleshooting:
- Close Your Project: Ensure that Unreal Engine is not running and your project is closed.
- Clean Temporary Folders: Navigate to your project directory and delete the
Binaries,Build,DerivedDataCache, andIntermediatefolders. - Remove Redundant Plugin Installations: Ensure that the Odin plugin is only installed in one location. Remove it from the Engine’s Marketplace Plugins folder if it’s already in your Project’s Plugins folder.
- Download and Install Plugin: Download the latest release of the Odin plugin for your Unreal Engine version from the Odin SDK Unreal Releases github page. For a clean install, please make sure to first completely remove the old
Odinplugin folder. Then extract the downloaded release into your Project’sPluginsfolder. The folder hierarchy should look similar to this:../[ProjectName]/Plugins/Odin/Odin.uplugin - Regenerate Project Files: Right-click your project’s
.uprojectfile, select “Generate Visual Studio project files”, and allow the process to complete. - Open Your Project and Rebuild: Double-click the
.uprojectfile to open your project. If prompted, rebuild the missing modules by clicking ‘Yes’. - Reattempt the Build: Try to build a standalone version of your project again to see if the issue is resolved.
Following these steps will ensure that your plugin installation does not interfere with the UnrealBuildTool and your project builds successfully.
I cannot find the Capture Audio nodes?
If you have any issues finding nodes in Blueprint, make sure the Audio Capture plugin is enabled. In the Unreal Editor open
Plugins (Menu -> Edit -> Plugins) and make sure that in the Audio Section the Audio Capture plugin is
activated like shown in this screenshot:
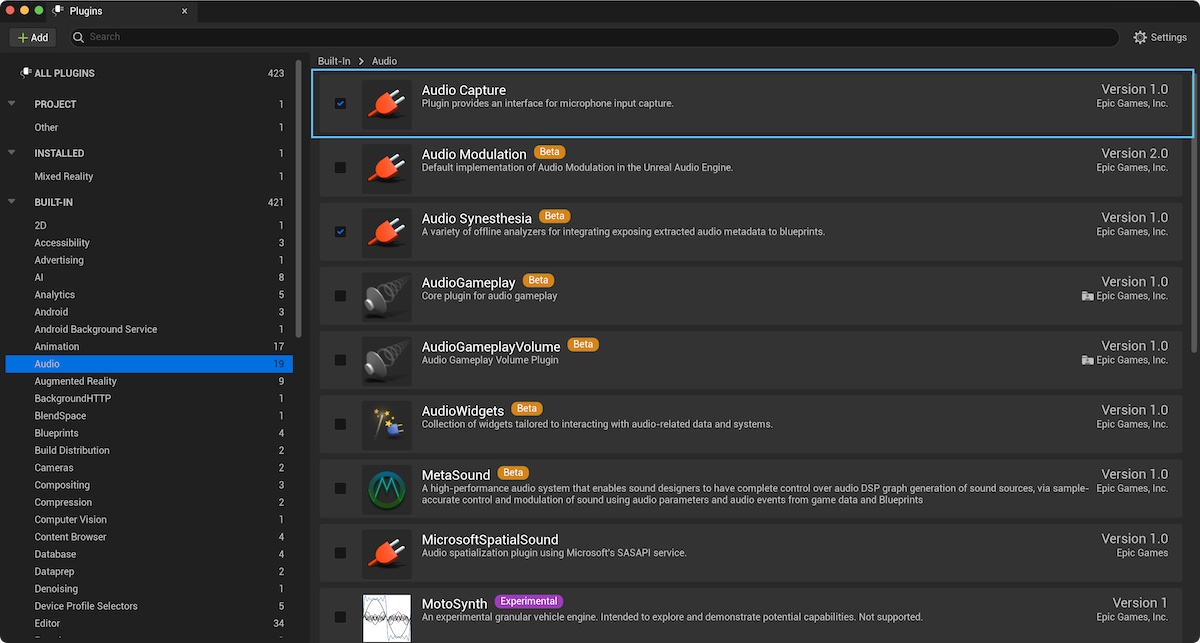
Enabling the Audio Capture Plugin
LogUObjectGlobals: Warning: [AssetLog] ... Can't find file Error when running a packaged build
If you encounter a warning that says
LogUObjectGlobals: Warning: [AssetLog] PATH_TO_ASSET\.uasset: Failed to load '/Script/Odin': Can't find file.
while running your packaged Unreal Engine build, it typically indicates issues with asset redirectors. To resolve this, follow these steps:
Fixing Asset Redirectors:
- Open Unreal Editor: Launch your Unreal Editor and open your project.
- Select the Content Folder: In the Content Browser, right-click the root
Contentfolder. - Fix up Redirectors: Choose “Fix up Redirectors” from the context menu. This action helps ensure all references are correctly updated and pointing to the valid assets.
After performing these steps, run your build again to check if the issue is resolved.
My blueprint nodes are broken after upgrading to a new Unreal Engine version. What's wrong?
When upgrading to a new version of Unreal Engine, it is crucial to ensure that the Odin plugin is installed before opening your project in the new engine version. Following these steps can prevent the loss of blueprint functionality:
- Pre-upgrade preparation: Before upgrading to a newer Unreal Engine version, confirm that the Odin plugin is available and supported in the new version.
- Install before opening: Install the Odin plugin in the new version of Unreal Engine before opening your project. This helps to ensure that all Odin-related blueprints and functionalities remain intact.
- Delete Intermediate and Binaries folders: To avoid any intermediate files conflicting with newer Engine or Plugin version, delete the
Binaries,Build,DerivedDataCacheandIntermediatefolders in your project directory and theBinariesandIntermediatefolders in your[Projectfolder]/Plugins/Odindirectory. - Do not compile without Odin: Avoid compiling any of your blueprint nodes if the Odin plugin is not installed in the new Unreal Engine version. Compiling without the plugin can lead to irreversible damage to Odin-dependent blueprints.
- Handling accidental compiles: If you have accidentally compiled one of your blueprints without the Odin plugin, attempt to revert to a previous stable version of your project using your source control system.
Following these guidelines will help you maintain the integrity of your project and avoid potential setbacks when transitioning between Unreal Engine versions with the Odin plugin installed.
Spatial audio does not work. What is wrong?
If the voice chat is working und you managed to hear other players, but it sounds like they are always “inside your head”, please look Add Odin Synth Component ">here and check if you set the right target for the Odin Synth Component.
If you used this blueprint example, you have to be careful to choose the right player character for every single event as mentioned in the info box below.
“In a real 3D shooter with 3D audio you would not choose the local player, but map the Odin Peer Id with your Unreal Player Id and then assign the Media to the corresponding player character. This way, Unreal will automatically process the audio in its audio engine and apply attenuation, i.e. dampen the volume the farther away the player is from the listener.”
If everything is connected correctly, more details on Sound Attenuation can be found in the Unreal Documentation
Explore our comprehensive Unreal Tech Demo Project for a hands-on learning experience on setting up Proximity Voice Chat in a Multiplayer Game. This demo project is designed to guide you through the key steps and considerations for integrating proximity-based voice communications effectively.
For a more interactive learning journey, we also offer an extensive Unreal video tutorial series. This series provides step-by-step instructions on configuring Proximity Voice Chat, ensuring a thorough understanding of the process from start to finish.
Update Peer Position does not work or works incorrectly
Please make sure to follow these tips:
- The position scale should be set to the same value for all Peers in the ODIN room. The scale value also has to be set individually for each room that will utilize ODIN’s optimization feature. You can set the position scale using Unreal Set Room Position Scale ">Set Room Position Scale.
- Invoking Unreal Update Peer Position
">Update Peer Position
too frequently can lead to operational issues where the optimization of audio streams may not function correctly.
Limit the frequency of calling
Update Peer Positionto a maximum of 10 times per second. This equates to one update every 100 milliseconds. We recommend using Unreal’s Set Timer by Event node to update the position in Odin rooms.
What if I do not want to have spatial audio, just like in my favourite conferencing software?
Like in the answer to the question above “Spatial audio does not work. What is wrong?” you can do the contrary and set the synth component to playback only in 2D. Look in the Unreal Documentation here.
My issue is not listed in the FAQs, what should I do?
If you encounter an issue with your project that isn’t covered in our FAQs, here are some troubleshooting steps you can try before looking for further assistance:
Recommended Troubleshooting Steps:
- Delete Intermediate Folders: This can resolve issues caused by corrupted files. Close Unreal Engine, navigate to your project directory, and delete the
Binaries,Build,DerivedDataCacheandIntermediatefolders. If Odin is installed in the project, navigate to the Plugin directory ([Project Path]/Plugins/Odin) and delete theBinariesandIntermediatefolders. - Regenerate Visual Studio Project Files (for C++ projects): Right-click your
.uprojectfile and select “Generate Visual Studio project files”. - Install the Plugin Directly in the Project: We recommend installing the Odin plugin directly in your project. This approach enhances compatibility and ensures that the plugin is included in your source control, making it available to all project members. To install the plugin in your project:
- Download the latest plugin version for your Unreal Engine version from Odin SDK Unreal Releases.
- Extract the plugin into your project’s
Pluginsfolder. If this folder does not exist, create it. - Restart Unreal Engine and enable the plugin through the ‘Plugins’ menu.
Further Assistance:
If the issue is still present after following the above steps, you can ask for further assistance through our Discord:
- Join Our Discord: Join here if you’re not already a member.
- Post in the Support Channel: Navigate to the
#odin-unrealchannel and describe your issue. Include the following:- A detailed description of the problem.
- Any relevant screenshots or error logs.
- The Odin plugin version and the Unreal Engine version used in your project.
- Steps you have already tried.
Our community and support team will then take a look at your request and help you as quickly as possible. Thank you for your patience!
Unreal Engine Tech Demo

This is a small demonstration of the usage of the Unreal SDK of 4Player’s ODIN, a Voice Chat full service solution. The SDK provides an audio stream that can be processed in the audio engine of Unreal to add spatialization or audio effects.
This version is built upon the free tier of the Photon Networking Engine. The audio stream is processed with the help of Steam Audio, which is delivered together with the Unreal Engine.
Download links
Grab the latest version of the demo from our Github repository:
Download the runnable also from Github right here :
Features
The Demo showcases the usage of ODIN together with Unreal’s Audio Engine. The example uses two Odin voice chat rooms - one for spatialized (proximity) chat, and one for a radio simulation with audio effects applied. It shows:
- how to connect to an ODIN voice chat room with an acquired room token generated from your access key
- how to attach the incoming audio stream to an ODIN synth component, adding spatialization (3D / proximity)
- how to connect an additional audio engine plugin like Steam Audio and use it together with ODIN
- how to increase immersion by adding audio occlusion effects through collision rays
- how to send the voice chat audio stream to audio effect processors, e.g. for environmental effects that also apply to voice
- how to use a second ODIN room for simulating 2D radio communication (press and hold R key while talking)
- how to activate different filters (APMs) to improve the audio capture quality
Getting Started
In the releases you can find a pre-built game executable and the current project’s code base. The pre-built game can likely be executed without any installations required - if you do not have the redistributable packages of C++ installed, that Unreal needs, you can find it in the \Engine\Extras\Redist\en-usfolder of the pre-built game.
To open the project in the Unreal Editor you need to install the Unreal Engine 4.26*, 4.27 or 5.0. You can open the source code with UE5.0 easily. If you need to open it with a 4.26 or 4.27 build of the Unreal Engine you can right-click the OdinUnrealSample.uproject file and Switch Unreal Engine version ... to the Engine version you have installed that you want the project to open with. If the Editor fails to launch, rebuild the project from Visual Studio. You might also need to exchange the Odin Plugin to the corresponding version, downloadable e.g. in its Github Repository.
Although the Unreal SDK itself is fully compatible with UE 4.26, there are some issues right now when compiling the demo with that version. We recommend using UE 4.27 or UE 5.0 right now.
Dependencies
- The sample is built with the Unreal Engine version 5.0. Alternatively you need UE4.26* or UE4.27.
- Although it builts upon Photon’s networking engine, you do not need to install anything, since the sample delivers all needed libraries for that
- The sample depends on Steam Audio, which is delivered together with the Unreal Engine so you do not need to install the plugin manually, if you have installed plugins with your Unreal Engine version
Version History
- 0.2
- Extended Documentation
- Small changes to tidy up blueprints
- 0.1
- Initial Release
Sample Map
Below you can see an overview of the map, its areas and what they show:
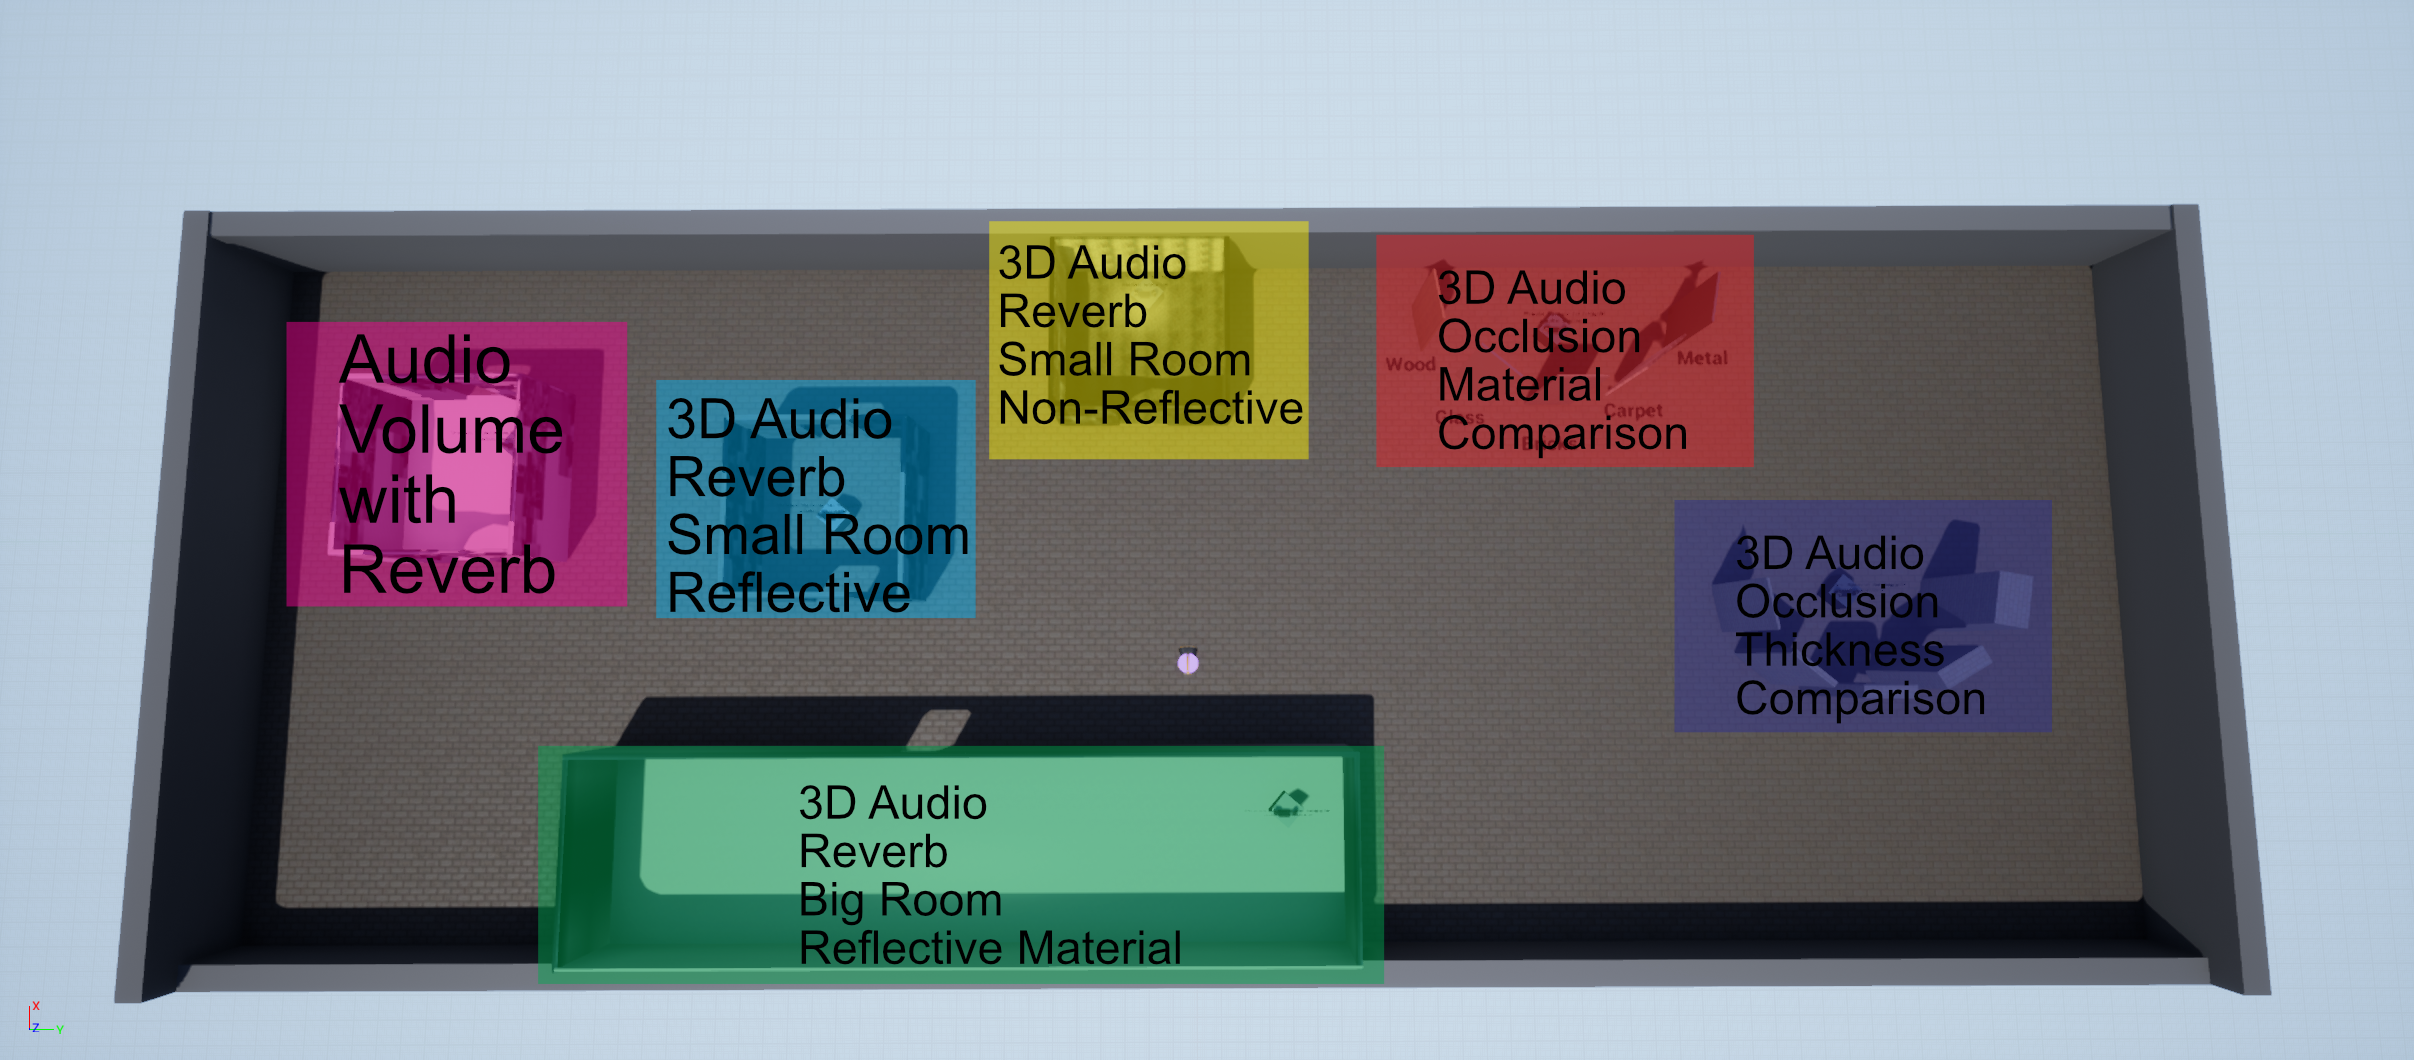
The audio sources in the level have the same attenuation settings as the voice chat and so you can use them to get an idea of what the level does without having to invite someone else to test with you. To turn an audio source on, go near it and then press space on your keyboard.
Project Structure
This guide is written for Unreal Engine version 4.27 as the project is targeted for this version of the engine. You will need to adjust for Unreal Engine 5.0 and above accordingly.
The project is based on the Top Down Example by Epic Games, so most of its structure can be found in this project as well. The code is based on the Unreal Example of Photon with adjustments so that it works for a 3D Game with continuous movement and integrates in the project structure properly.
This document outlines the structure of this sample project and describes how you can achieve similar results in your Unreal project. First we will have a look at the overall folder structure of the project so you can find every asset. Next we will outline the Game Mode, Game Instance and Player Controller classes to create the basic game rules and input methods. After that we describe the Photon Networking of this project and how it replicates the player characters’ positions to all clients before we look at how we incorporate Odin here so that each character gets the correct Odin Media assigned. Lastly we look at the map and see what features of the Unreal Audio Engine are show cased here in which way.
Source Code
As stated, the source code is mostly based on the Unreal Photon Example. To get a basic understanding of what they did to integrate Photon, check out their documentation on the sample. We have integrated the Content of the Top Down Example by Epic Games and made some minor adjustments to the Photon Code.
Firstly, we have changed the UPhotonLBClient - the heart and meat of the Photon integration - to a UActorComponent instead of an AActor. As a consequence we have changed some overridden functions: Tick becomes TickComponent and needs some additional parameters. Additionally, in the constructor we set PrimaryComponentTick.bCanEverTick = true;. Once this is done, we can inherit an Actor Component from this class to more easily integrate it in our Project Structure.
Secondly, we have changed the SetLocalPlayerPos to take 6 instead of 2 floats as inputs. We adjusted the LoadBalancingListener::setLocalPlayerPos() accordingly to send these floats as well and the LoadBalancingListener::customEventAction() function needs to handle the new kind of object as well. Have a look at the LoadBalancingListener.cpp and the PhotonLBClient.h and PhotonLBClient.cpp files in the project to get the complete source code of these adjustments. The rest of the source code stayed as it was in the example.
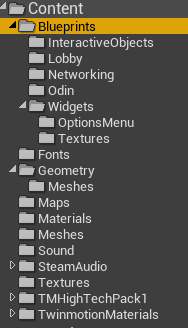
Content Directory
Most of the project’s logic is located inside the Blueprints folder. Other folders hold the needed fonts for texts, meshes, materials and so on. In the Sound folder you can find the used attenuation settings and sound effect assets. Depending on which audio engine you whish to use they may differ from what you need in your project. In order to get an idea of what they do and how the settings affect the audio output of the project you can check out the documentation on Sound in General in the Unreal Engine, and Sound Attenuation in the Unreal Engine specifically as well as Submixes. The Steam Audio Unreal Engine Integration has a pretty helpful documentation on their SDK as well.
The Maps folder holds both the map for the Lobby UI and the default map of the project. The Lobby map simply overrides the standard Game Mode with a Lobby Game Mode that opens the needed UI. The main map is the TopDownExampleMap in here.
In the Blueprint Folder you can find the Game Instance, Game Mode, Player Controller and Player Character Classes - these are the entry points for the engine to our game logic, so we will have a look at them in the next paragraph of this guide.
Next to them you can find folders for each different kind of objects in the project - Interactive Objects holds an Actor for the playback of a simple sound that uses the same attenuation settings as the Odin integration so that you can compare the Odin Audio to the internal sounds directly produced in the engine. In Lobby you can find an additional Game Mode for the Lobby Menu that simply loads the corresponding UI. In Networking you can find everything related to Photon. Odin holds the custom Actor Component we have built for this project as well as some helper classes. Lastly, in the Widgets folder you can find any widget that is used in the project - they are built in a way that they do not need to know of the Odin SDK, so that you do not have to look into these classes. Of course it can make sense for you to copy and paste widgets from the Options Menu for use in your own game as the needed UI for the Odin Options stays the same for each application.
Now that you have an overview of the Project in general, we can have a look at the Standard Game Mode and its related classes.
Game Mode, Game Instance and Player Controller
The Game Mode Top Down Game Mode used in the games main map has almost no logic in it and only defines the used default classes - we have changed the default player controller to the TopDownController class and the default pawn class to TopDownCharacter.
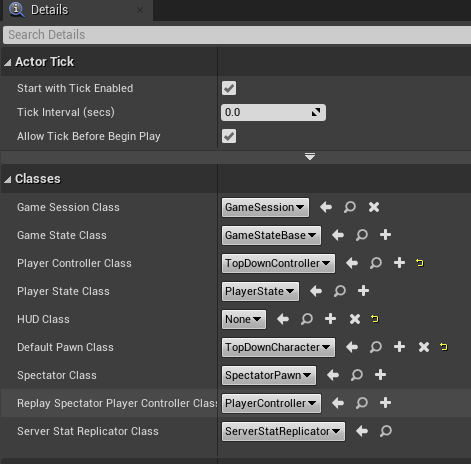
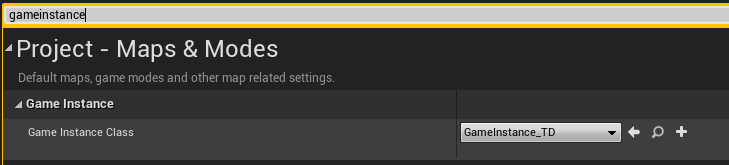
In the project settings (in the main menu bar go to Edit and then Project Settings...) then we needed to change the game instance class to GameInstance_TD in the Maps&Modes category.
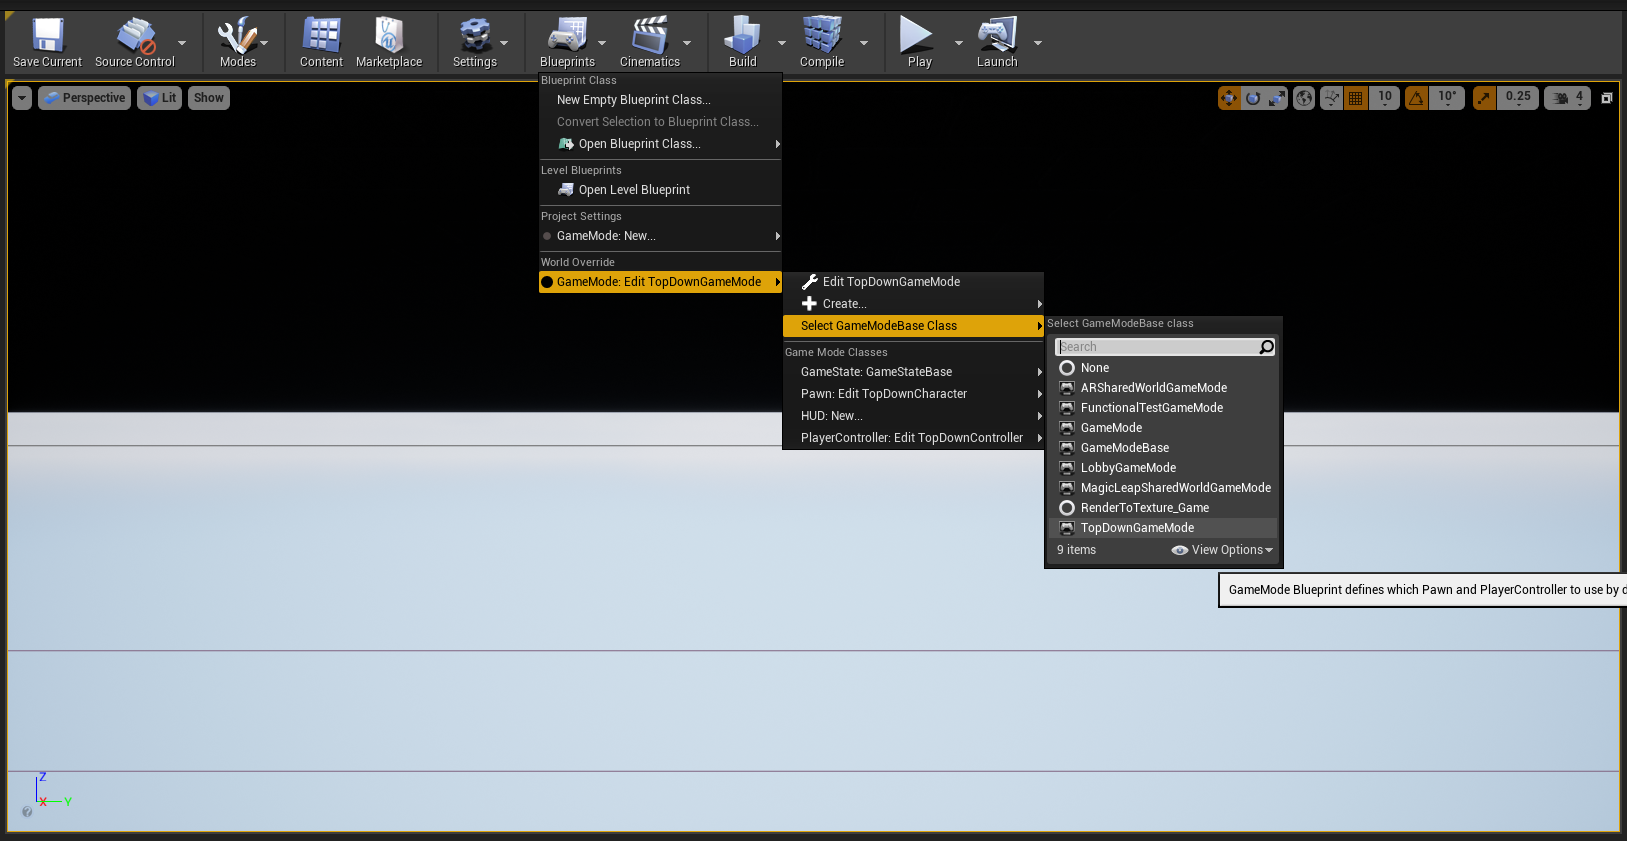
You can also just change your default GameMode here or you can define it on a per-map basis which we did in this project. To do so, open the map, go to Blueprints above the renderer panel and select your game mode under World Overrides -> Game Mode.
The Game Instance has no logic as well - it just holds a string variable Player Name that the player may choose in the Lobby and that needs to be saved when loading the main map. Here it is used to identify a player’s character on other clients - so we will just copy the player name and replicate it to the other clients. We will do so in a minute.
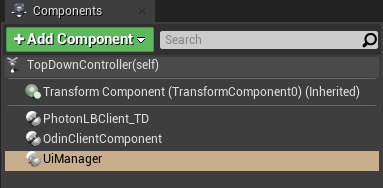
But first we will have a look at the Top Down Controller. The logic in here fully relates to inputs - they allow switching between a top down paradigm to first person perspective and back at any time to help play around with the immersion coming from the 3D Audio.
More important for the Controller are the assigned Components. The PhotonLBClient_TD is our networking component that we will use to replicate player’s movements, OdinClientComponent is the custom Component handling all the logic for the communication with Odin and UiManager simply handles some of the UI shown on screen - in our case it just adds and removes widgets reflecting connected players.
In the next part we will now look at what the Networking Component does exactly.
Photon Component and Networking
The PhotonLBClient_TD class can be found in the Blueprints/Networking folder. It inherits from the UPhotonLBClient Actor Component from the C++ Source Code and thus already has most functionality to communicate with the Photon framework. The Component extends the class to handle our use case - yet it is still agnostic to the Odin Framework and thus implements the Networking Component Blueprint Interface so that other Components can communicate with the implemented networking framework without knowing which one is used exactly. You can easily extend or exchange this component for anything you would like to use in your application.
The Networking Component interface has 4 functions:
Get Own Network Id: Returns an integer representing a unique identifier for the client in the network.Replicate Transform: Takes a transformation (of the local player character) and sends it over the network to all other clients.Leave Network Session: Leaves the current network session and stops replication.Get Actors Map: The Networking Component needs to track references to each actor owned by a client so that you can get an actor of a client by its unique identifier.
Just like the Source Code of the project, the blueprints of this class are based on the sample blueprints of the Photon sample for the Unreal Engine. It has Events that are called from the C++ parent class when a player joins the Photon room, when one player leaves it and when a player changes their position.
Add Player: This is called whenever any client is added. With theLocalflag we can decide what to do with the event. If it is local we just prepare our existing local player character and also start the connection to ODIN from theOdinClientComponent. If it is a non-local client the blueprint creates a player character for that client and assigns it the given photon id and sets it up.Remove Player: This is called whenever any client leaves the session. Here we search the according player character and delete it.Change Player Pos: Retrieves positional and rotational values that we apply to the correct player character.
If you want to exchange the Photon Networking for e.g. the Unreal Networking System you can easily do so by implementing a component that uses corresponding RPC Calls - just have in mind that you will not use advanced systems, like the Networked Movement in the Character Movement Component.
Odin Client Component
The Odin Client Component is the meat and bone of this sample so we will have a detailed look at what it does.
It derives directly from Actor Component and does not implement any interfaces. It has two sets of functions - one for each ODIN room it connects to - remember that we have a proximity chat and a radio chat so that we need to join two ODIN rooms in total. You can either connect to them in the same function and then decide how to handle the different events with the passed Room parameter, or do it like in this sample and break them into two parts.
The Start Connect Custom Event is called once the local player is connected to the Photon room. It is mainly taken from the ODIN Unreal SDK Manual. In summary, we generate a room token with our access key, a room id and a user id. Note, that the Access Key should not be known to the client normally and you should do this on a trusted Web Server instead. For the simplicity of this sample we kept the call on the client though.
Then we construct a local room handle and bind all needed events to appropriate Custom Events (we go through them in a bit). Then we create some User Data - they contain the chosen User Name from the Login Screen and the Network Id from our Photon Component. The Network Id is needed by the other clients so that they can get the correct Player Character from the Photon Component to assign it an Odin Synth Component with the correct Media Stream. Once that is done, we will call the Join Room function and are done with the event. We do this two times in total, once for each Odin Room.
We handle the Room Events in different events:
Peer Joined: This event is called before the media of the other peer is added to the room, so we can setup the player character - we use the network id in the user data and the passed ODIN peer id to create a map on this component, so once we get the media stream with the ODIN id we can get the correct network id and thus correct actor to assign it the stream.Joined Room: This event is called once we join the room ourselves. Here we can create an Audio Capture and from it an ODIN Media Stream that we add to the room afterwards via theAdd Medianode. We also save the Audio Captures of both rooms in a variable to reference them later.Peer Left: This is called when another peer leaves. Here we just print a message in this sample.Media Added: This Event is called when the media stream of another peer is added to the room. It grabs the actors map from our Networking Component and adds anOdin Synth Componentto it, activates it and assigns it the given media stream.
Additionally we have some functionality to adjust the APM Settings of the rooms - this is done in the SetApmSettings event. Also we can open the APM Settings menu with the OpenOptions event and close them with CloseOptions.
Lastly, in the Tick Event we start and stop the Capturing of the Proximity Chat and Radio Chat Audio Captures - depending on whether we press the R Key or not. The RPressed variable is set from the player controller class.
Conclusion
This was a rough rundown of the demo project - to get started in your own project with ODIN you can copy and paste any portions of the project. Also have a look at the ODIN Unreal SDK Manual. Here you have a step by step guide on how to implement the ODIN SDK in your application. On the 4Players Website you get all information on how to integrate ODIN properly.
Unreal, Wwise and ODIN
Integrating ODIN Voice Chat with the Wwise Audio Solution in Unreal.
Introduction
Welcome to this guide on integrating the ODIN Voice Chat Plugin with the Wwise Audio Solution in Unreal. The code used in this guide is available on the ODIN-Wwise Sample Project GitHub Repository.
What You’ll Learn:
- How the
UAkOdinInputComponentscript works and how to use it in your project - Properly set up ODIN in Unreal when using Wwise as audio solution
- Deal with limitations and potential pitfalls
Getting Started
To follow this guide, you’ll need to have some prerequisites:
- Basic knowledge of Unreal as well as Wwise
- The Wwise Plugin for Unreal, which you can get here
- The ODIN Voice Chat Plugin, available here
To set up Wwise in your project, please follow Wwise’s in-depth integration-tutorial. You can find the tutorial here.
To set up the ODIN Voice Chat Plugin, please take a look at our Getting-Started guide, which you can find here:
Begin ODIN Getting Started Guide
This guide will show you how to access the Odin Media Stream and copy it to the Audio Input Plugin of Wwise in order to pass it to the Wwise Audio Engine. This means, we will only cover the receiver-side of the communication - the sender just uses Unreal’s Audio Capture Module and thus is handled no different than any other implementation of Odin in Unreal.
Sample Project
You can find a sample project in a repository in our GitHub account. Feel free to download it and set it up in order to view a working integration of this class in a small sample project. This sample is based on the result of the second video of the Odin tutorial Series.
UAkOdinInputComponent
The UAkOdinInputComponent class is an essential part of the Wwise integration. It replaces the default ODIN UOdinSynthComponent
component, taking over the voice output responsibilities by using Wwise. This script is crucial for receiving voice chat data from the ODIN servers.
The header can be found here and the source file is located here
The UAkOdinInputComponent inherits from Audiokinetic’s AkAudioInputComponent from their Audio Input Plugin. As such it must override the methods FillSamplesBuffer and GetChannelConfig to work with the Wwise Audio Engine. There is a tutorial from Audiokinetic on How to use their Audio Input Plugin in Unreal. The script is a customization of that, replacing the usage of the microphone input by Odin’s Voice Media Stream.
You can either follow the Usage setup to drop the UAkOdinInputComponent directly into your project, or take a look at how it works to adjust the functionality to your requirements.
This is the header:
#include "CoreMinimal.h"
#include "AkAudioInputComponent.h"
#include "AkOdinInputComponent.generated.h"

class OdinMediaSoundGenerator;
class UOdinPlaybackMedia;
UCLASS(ClassGroup=(Custom), BlueprintType, Blueprintable, meta=(BlueprintSpawnableComponent))
class MODULE_API UAkOdinInputComponent : public UAkAudioInputComponent
{
    GENERATED_BODY()

public:
    // Sets default values for this component's properties
    UAkOdinInputComponent(const class FObjectInitializer& ObjectInitializer);

    virtual void DestroyComponent(bool bPromoteChildren) override;

    UFUNCTION(BlueprintCallable, Category="Odin|Sound")
    void AssignOdinMedia(UPARAM(ref) UOdinPlaybackMedia *&Media);

    virtual void GetChannelConfig(AkAudioFormat& AudioFormat) override;
    virtual bool FillSamplesBuffer(uint32 NumChannels, uint32 NumSamples, float** BufferToFill) override;

protected:
    UPROPERTY(BlueprintReadOnly, Category="Odin|Sound")
    UOdinPlaybackMedia* PlaybackMedia = nullptr;
    TSharedPtr<OdinMediaSoundGenerator, ESPMode::ThreadSafe> SoundGenerator;

    float* Buffer = nullptr;
	int32 BufferSize = 0;
};
And this is the source file of the class:
#include "AkOdinInputComponent.h"
#include "OdinFunctionLibrary.h"
#include "OdinPlaybackMedia.h"

UAkOdinInputComponent::UAkOdinInputComponent(const FObjectInitializer& ObjectInitializer) : UAkAudioInputComponent(
	ObjectInitializer)
{
	PrimaryComponentTick.bCanEverTick = true;
}

void UAkOdinInputComponent::AssignOdinMedia(UOdinPlaybackMedia*& Media)
{
    if (nullptr == Media)
        return;

    this->SoundGenerator = MakeShared<OdinMediaSoundGenerator, ESPMode::ThreadSafe>();
    this->PlaybackMedia = Media;

    SoundGenerator->SetOdinStream(Media->GetMediaHandle());
}

void UAkOdinInputComponent::DestroyComponent(bool bPromoteChildren)
{
	Super::DestroyComponent(bPromoteChildren);
	if (nullptr != Buffer)
	{
		delete Buffer;
		Buffer = nullptr;
		BufferSize = 0;
	}
}

void UAkOdinInputComponent::GetChannelConfig(AkAudioFormat& AudioFormat)
{
    AkChannelConfig ChannelConfig;
	ChannelConfig.SetStandard(AK_SPEAKER_SETUP_STEREO);

	// set audio format
	AudioFormat.SetAll(
		48000, // Sample rate
		ChannelConfig, // \ref AkChannelConfig
		8 * sizeof(float), // Bits per samples
		sizeof(float), // Block Align
		AK_FLOAT, // feeding floats
		AK_NONINTERLEAVED
	);
}

bool UAkOdinInputComponent::FillSamplesBuffer(uint32 NumChannels, uint32 NumSamples, float** BufferToFill)
{
    if (!SoundGenerator || !PlaybackMedia)
        return false;

    const int32 RequestedTotalSamples = NumChannels * NumSamples;
	if (BufferSize != RequestedTotalSamples)
	{
		if (nullptr != Buffer)
			delete Buffer;
		Buffer = new float[RequestedTotalSamples];
		BufferSize = RequestedTotalSamples;
	}

	const uint32 Result = SoundGenerator->OnGenerateAudio(Buffer, RequestedTotalSamples);
	if (odin_is_error(Result))
	{
		FString ErrorString = UOdinFunctionLibrary::FormatError(Result, true);
		UE_LOG(LogTemp, Error, TEXT("UAkOdinInputComponent: Error during FillSamplesBuffer: %s"), *ErrorString);
		return false;
	}

	for (uint32 s = 0; s < NumSamples; ++s)
	{
		for (uint32 c = 0; c < NumChannels; ++c)
		{
			BufferToFill[c][s] = Buffer[s * NumChannels + c];
		}
	}


	return true;
}
Remember to adjust the Build.cs file of your game module accordingly. We need to add dependencies to “Odin” obviously, but also “OdinLibrary” is needed for the call to odin_is_error(). From Wwise we need the “AkAudio” and “Wwise” Modules in order to work with the Audio Input Plugin. So all in all add these to your Public Dependency Modules:
PublicDependencyModuleNames.AddRange(
	new string[]
	{
        "Core",
        "Odin",
        "AkAudio",
        "Wwise",
		"OdinLibrary"
	}
	);
Usage
The above class uses the Wwise Audio Input Plugin to pass dynamically created Audio Data to the Wwise Engine. So we will need to set this up in the Wwise Authoring Tool and then use the class in your Game Logic properly.
Creating a Wwise Event
To provide Unreal with the correct Wwise Event you need to add an Audio Input Plugin Source to your Soundbank. An example of this can be found in the sample project. To achieve this, you can follow these steps:
- In the “Audio” tab of the Project Explorer right-click on the wanted work unit of the “Actor-Mixer-Hierarchy” and add a “New Child->Audio Input”.
Wwise Step1
- Make adjustments to it like needed in your project.
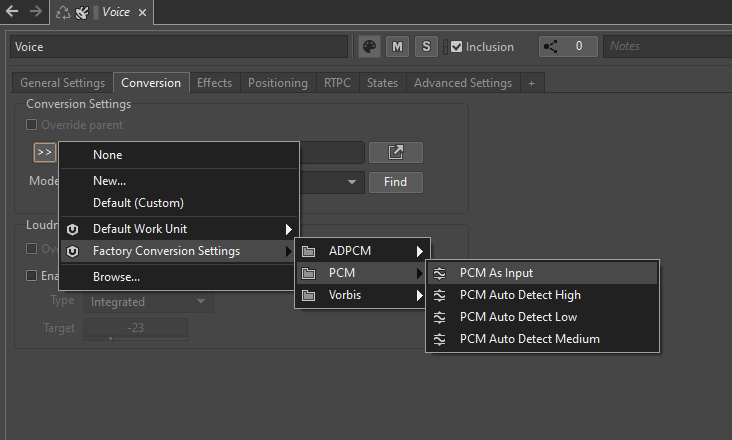
- Make sure to go to the “Conversion” tab in the Contents Editor and set the Conversion to “Factory Conversion Settings->PCM->PCM as Input” by clicking on the “»” button.
Wwise Step2
- Right-click the newly created source and add a “New Event->Play” to it.

Wwise Step3
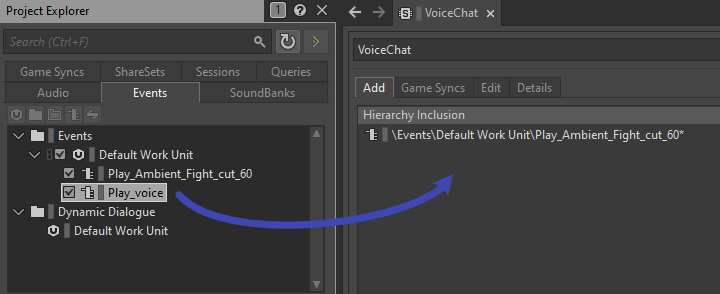
- Lastly you need to add that event to the Soundbank by dragging it from the “Events” tab in the Project Explorer to the Soundbank’s Content Editor.
Wwise Step4
- Export using the Wwise Browser like described in Audiokinetic’s Guide in Unreal and you are good to go!
Integrating the Input Component in your Unreal Project
In the next step we will now use the created event to play back the incoming Odin Media Stream. Again you can find an example of this in the Odin Client Component of the sample project.
First replace the creation of an OdinSynthComponent that you have placed in the Odin Unreal Guide in your project with the new AkOdinInputComponent.
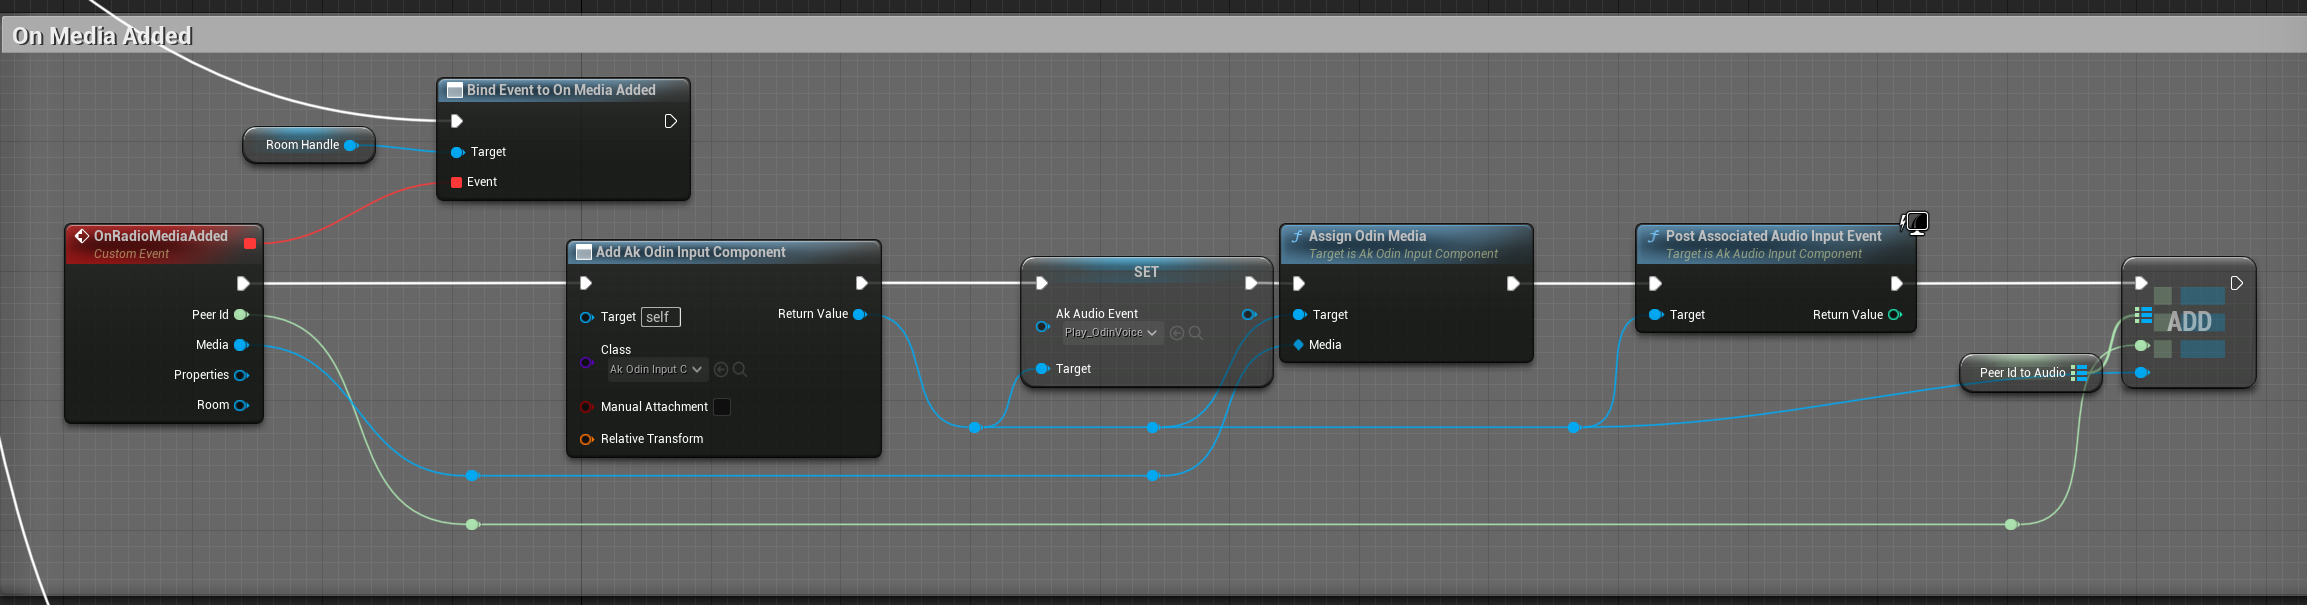
In the OnMediaAdded event of your Odin implementation in your project you can then set the AkAudioEvent of the created AkOdinInputComponent to the Wwise Event that we imported earlier. Call the Assign Odin Media function that we have declared in the C++ class and pass it the reference to the incoming Media Stream and lastly call PostAssociatedAudioInputEvent. It is important to use that function from the AkAudioInputComponent since any other “Post Event” function will not work with the Wwise Audio Input Plug-in. You can see a sample of the Blueprint implementation below:
Setup for the OnMediaAdded event
Like with the OdinSynthComponent, you can also choose to place the AkOdinInputComponent directly on the Player Character as a component and then reference it in your OnMediaAdded event handler. This way you do not have to create it in the Blueprint and it is easier to change its properties - e.g. its Wwise-specific (attenuation) settings.
How it works
The above class uses the Wwise Audio Input Plugin to pass dynamically created Audio Data to the Wwise Engine. It copies the incoming Audio Stream from Odin to the Input Buffer of the Audio Input Component by Wwise. This is done by inheriting from the UAkAudioInputComponent and overriding the respective methods.
1. Setup
The setup of the UAkOdinInputComponent is done by passing it a reference to the incoming Odin Media Stream. In this guide we have done this via a Blueprint call, but the method can also be called from another C++ Class in your game module.
This method creates a new pointer to a new OdinMediaSoundGenerator and sets its OdinStream to the incoming Media’s handle.
Next, the Wwise Audio Input Plug-In asks for the Channel Configuration, calling GetChannelConfig (this is done from the Wwise Audio Engine, so we do not need to take care of calling this function). Here we set the Audio Format of the AkAudioComponent to a new format with 48k sample rate and non-interleaved floats.
2. Reading and Playing Back ODIN Audio Streams
The FillSamplesBuffer function is called from the Wwise Audio Input Plug-in whenever the playback requests more data for its buffer.
Here the AkOdinInputComponent calls the OnGenerateAudio function of the OdinMediaSoundGenerator. The generated sound is copied into the Buffer.
If any error occurs in that call, the function will return without copying anything and tell the Wwise Audio Plugin that it failed to capture more samples.
Since Wwise only accepts float samples only as non-interleaved data (see here for reference) and the OdinMediaSoundGenerator provides it as interleaved, we need to sort it accordingly into the BufferToFill. This is done with the nested for-loops at the end of the function.
Lastly, if everything worked as expected the function returns true to let Wwise know it can now use the BufferToFill.
Conclusion
This simple implementation of an Odin to Wwise adapter for Unreal is a good starting point to give you the control over the audio playback that you need for your Odin Integration in your project. Feel free to check out the sample project in our public GitHub and re-use or extend any code to fit your specific needs.
This is only a starting point of your Odin Integration with Wwise and the Unreal Engine. Feel free to check out any other learning resources and adapt the material like needed, e.g. create realistic or out of this world dynamic immersive experiences with Wwise Spatial Audio aka “proximity chat” or “positional audio”: