ODIN Unity Guides
Welcome to 4Players ODIN, our next-generation, real-time, zero maintenance, highest quality voice solution deeply integrated into Unity. Thank you very much for your interest in ODIN and for the time you’ll spend figuring out if ODIN is the best solution for your game. We are sure it is, and therefore we have made our best to provide extensive documentation to get you started quickly.
In this document we provide guides and reference documentation for Unity.
Getting Started
4Players ODIN is deeply integrated into Unity and supports all major platforms. A couple of components are enough to add real-time voice communication to your game in no time. Please note, that ODIN requires Unity 2019.4 or any later version. We also support Apple Silicon, however right now this only works with the latest Unity version with native Apple Silicon support.
Getting Started
We have compiled a couple of Getting Started Guides to get you started quickly.
Unity video tutorial series
Watch our Unity video tutorial series
Written guides


General Guides
A couple of concepts apply to all game engines and platforms and it’s important to understand those, especially when going into production.
- Understanding Access Keys is an important part later when moving your game to production. Read this guide to understand how we use access keys and how they work in detail.
Basic Event Handling
Events in ODIN allow you to quickly customize the implementation of voice in your game or application.
Basic application flow
Have a look at this application flow of a very basic lobby application. Events that you need to implement are highlighted in red.
Handling Notifications to users
Many applications notify users that other users have left or joined the room. If you show these notifications
whenever a PeerJoined event is incoming, you’ll show a notification for every user that is already connected to
the user. If you just want to notify users of changes after they have connected the room you have two options:
- The property Self
of the Room
is set in the
RoomJoinedevent. If this property is notnullthen you can be sure, that the event indicates a change after the user connected - You can set a local
Booleanproperty in your class that isfalseper default and is set totruein theRoomJoinedevent. In yourPeerJoinedevent you can check if this property is true or not. Only show notifications if this property is set totrue
Example Implementation
We have created a simple showcase demo in Unity. The idea is, that you need to find other players in a foggy environment just by their voice. We leverage ODINs built-in 3D positional audio that typically attaches the voice to player game objects so that their voice represents their location in 3D space - they are louder if close, and you might not hear them if they are far away. If they don’t find each other they can use a walkie-talkie like functionality to talk to other players independently of their 3D location.
In the first step, we implement that basic walkie-talkie functionality by implementing these events: OnMediaAdded , OnMediaRemoved and OnRoomLeft .
Walkie-Talkie
This simple example works like that:
- All users are connected to the same ODIN room named “WalkieTalkie1”
- We provide an AudioMixerGroup with some audio effects added to the voice of other users, so they sound a bit distorted
- In our example, the local player object is controlled by a
PlayerControllerscript that has awalkieTalkiemember variable that references a walkie-talkie mesh of the player character (see image below). - A singleton
GameManagerinstance handles creation of player objects and manages them. We use this class instance to get hold of our local player object to get a reference to the walkie-talkie game object that we need in the next step. - Whenever another user connects a room, we handle the OnMediaAdded event and attach a PlaybackComponent to this walkie talkie mesh. Therefore, all audio sent by other players voice is coming out of this walkie talkie mesh.
The simplest way to do that is to create a new class in Unity (in our example we name it OdinPeerManager) and to
implement that callback functions there. Then, either create an empty GameObject in your scene and attach the
OdinPeerManager component to it or attach the OdinPeerManager directly to the ODIN Manager prefab that you
already have in your scene and use inspector of the Odin Manager prefab to link the events of the ODIN SDK to your own implementation.
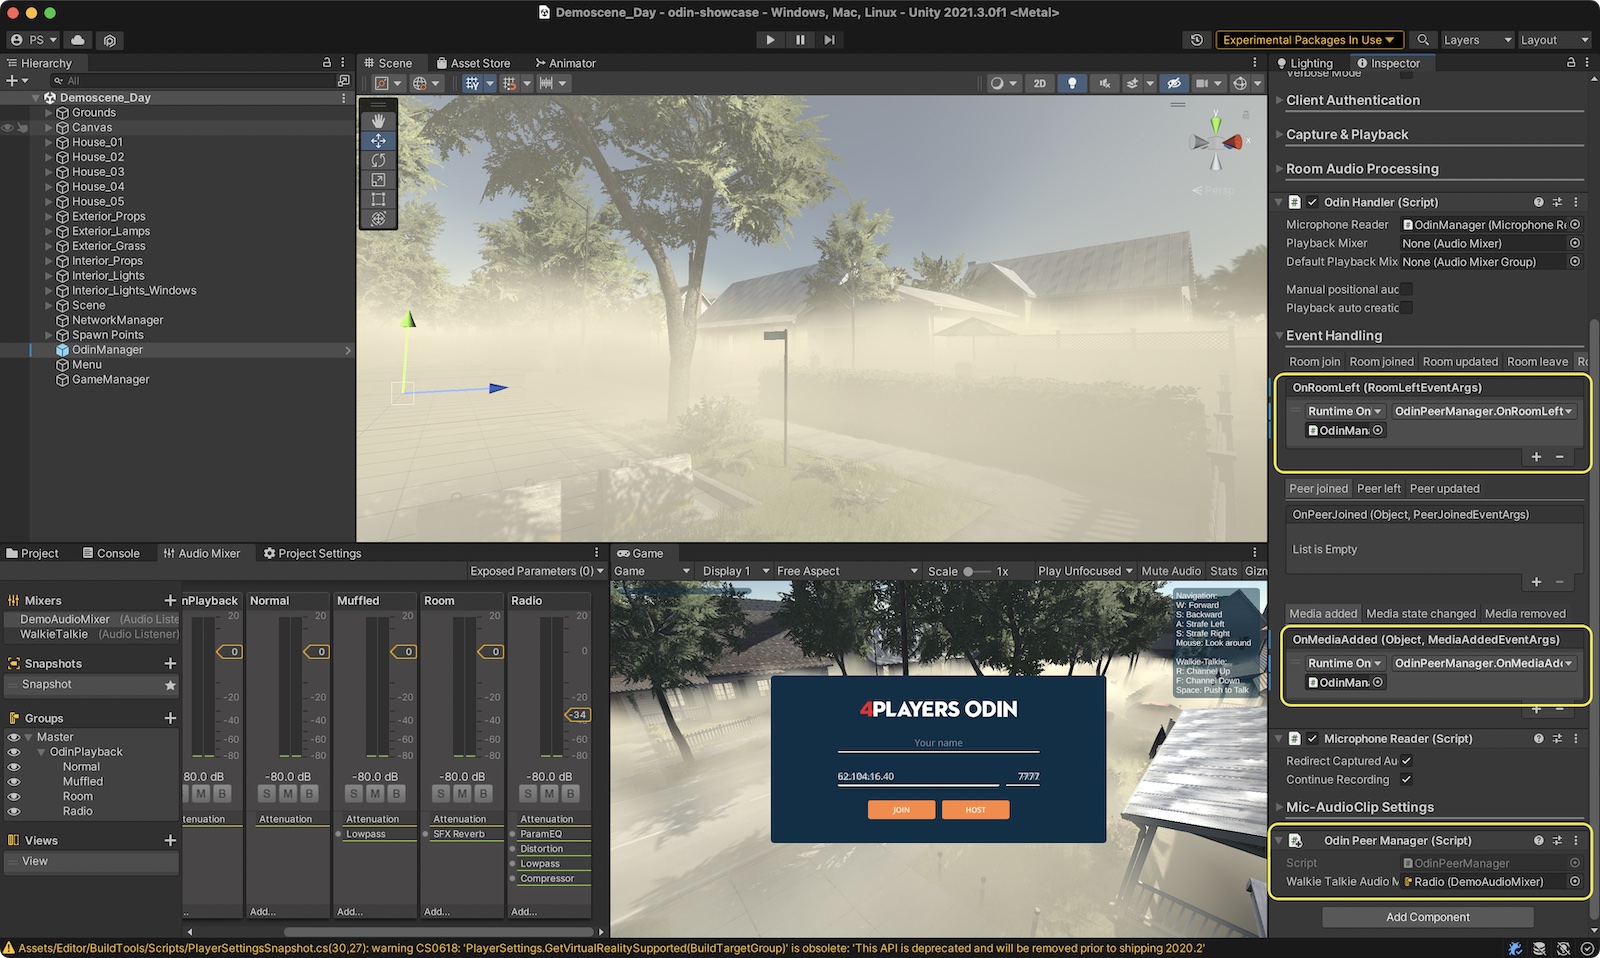
Our OdinPeerManager added to our scene.
This is the player mesh we used in our ODIN example showcase. It’s Elena from the Unity Asset Store that looks stunning and is very easy to use. Highlighted is the walkie-talkie game object that is used to realistically attach all other players voice to this object. Therefore, other players will hear walkie-talkie sound coming out of this players walkie-talkie as you would in real life.
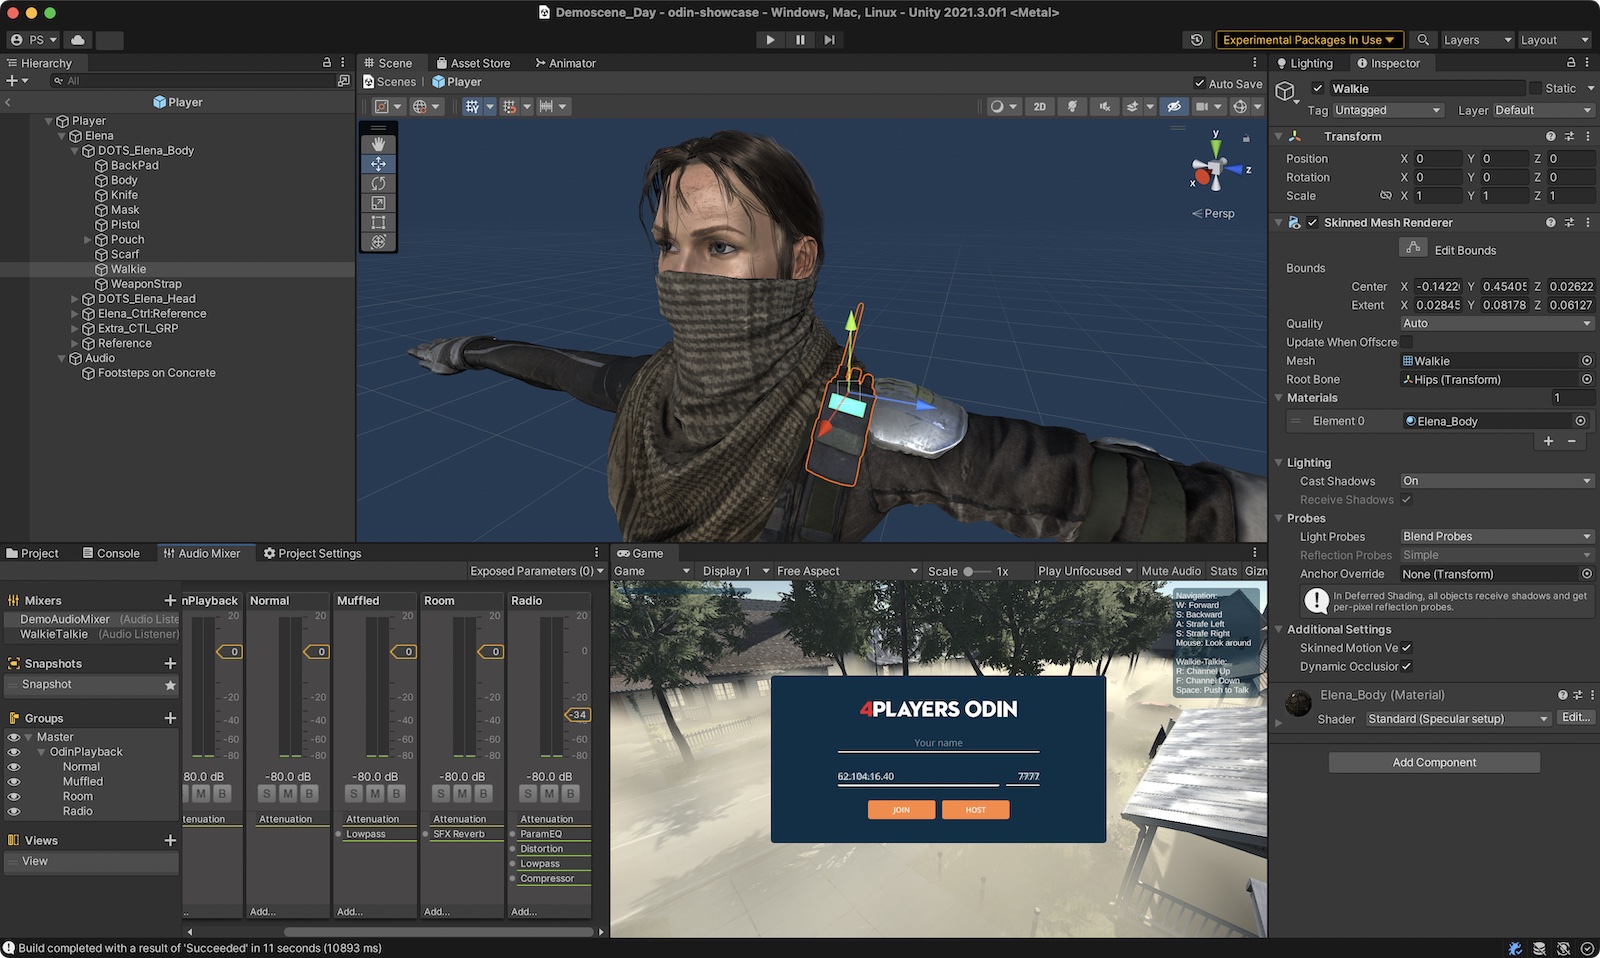
This is the Elena Soldier Model from the Unity Asset Store that we used in our demo
The final implementation of our OdinPeerManager implementing what we have defined above looks like this:
using OdinNative.Odin.Room;
using OdinNative.Unity.Audio;
using UnityEngine;
using UnityEngine.Audio;

public class OdinPeerManager : MonoBehaviour
{
    [ToolTip("Set to an audio mixer for radio effects")]
    public AudioMixerGroup walkieTalkieAudioMixerGroup;

    private void AttachWalkieTalkiePlayback(GameObject gameObject, Room room, ulong peerId, ushort mediaId)
    {
        // Attach the playback component from the other player to our local walkie talkie game object
        PlaybackComponent playback = OdinHandler.Instance.AddPlaybackComponent(gameObject, room.Config.Name, peerId, mediaId);

        // Set the spatialBlend to 1 for full 3D audio. Set it to 0 if you want to have a steady volume independent of 3D position
        playback.PlaybackSource.spatialBlend = 0.5f; // set AudioSource to half 3D
        playback.PlaybackSource.outputAudioMixerGroup = walkieTalkieAudioMixerGroup;
    }

    public void OnRoomLeft(RoomLeftEventArgs eventArgs)
    {
        Debug.Log($"Room {eventArgs.RoomName} left, remove all playback components");

        // Remove all Playback Components linked to this room
        OdinHandler.Instance.DestroyPlaybackComponents(eventArgs.RoomName);
    }

    public void OnMediaRemoved(object sender, MediaRemovedEventArgs eventArgs)
    {
        Room room = sender as Room;
        Debug.Log($"ODIN MEDIA REMOVED. Room: {room.Config.Name}, MediaId: {eventArgs.Media.Id}, UserData: {eventArgs.Peer.UserData.ToString()}");

        // Remove all playback components linked to this media id
        OdinHandler.Instance.DestroyPlaybackComponents(eventArgs.Media.Id);
    }

    public void OnMediaAdded(object sender, MediaAddedEventArgs eventArgs)
    {
        Room room = sender as Room;
        Debug.Log($"ODIN MEDIA ADDED. Room: {room.Config.Name}, PeerId: {eventArgs.PeerId}, MediaId: {eventArgs.Media.Id}, UserData: {eventArgs.Peer.UserData.ToString()}");

        // Another player connected the room. Find the local player object and add a PlaybackComponent to it.
        // In multiplayer games, player objects are often not available at runtime. The GameManager instance handles
        // that for us. You need to replace this code with your own
        var localPlayerController = GameManager.Instance.GetLocalPlayerController();
        if (localPlayerController && localPlayerController.walkieTalkie)
        {
            AttachWalkieTalkiePlayback(localPlayerController.walkieTalkie, room, eventArgs.PeerId, eventArgs.Media.Id);
        }
    }
}
What’s left is that we need to join the room once the game starts. We do that in our PlayerController script.
public class PlayerController : MonoBehaviour
{
    // Join the room when the script starts (i.e. the player is instantiated)
    void Start()
    {
        OdinHandler.Instance.JoinRoom("WalkieTalkie1");
    }

    // Leave the room once the player object gets destroyed
    void OnDestroy()
    {
        OdinHandler.Instance.LeaveRoom("WalkieTalkie1");
    }
}
Switching channels
Walkie-talkies allow users to choose a channel so not everyone is talking on the same channel. We can add this functionality with a couple lines of code. The only thing we need to do is to leave the current room representing a channel and to join another room. That’s it.
ODIN rooms are represented by its name. Nothing more. There is no bookkeeping required. Choose a name that makes sense for your application and join that room.
public class PlayerController : MonoBehaviour
{
    // The current walkie-talkie channel
    public int channelId = 1;

    // Create a room name of a channel
    string GetOdinRoomNameForChannel(int channel)
    {
        return $"WalkieTalkie{channel}";
    }

    // Join the room when the script starts (i.e. the player is instantiated)
    void Start()
    {
        UpdateOdinChannel(channelId);
    }

    // Leave the room once the player object gets destroyed
    void OnDestroy()
    {
        OdinHandler.Instance.LeaveRoom(GetOdinRoomNameForChannel(channelId));
    }

    // Leave and join the corresponding channel
    private void UpdateOdinChannel(int newChannel, int oldChannel = 0)
    {
        if (oldChannel != 0)
        {
            OdinHandler.Instance.LeaveRoom(GetOdinRoomNameForChannel(oldChannel));
        }

        OdinHandler.Instance.JoinRoom(GetOdinRoomNameForChannel(newChannel));
    }

    // Check for key presses and change the channel
    void Update()
    {
        if (Input.GetKeyUp(KeyCode.R))
        {
            int newChannel = channelId + 1;
            if (newChannel > 9) newChannel = 1;
            UpdateOdinChannel(newChannel, channelId);
        }

        if (Input.GetKeyUp(KeyCode.F))
        {
            int newChannel = channelId - 1;
            if (newChannel < 1) newChannel = 9;
            UpdateOdinChannel(newChannel, channelId);
        }
    }
}
That’s it. You don’t need to change anything in the OdinPeerManager as we already handle everything. If we switch
the room, we first leave the current room, which triggers the OnRoomLeft
event. As we implemented
that event callback we just remove all PlaybackComponent
objects linked to this room - i.e. there
will be no PlaybackComponent
objects anymore linked to our walkie-talkie game object.
Next, we join the other room. For every player that is sending audio in this channel. we’ll receive the OnMediaAdded event which will again create PlaybackComponent objects to our walkie-talkie game object.
3D Positional Audio
As described above, in our example we have two layers of voice: walkie-talkie that we have just implemented and 3D positional audio for each player.
Adding the second layer requires two things:
- Joining another room when the game starts. Yes, with ODIN you can join multiple rooms at once and our SDK and servers handle everything automatically for you.
- Changing the OnMediaAdded callback to handle 3D rooms differently than Walkie-Talkie rooms.
Joining the world room
All players running around in our scene join the same room, we simply call it “World”. So, we adjust our current
Start implementation in PlayerController:
public class PlayerController : MonoBehaviour
{
    // ...

    // Join the room when the script starts (i.e. the player is instantiated)
    void Start()
    {
        UpdateOdinChannel(channelId);

        // Join the world room for positional audio
        OdinHandler.Instance.JoinRoom("World");
    }

    // Leave the room once the player object gets destroyed
    void OnDestroy()
    {
        OdinHandler.Instance.LeaveRoom(GetOdinRoomNameForChannel(channelId));

        // Leave the world room
        OdinHandler.Instance.LeaveRoom("World");
    }

    // ...
}
Adjusting OnMediaAdded
That’s it. We now have joined the world room. What happens now is, that all players voice is attached to our walkie-talkie. Which is not what we want. We want to have the other players walkie-talkies attached to our walkie-talkie, but the other players “world-voice” we want to attach to the corresponding players in the scene so that their voice position is identical to their position in the scene.
Our current implementation on OnMediaAdded looks like this:
public class OdinPeerManager : MonoBehaviour
{
    // ...

    public void OnMediaAdded(object sender, MediaAddedEventArgs eventArgs)
    {
        Room room = sender as Room;
        Debug.Log($"ODIN MEDIA ADDED. Room: {room.Config.Name}, PeerId: {eventArgs.PeerId}, MediaId: {eventArgs.Media.Id}, UserData: {eventArgs.Peer.UserData.ToString()}");

        // Another player connected the room. Find the local player object and add a PlaybackComponent to it.
        // In multiplayer games, player objects are often not available at runtime. The GameManager instance handles
        // that for us. You need to replace this code with your own
        var localPlayerController = GameManager.Instance.GetLocalPlayerController();
        if (localPlayerController && localPlayerController.walkieTalkie)
        {
            AttachWalkieTalkiePlayback(localPlayerController.walkieTalkie, room, eventArgs.PeerId, eventArgs.Media.Id);
        }
    }

    // ...
}
Depending on the room where the media is added we need to handle things differently. If it’s a walkie-talkie room, we add the PlaybackComponent representing the other players voice to the local players walkie-talkie. This is what we have implemented today. But if it’s the world room, we need to attach the PlaybackComponent to the game object representing the player in the scene.
public class OdinPeerManager : MonoBehaviour
{
    // ...

    // Create and add a PlaybackComponent to the other player game object
    private void AttachOdinPlaybackToPlayer(PlayerController player, Room room, ulong peerId, ushort mediaId)
    {
        PlaybackComponent playback = OdinHandler.Instance.AddPlaybackComponent(player.gameObject, room.Config.Name, peerId, mediaId);

        // Set the spatialBlend to 1 for full 3D audio. Set it to 0 if you want to have a steady volume independent of 3D position
        playback.PlaybackSource.spatialBlend = 1.0f; // set AudioSource to full 3D
    }

    // Our new OnMediaAdded callback handling rooms differently
    public void OnMediaAdded(object sender, MediaAddedEventArgs eventArgs)
    {
        Room room = sender as Room;
        Debug.Log($"ODIN MEDIA ADDED. Room: {room.Config.Name}, PeerId: {eventArgs.PeerId}, MediaId: {eventArgs.Media.Id}, UserData: {eventArgs.Peer.UserData.ToString()}");

        // Check if this is 3D sound or Walkie Talkie
        if (room.Config.Name.StartsWith("WalkieTalkie"))
        {
            // A player connected Walkie Talkie. Attach to the local players Walkie Talkie
            var localPlayerController = GameManager.Instance.GetLocalPlayerController();
            if (localPlayerController && localPlayerController.walkieTalkie)
            {
                AttachWalkieTalkiePlayback(localPlayerController, room, eventArgs.PeerId, eventArgs.Media.Id);
            }
        }
        else if (room.Config.Name == "World")
        {
            // This is 3D sound, find the local player object for this stream and attach the Audio Source to this player
            PlayerUserDataJsonFormat userData = PlayerUserDataJsonFormat.FromUserData(eventArgs.Peer.UserData);
            PlayerController player = GameManager.Instance.GetPlayerForOdinPeer(userData);
            if (player)
            {
                AttachOdinPlaybackToPlayer(player, room, eventArgs.PeerId, eventArgs.Media.Id);
            }
        }
    }

    // ...
}
If the room a media is added is a “WalkieTalkie” room, we use the same implementation used before. However, if it’s
the world room, we need to find the corresponding player game object in the scene and attach the PlaybackComponent
to it. We also set spatialBlend
to 1.0 to activate 3D positional audio,
that is Unity will handle 3D audio for us automatically.
This guide should show you how to do the basic and required event handling. We don’t go into much detail how to merge your multiplayer framework with ODIN. Depending on the multiplayer framework there are different solutions on how to do that. We show a typical solution in our Mirror Networking guide and have an open-source example available for Photon.
Adding ODIN to existing Unity Projects
David Liebemann at SciCode Studio added ODIN to an existing multiplayer game - the Photon Fusion Tanknarok sample - to showcase the steps you need to take to integrate ODIN’s proximity voice chat to your own multiplayer application. Using these tips you can easily add voice chat to your game even after release!
The Unity project is open source and available as a Github repository. You can download the binaries to test it here:
Integrating ODIN into an existing multiplayer project
In this guide we’ll show you how to integrate ODIN into an existing multiplayer project. We’ll use the Photon Fusion Tanknarok project as a base multiplayer project without any Voice Chat. In just a few steps you’ll learn how to take your project to the next level by integrating ODIN and adding proximity voice chat.
Photon Fusion is a multiplayer framework used in many Unity games. We use it and the Tanknarok Sample Project to give you an idea of how you can integrate ODIN into an existing, fully functional project. The same principles will of course also work for projets developed with Mirror or Unity Netcode. We’ve even created a guide showing you how to set up a simple Mirror multiplayer game with ODIN integration.
If you’re completely new to ODIN and would like to learn more about our features and what makes us special, take a look at our introduction.
Project Setup
First, we’ll download the base project from the project website. Choose the most up to date version - we’ve used Version 1.1.1 - download and then unzip the project files. We can then open the project using the Unity Hub. Just select Open and navigate to the folder that contains the project files.
Important: You need to select the directory that contains the Assets, Packages and ProjectSettings directories, otherwise the Unity Hub won’t recognize it as a valid project.
Select the Editor version you’d like to use and confirm the Change Editor version? prompt. Please note that ODIN requires Unity version 2019.4 or later, but the Tanknarok project was created in 2020.3.35f1 - so we’ll need to use that or any later version. In this guide we used version 2021.3.9f1.
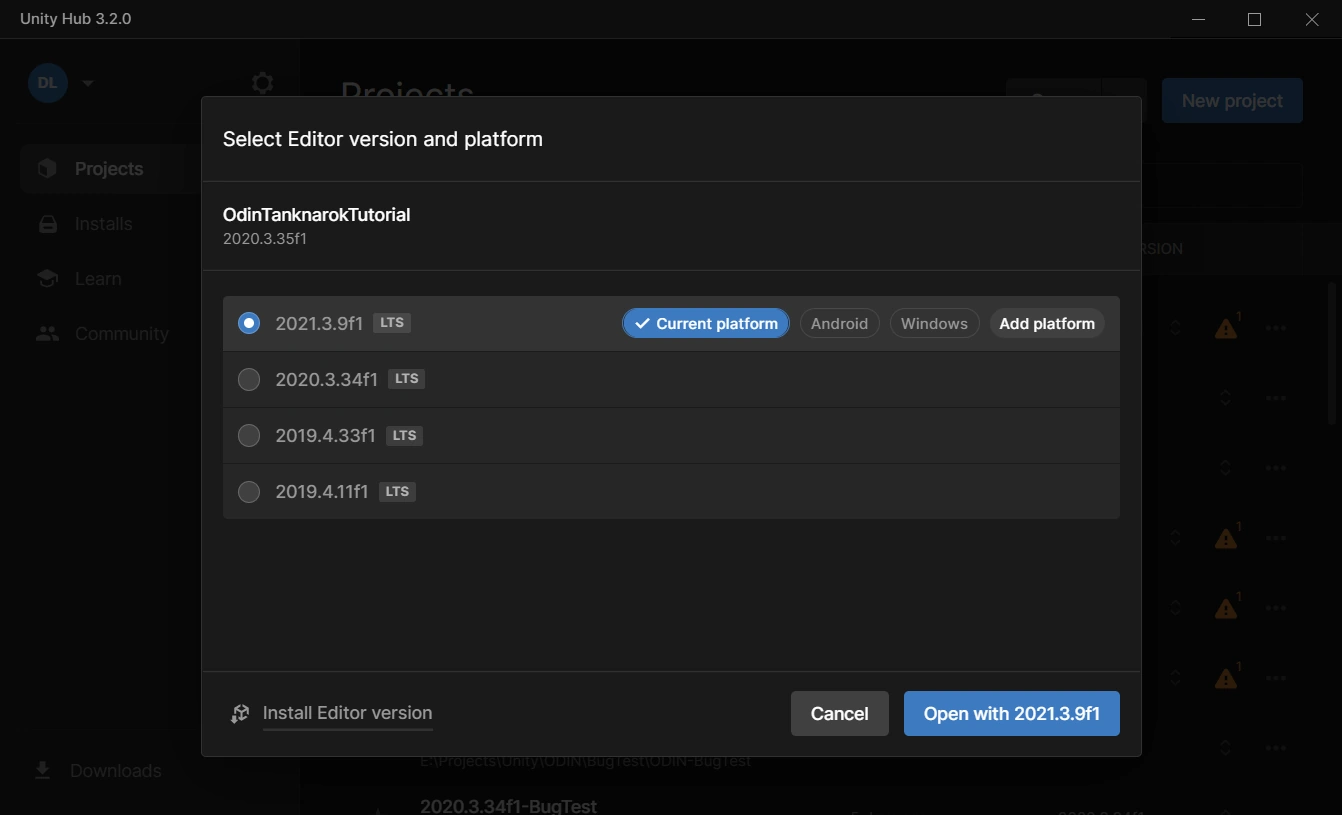
Create a new project with the Unity Hub.
If you see another prompt Opening Project in Non-Matching Editor Installation, click the Continue button to convert your project.
After opening up, you’ll be greeted by the Welcome to Photon Fusion prompt, asking you to supply your Fusion App Id. This is required for Photon multiplayer to work. Don’t worry, Photon allows a small contingent of 20CCU for test projects, so you won’t be billed anything during development. Open up the Dashboard and select the Create a new app button. When prompted for a Photon Type, select Fusion. Finally, copy the App ID of your newly created Application into the field in the Unity Editor and press enter. You should see a small, green check mark, confirming your successful Fusion setup.
If you’ve accidentally closed the Photon Fusion Hub you can open it up again by selecting Fusion > Fusion Hub from the Unity Editor menus or press Alt+F.
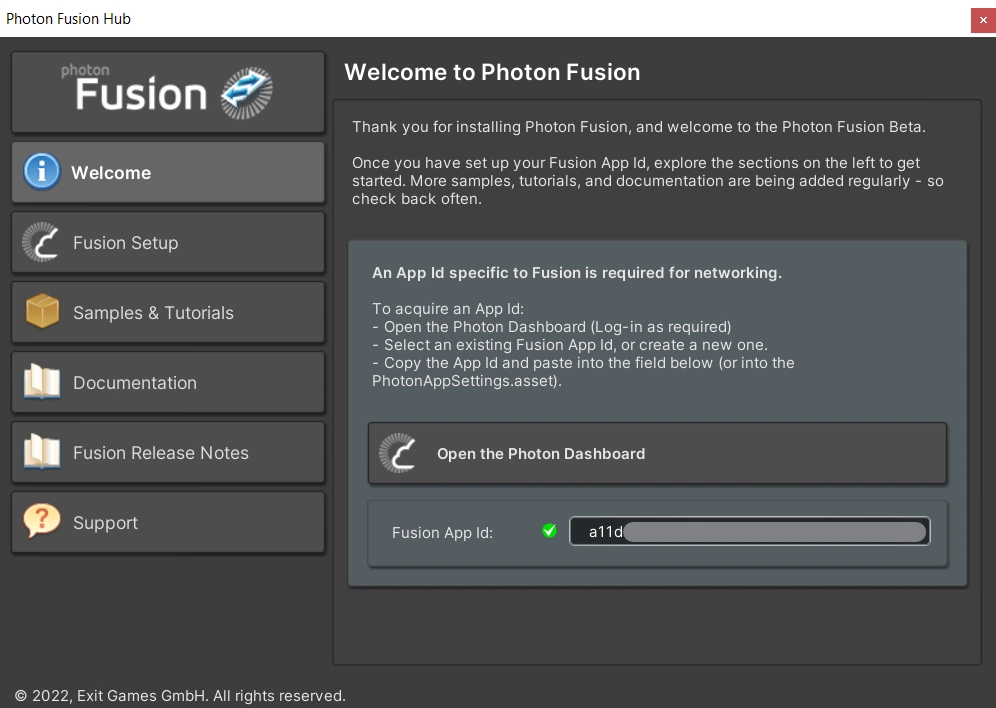
The Photon Hub with a valid Fusion Id.
Great - now we’ve got the base project set up, let’s take a look at the interesting stuff: Getting Voice Chat into a game.
ODIN installation
First, let’s install ODIN into our project. ODIN can be imported using either a .unitypackage or by using Unity’s Package Manager and Git. We recommend the package manager, because it is easier to keep ODIN up to date. If you don’t have Git set up, you can still fall back to the Unity package.
Package Manager
Select Window > PackageManager to open up Unity’s package manager. In the top left, select the + symbol to add a new package and select Add package from git URL. Use the URL
https://github.com/4Players/odin-sdk-unity.git
and select Add. The Package Manager will now download the newest release and resolve any dependencies.
Unity Package
Download the latest ODIN version as a .unitypackage from https://github.com/4Players/odin-sdk-unity/releases. Use the Assets > Import Package > Custom Package... option and navigate to the downloaded file. Make sure that all Assets are selected and press Import.
Quick Setup
Next, we’ll perform the basic setup for ODIN. Let’s open the MainScene in the directory Assets > Scenes. This is the startup scene in which Fusion lets you choose the Network Modes. This scene will also persist in all other scenes - any lobby or gameplay scenes will be loaded in addition to the main scene.
In this scene we will now add the OdinManager prefab. This prefab contains scripts which handle communication with ODIN servers and allow you to adjust settings. You can find all ODIN files under Packages > 4Players ODIN in the Project Window. Navigate to Packages > 4Players ODIN > Runtime and drag the OdinManager into the scene. Your Scene should now look something like this:

The OdinManager in the Main Scene.
For ODIN to work, we need an Access Key. Select the OdinManager object in the scene and open the Client Authentication drop-down in the Inspector window. ODIN is free to use for up to 25 concurrent users, without requiring an account. Simply press the Manage Access button, click on Generate Access Key and we’re good to go.
We’ll do a quick test to see if everything was set up correctly. Let’s create a new folder ODIN in the Assets directory and then add the new script OdinConnectionTest. This script will contain the following:
public class OdinConnectionTest : MonoBehaviour
{
    [SerializeField] public string roomName;
    void Start()
    {
        OdinHandler.Instance.JoinRoom(roomName);
    }
}
We use the OdinHandler.Instance singleton to join an ODIN room with the name given by the field roomName. The OdinHandler
script is the main entry point for interacting with the ODIN Api, persists through scene changes and can be accessed anywhere in your code by using OdinHandler.Instance.
Every client connects to an ODIN server, authenticates with an access token and joins a room. Once the client has joined a room, they are a peer inside the ODIN room. Every peer can add a media stream to that room to transmit their microphone input. Clients can join multiple rooms at the same time and can add multiple media streams at the same time.
Only clients in the same room can actually hear each other, so you can implement features like a global voice chat for all players and sepearte team voice chats, in which only members of the same team can communicate which each other.
To find more information on the basic ODIN topology, take a look at the Basic Concepts documentation.
For now, we only want to join a room, so the OdinConnectionTest script is enough for our purposes. Let’s create a new empty GameObject in the scene hierarchy and add the OdinConnectionTest component to it. Finally, enter a creative room name (like “Test”) and our test setup is complete. Your project should now look something like this:
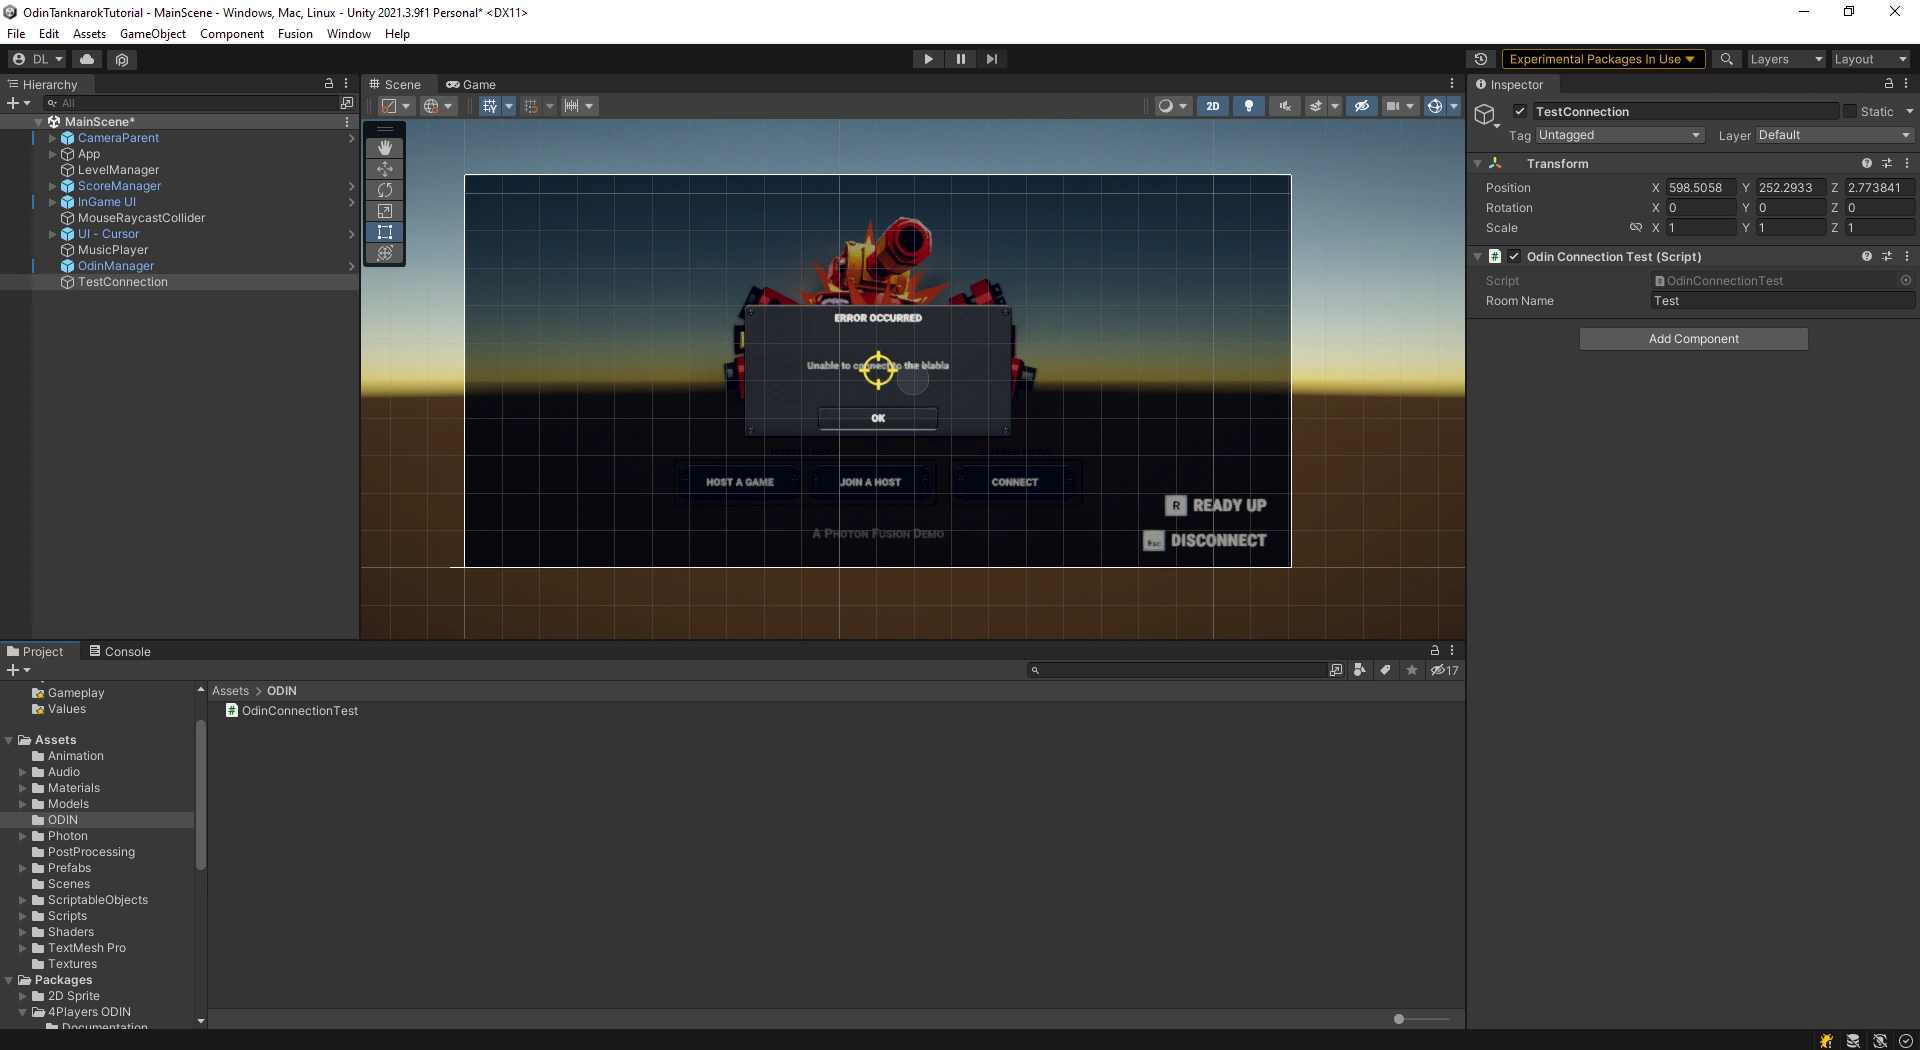
Our test scene.
To test the project, we’ll need create a Build and run it in parallel to the editor. This way we can test everything on the same computer. Press Ctrl+Shift+B or use the File > Build Settings... menu to show the Build Settings window. Make sure that the MainScene, Lobby, Level1 and Level2 scenes are shown and selected in the build list. Click on Build And Run, select a directory in which your binaries will be created and wait until the Build was started. Switch to the Editor, press play and you should now be able to hear your own voice transmitted via ODIN.
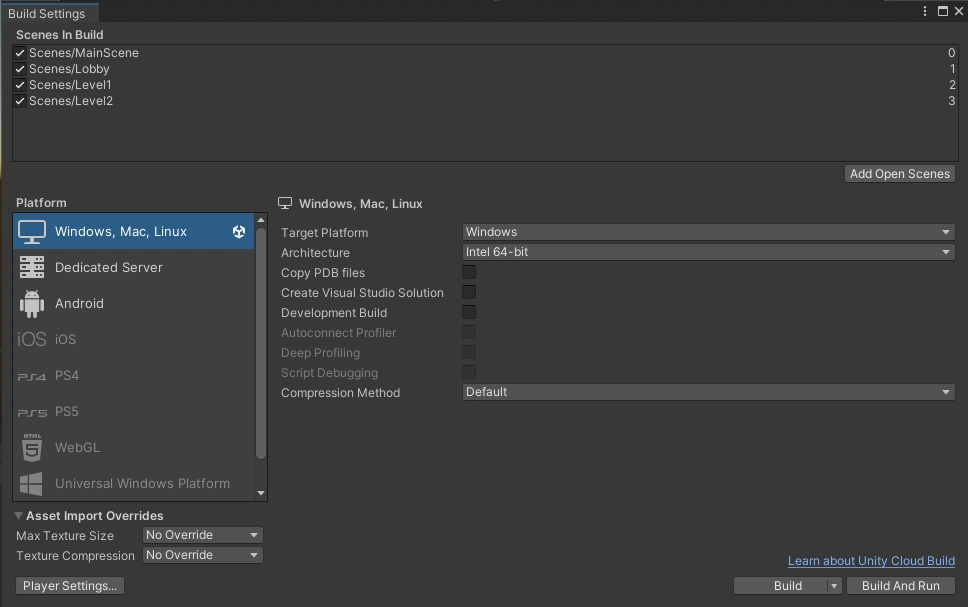
The Build Settings for testing our voice chat locally.
Congratulations, you’ve officially added Voice Chat to a Multiplayer Game! But right now it doesn’t matter where the players are positioned - in fact, we can hear all players in the Start Screen, without having to enter the game. In a real game this would probably become quite chaotic quite fast, so let’s improve that and switch to a Proximity Voice Chat.
Proximity Voice Chat
Joining and leaving
First, let’s remove the TestConnection object from the MainScene, we won’t need it anymore. Instead, we’ll use the Player object itself to control when to join or leave a room. Because the Player object is automatically instantiated in the scenes that should allow Voice Chat - i.e. in the lobby and the gameplay levels - it’s the perfect fit for us.
You can find the Player prefab in Assets > Prefabs > Game > PlayerTank. Let’s create a new script called OdinLocal and add it to the PlayerTank prefab root. This script will from now on handle joining and leaving the room.
Just as before we’ll create a string field to allow us to define the room name and join the ODIN room in Start(), but we’ll also leave the room in OnDestroy(). Now the voice chat will only be active in the lobby and gameplay levels. But because the PlayerTank is instantiated for each player in the scene - both the remote and local players - the JoinRoom function will be called for each player that enters a lobby. We need a way to differentiate between our local player and the remote clients.
We’ll use Fusion’s NetworkObject for this. This behaviour assigns a network identity to a GameObject and allows us to identify players in our game. We get a reference to the NetworkObject and store wether the player is local in our new _isLocal variable by requesting networkObject.HasStateAuthority. This will only be true on the local player. Before joining or leaving a room, we add a check for _isLocal. Your script should look something like this:
using Fusion;
using UnityEngine;

public class OdinLocal : MonoBehaviour
{
    [SerializeField] private string roomName = "Proximity";
    private bool _isLocal;

    private void Start()
    {
        NetworkObject networkObject = GetComponent<NetworkObject>();
        _isLocal = networkObject.HasStateAuthority;
        if(_isLocal)
            OdinHandler.Instance.JoinRoom(roomName);
    }

    private void OnDestroy()
    {
        if(_isLocal)
            OdinHandler.Instance.LeaveRoom(roomName);
    }
}
Playback Prefab
ODIN uses the default AudioSource behaviours to play back incoming voice streams. It seemlessly integrates into the Audio system and allows us to adjust all settings just as we’re used to from Unity. The connection between these so called Media Streams and the AudioSource behaviours is handled by the PlaybackComponent
. Until now ODIN has automatically created and destroyed the components. But now we need more control over the AudioSource settings, especially the 3D sound options, which means we have to handle spawning of these behaviours ourselves.
Let’s setup a custom Playback Prefab. Create a new gameobject in your scene hierarchy, call it CustomPlayback and add a PlaybackComponent
in the Inspector - an AudioSource will automatically be added. To change the spatial mode of the audio source from 2D to 3D, set the Spatial Blend slider to a value of 1. We can also adjust the 3D Sound Settings - for the Tanknarok we’ve chosen a Min Distance of 2 and a Max Distance 100, but you can of course adjust this and any other settings to your preferred values. Finally, convert the object to a prefab and remove the object from the scene.
Next we need to implement a behaviour that handles the spawning of our Playback objects. We create a new script OdinRemote and add it to the PlayerTank prefab. We set up a reference to our PlaybackComponent
prefab and - in the Inspector - drag the previously created prefab into the field. Your PlayerTank prefab should look like this:
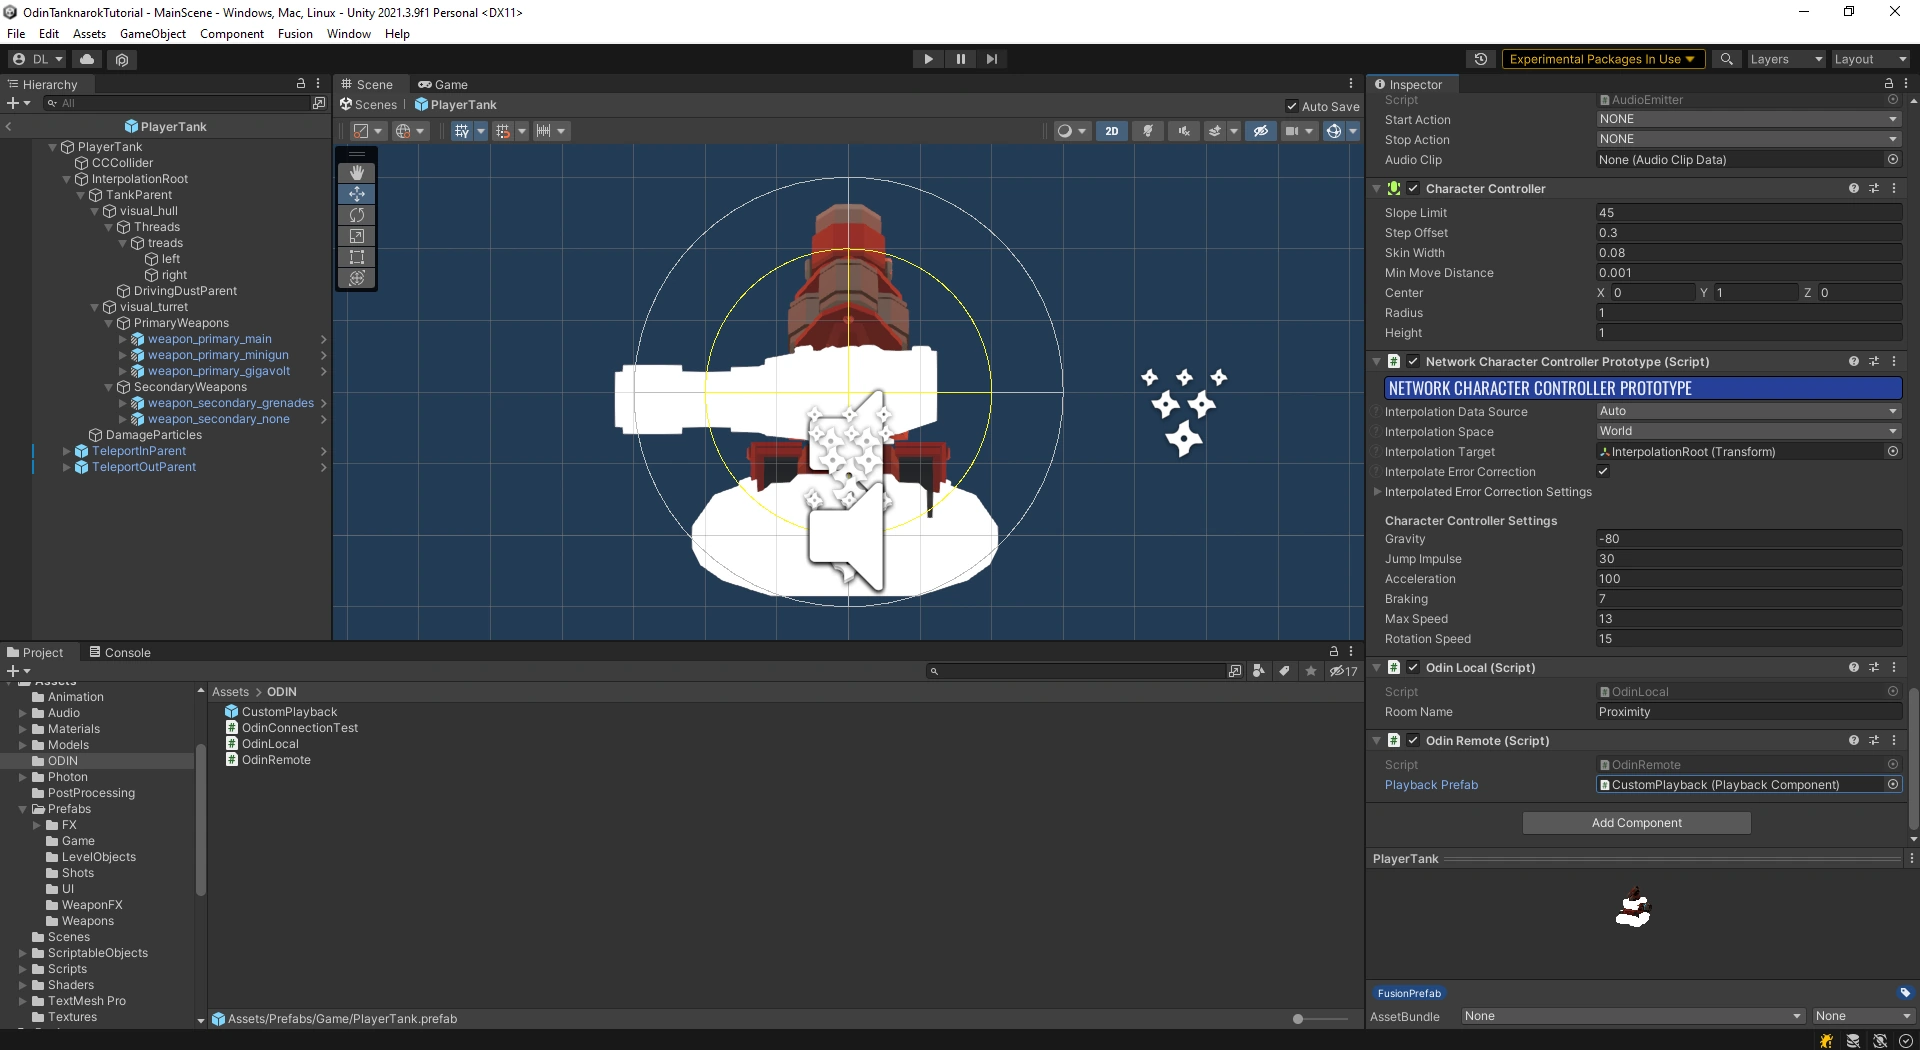
The PlayerTank prefab.
Then we start listening to our first Odin event - the OdinHandler.Instance.OnMediaAdded event. OnMediaAdded
gets invoked everytime a new Media Stream is added to an ODIN room our player is connected to. In order for the PlaybackComponent
to work, it needs a room name, peer id and media id. These three values uniquely identify a Media Stream.
using Fusion;
using OdinNative.Odin.Peer;
using OdinNative.Odin.Room;
using OdinNative.Unity.Audio;
using UnityEngine;

public class OdinRemote : MonoBehaviour
{
    // Don't forget to set this value
    [SerializeField] private PlaybackComponent playbackPrefab;
    private PlaybackComponent _spawnedPlayback;

    private void Start()
    {
        OdinHandler.Instance.OnMediaAdded.AddListener(MediaAdded);
    }

    private void MediaAdded(object roomObject, MediaAddedEventArgs eventArgs)
    {
        ulong peerId = eventArgs.PeerId;
        long mediaId = eventArgs.Media.Id;

        if (roomObject is Room room)
        {
            NetworkObject networkObject = GetComponent<NetworkObject>();
            bool isLocalPlayer = networkObject.HasStateAuthority;

            if(!isLocalPlayer){
                _spawnedPlayback = Instantiate(playbackPrefab, transform);
                _spawnedPlayback.transform.localPosition = Vector3.zero;
                _spawnedPlayback.RoomName = room.Config.Name;
                _spawnedPlayback.PeerId = peerId;
                _spawnedPlayback.MediaStreamId = mediaId;
            }

        }
    }

    private void OnDisable()
    {
        if (null != _spawnedPlayback)
            Destroy(_spawnedPlayback.gameObject);
    }
}
We retrieve the peer id and the media id from the MediaAddedEventArgs and the room name from the Room object, after casting. It’s important to instantiate the Playback Prefab as a child of the Player object and to reset the local position, to ensure that the AudioSource emits sound from the correct position. We also make sure, that we only spawn Playback components for remote players, we don’t want to listen to the local player’s voice.
Finally, we need disable the automatic playback spawning of the OdinHandler. We have to activate the Manual positional audio setting on our OdinManager object in the scene.
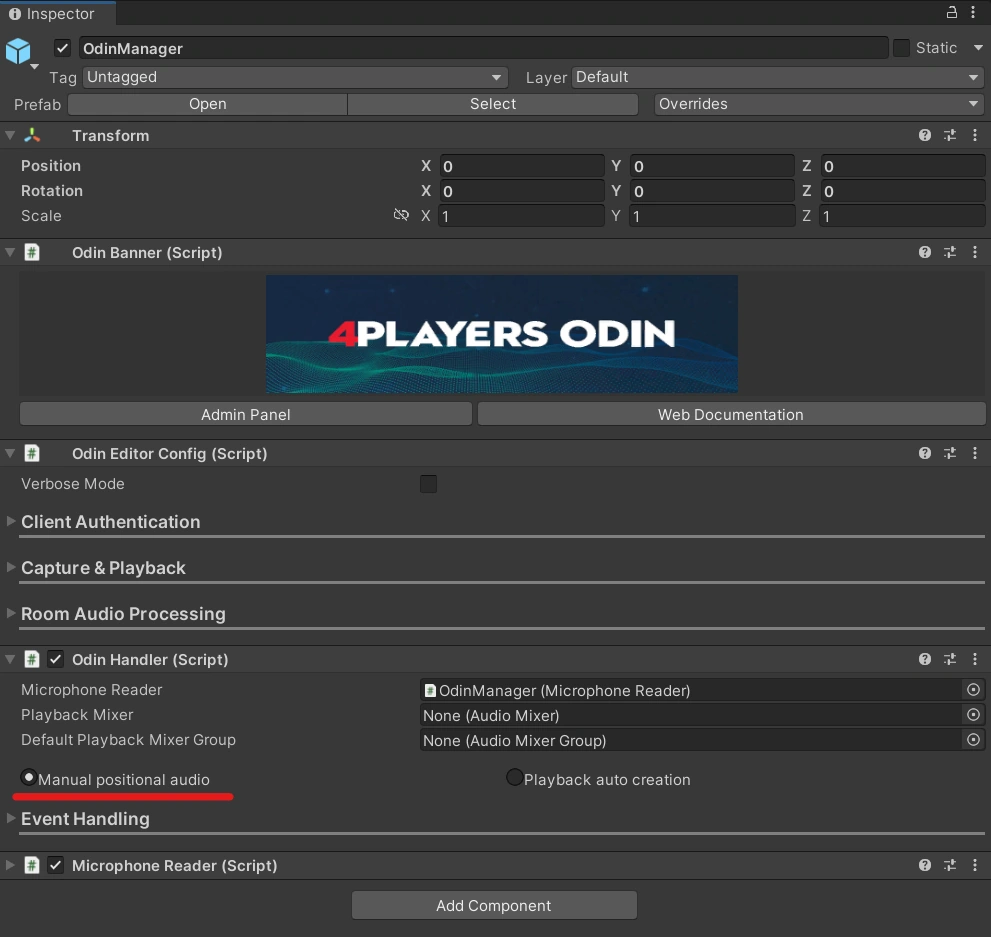
We activate Manual positional audio in our OdinHandler script.
Please Note: Some implementation choices in the OdinRemote script are due to the way the Tanknarok project is set up and to keep the code as short and simple as possible. The sample project does not destroy remote player objects, but instead chooses to reuse them when a remote player rejoins a lobby or game. Therefore we keep track of the spawned playback object and destroy it manually in OnDisable.
Identifying players with custom User Data
If we now test this with two players in a room, everything will seem to work. Other player’s voices lower in volume when driving away and we can hear whether a player is on our right or our left. But as soon as a third player enters the room, there’s an issue: because OnMediaAdded gets called for each remote player, our code will instantiate a Playback prefab for each remote player on all remote player objects. We need some way to connect a Media Stream to a Network Object.
ODIN’s custom User Data feature is ideal for handling this situation. Every peer connected to a room has its own user data, which is synchronized over the ODIN servers. We can define our own Data class and use the NetworkObject’s Id to uniquely connect an ODIN peer to an in-game player object. Let’s add our User Data implementation:
using OdinNative.Odin;

public class CustomUserData : IUserData
{
    public uint NetworkId;

    public override string ToString()
    {
        return JsonUtility.ToJson(this);
    }

    public bool IsEmpty()
    {
        return string.IsNullOrEmpty(this.ToString());
    }

    public byte[] ToBytes()
    {
        return Encoding.UTF8.GetBytes(ToString());
    }
}
The IUserData interface and IsEmpty() and ToBytes() implementations are required for ODIN to be able to transmit our custom data. When the data needs to be transmitted, we simply convert the object to a JSON representation using Unity’s built-in JsonUtility.TJson. For more information on User Data, take a look at our “Understanding User Data” guide.
The important part here is the addition of a NetworkId field. We can now create a new CustomUserData object in our Startmethod, set the NetworkId and supply the user data in our JoinRoom call. The new Start method in the OdinLocal script will now look like this:
...
private void Start()
{
    OdinHandler.Instance.OnMediaAdded.AddListener(OnMediaAddedCallback);

    NetworkObject networkObject = GetComponent<NetworkObject>();
    _isLocal = networkObject.HasStateAuthority;
    if (_isLocal)
    {
        CustomUserData roomData = new CustomUserData
        {
            NetworkId = networkObject.Id.Raw
        };
        OdinHandler.Instance.JoinRoom(roomName, roomData);
    }
}
...
The networkObject.Id.Raw uniquely identifies our local player on the network. ODIN will transfer the custom user data and synchronize it to all peers in the same room. This means, we can now read this value in the OdinRemote script. We do this in the MediaAdded callback:
...
private void MediaAdded(object roomObject, MediaAddedEventArgs eventArgs)
    {
        ulong peerId = eventArgs.PeerId;
        long mediaId = eventArgs.Media.Id;
        if (roomObject is Room room)
        {
            ulong peerId = eventArgs.PeerId;
            long mediaId = eventArgs.Media.Id;
            if (roomObject is Room room)
            {
                Peer peer = room.RemotePeers[peerId];
                CustomUserData userData = JsonUtility.FromJson<CustomUserData>(peer.UserData.ToString());
                NetworkObject networkObject = GetComponent<NetworkObject>();
                bool isLocalPlayer = networkObject.HasStateAuthority;
                if (!isLocalPlayer && userData.NetworkId == networkObject.Id.Raw)
                {
                    _spawnedPlayback = Instantiate(playbackPrefab, transform);
                    _spawnedPlayback.transform.localPosition = Vector3.zero;
                    _spawnedPlayback.RoomName = room.Config.Name;
                    _spawnedPlayback.PeerId = peerId;
                    _spawnedPlayback.MediaStreamId = mediaId;
                }
            }
        }
...
We first retrieve the Peer object from the rooms RemotePeers array with the peer id. The array contains a list of all remote peers connected to the ODIN room. The peer allows us to access the user data as a generic UserData object, so we need ot convert it into our CustomUserData format, before we can use it. The JsonUtility reads the string representation of the generic object and converts it into our custom format. Finally, we get a reference to the NetworkObject script and compare the Id to the NetworkId stored in the user data object. If it’s equal, we know that the newly added Media Stream belongs to the player object.
What Now?
You’re basically done! After building and opening multiple instances of our game, you can now experience the proximity voice chat you’ve added to the Tanknarok project.
Of course there are a lot of ways we can improve the project. Currently all players will enter the same ODIN room - even if they don’t join the same Multiplayer room! We can fix this by combining the name of the multiplayer room with the ODIN room name we’ve chosen and use the result when joining the room:
...
string combinedName = networkObject.Runner.SessionInfo.Name + "_" + roomName;
OdinHandler.Instance.JoinRoom(combinedName, roomData);
...
You might also have noticed, that the game’s music and sound effects are kind of loud. We can easily fix this, by navigating to Assets > Audio > Mixer and adjusting the volume settings of the Master, Music or SFX mixers. You could also create a new Audio Group for the in game voice, link it to the Playback Prefab’s AudioSource we created and fine tune the voice chat volume. This way you can also easily implement UI controls to allow players to adjust the volume in-game.
There are also issues that go beyond the scope of this tutorial. You might have noticed, that the direction a voice comes from sometimes does not exactly match what you’d expect. Unity’s Audio system assumes the listener to always be at the location of the AudioListener script. In the Tanknarok sample project, this script is positioned on the CameraParent game object, which represents the position the camera should look at. The position of this object does not always match the player location. To improve this, we’d have to add an AudioListener script to the local players gameobject and deactivate the existing behaviour (Unity requires you to always have only one active AudioListener). If you’d like us to add the solution to this tutorial or have other feedback, let us know on the discord server!
Using ODIN with Unity and FMod
Integrating ODIN Voice Chat with the FMOD Audio Solution in Unity.

Introduction
Welcome to this guide on integrating the ODIN Voice Chat Plugin with the FMOD Audio Solution in Unity. The code used in this guide is available on the ODIN-FMOD Git repository.
What You’ll Learn:
- How the FMODMicrophoneReader and FMODPlaybackComponent scripts work and how to use them in your project
- Properly set up ODIN in Unity when using FMOD as audio solution
- Deal with limitations and potential pitfalls
Note: This guide assumes that your project has disabled Unity’s built-in audio.
Disclaimer: Be aware that the implementation shown here uses Programmer Sounds of the FMOD Engine. While this allows real-time audio data, a big disadvantage of this approach is an increased latency by ~500ms.
Getting Started
To follow this guide, you’ll need to have some prerequisites:
- Basic knowledge of Unity
- The FMOD Plugin for Unity, which you can get here
- The ODIN Voice Chat Plugin, available here
To set up FMOD in your project, please follow FMOD’s in-depth integration-tutorial. You can find the tutorial here.
To set up the ODIN Voice Chat Plugin, please take a look at our Getting-Started guide, which you can find here:
Begin ODIN Getting Started Guide
FMODMicrophoneReader
The FMODMicrophoneReader script is an essential part of the FMOD integration. It replaces the default ODIN MicrophoneReader component, taking over the microphone input responsibilities by using FMOD. This script is crucial for reading microphone data and sending it to the ODIN servers for voice chat.
You can either follow the Usage setup to drop the FMODMicrophoneReader directly into your project, or take a look at how it works to adjust the functionality to your requirements.
Usage
- Add the FMODMicrophoneReader
script to your
OdinManagerprefab. - Disable the original MicrophoneReader component.
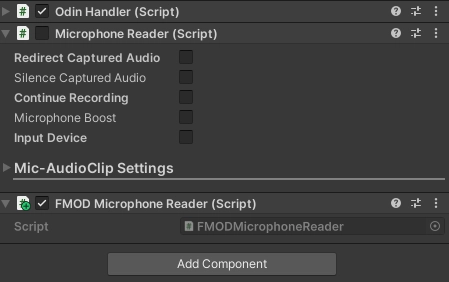
The OdinManager prefab after adding the FMODMicrophoneReader and disabling the original MicrophoneReader
The script currently doesn’t support automatic device switching or allow for programmatically changing devices. If you’d like to see extensions to this script, feel free to join our Discord server and let us know.
How it works
To read data from the microphone using FMOD, we’ll need to perform the following steps:
- Setup and create a
FMOD.Soundobject, into which FMOD can store the microphone input data. - Start the microphone recording.
- Continually read the FMOD microphone data and push it to the ODIN servers
1. Setup
The setup is performed in Unity’s Start() method.
Retrieve Microphone Info
You need to retrieve details about the microphone, such as the sampling rate and the number of channels. We’ll use this info to configure the FMOD recording sound in the next step and the ODIN microphone streams later on.
FMODUnity.RuntimeManager.CoreSystem.getRecordDriverInfo(_currentDeviceId, out _, 0, out _,
    out _nativeRate, out _, out _nativeChannels, out _);
Configure Recording Sound Info
After obtaining the input device details, the next action is to set up the CREATESOUNDEXINFO object. This object carries essential metadata that FMOD needs for audio capture.
_recordingSoundInfo.cbsize = Marshal.SizeOf(typeof(CREATESOUNDEXINFO));
_recordingSoundInfo.numchannels = _nativeChannels;
_recordingSoundInfo.defaultfrequency = _nativeRate;
_recordingSoundInfo.format = SOUND_FORMAT.PCMFLOAT;
_recordingSoundInfo.length = (uint)(_nativeRate * sizeof(float) * _nativeChannels);
We use SOUND_FORMAT.PCMFLOAT because ODIN requires this format for microphone data. This avoids the need for audio data conversions later on.
The _recordingSoundInfo.length is set to capture one second of audio. To change the recording duration, you can adjust the formula with a different multiplier.
Create Recording Sound
To hold the captured audio, FMOD requires us to create a FMOD Sound object as shown below.
FMODUnity.RuntimeManager.CoreSystem.createSound("", MODE.LOOP_NORMAL | MODE.OPENUSER,
    ref _recordingSoundInfo,
    out _recordingSound);
Here, we use the MODE.LOOP_NORMAL | MODE.OPENUSER flags in combination with the previously configured _recordingSoundInfo to initialize the _recordingSound object.
2. Recording
At this point, we’re ready to start capturing audio. To do so, call the recordStart method from FMOD’s core system.
FMODUnity.RuntimeManager.CoreSystem.recordStart(_currentDeviceId, _recordingSound, true);
_recordingSound.getLength(out _recordingSoundLength, TIMEUNIT.PCM);
After initiating the recording, we also get the length of the recorded sound in PCM samples by calling getLength. This value will help us manage the recording buffer in later steps.
3. Continually push microphone data
In the Update() method, we manage the ongoing capture of audio data from the FMOD microphone and its transmission to the ODIN servers. This ensures that the audio stream remains both current and continuously active.
Initialization
The method starts by checking if there is an active OdinHandler with valid connections and rooms. If not, it returns immediately.
if (!OdinHandler.Instance || !OdinHandler.Instance.HasConnections || OdinHandler.Instance.Rooms.Count == 0)
       return;
The next step is to find out how much audio has been recorded since the last check. This way we know how much data to read from the buffer.
FMODUnity.RuntimeManager.CoreSystem.getRecordPosition(_currentDeviceId, out uint recordPosition);
uint recordDelta = (recordPosition >= _currentReadPosition)
    ? (recordPosition - _currentReadPosition)
    : (recordPosition + _recordingSoundLength - _currentReadPosition);

// Abort if no data was recorded
if (recordDelta < 1)
    return;
If the read buffer is too short to hold the new audio data, its size is updated.
if(_readBuffer.Length < recordDelta)
    _readBuffer = new float[recordDelta];
Read Microphone Data
Microphone data is read from the FMOD sound object and copied into the read buffer using FMODs @lock and the System Marshal.Copy functions.
IntPtr micDataPointer, unusedData;
uint readMicDataLength, unusedDataLength;

_recordingSound.@lock(_currentReadPosition * sizeof(float), recordDelta * sizeof(float), out micDataPointer, out unusedData, out readMicDataLength, out unusedDataLength);
uint readArraySize = readMicDataLength / sizeof(float);
Marshal.Copy(micDataPointer, _readBuffer, 0, (int)readArraySize);
_recordingSound.unlock(micDataPointer, unusedData, readMicDataLength, unusedDataLength);
In this implementation, it’s crucial to be aware of the unit differences between FMOD, ODIN, and the system’s Marshal.Copy function. FMOD expects the read position and read length to be specified in bytes. In contrast, both ODIN and Marshal.Copy require the lengths to be represented as the number of samples being copied. Since we’re recording in the SOUND_FORMAT.PCMFLOAT format, we can use sizeof(float) to easily switch between FMOD’s byte-sized units and ODIN’s sample-sized units.
Push Microphone Data
After reading, if there is any valid data, it is pushed to the ODIN servers and the current microphone read position is updated.
if (readMicDataLength > 0)
{
    foreach (var room in OdinHandler.Instance.Rooms)
    {
        ValidateMicrophoneStream(room);
        if (null != room.MicrophoneMedia)
            room.MicrophoneMedia.AudioPushData(_readBuffer, (int)readArraySize);
    }
}

_currentReadPosition += readArraySize;
if (_currentReadPosition >= _recordingSoundLength)
    _currentReadPosition -= _recordingSoundLength;
The _currentReadPosition is reset back to zero when it reaches the length of the recording buffer to avoid going out of bounds.
The ValidateMicrophoneStream method ensures that an ODIN microphone stream is setup and configured correctly:
private void ValidateMicrophoneStream(Room room)
{
    bool isValidStream = null != room.MicrophoneMedia &&
        _nativeChannels == (int) room.MicrophoneMedia.MediaConfig.Channels &&
        _nativeRate == (int) room.MicrophoneMedia.MediaConfig.SampleRate;
    if (!isValidStream)
    {
        room.MicrophoneMedia?.Dispose();
        room.CreateMicrophoneMedia(new OdinMediaConfig((MediaSampleRate)_nativeRate,
            (MediaChannels)_nativeChannels));
    }
}
By understanding and implementing these steps, you should be able to continually read FMOD microphone data and push it to the ODIN servers, thereby keeping your audio stream up-to-date.
FMODPlaybackComponent
The FMODPlaybackComponent script replaces the default ODIN PlaybackComponent component, taking over the creation and playback of an FMOD audio stream based on the data received from the connected ODIN Media Stream.
You can either follow the setup to use the FMODPlaybackComponent directly in your project, or take a look at how it works to adjust the functionality to your requirements.
Usage
- On the OdinHandler
script of your
OdinManagerprefab, switch fromPlayback auto creationtoManual positional audio.
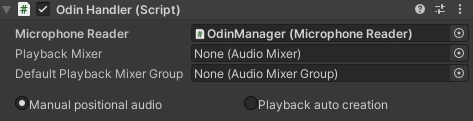
The OdinHandler’s Manual positional audio setting required for FMODPlaybackComponent to work.
- In a OnMediaAdded
callback, instantiate a new FMODPlaybackComponent
and set the
RoomName,PeerIdandMediaStreamIdvalues based on theMediaAddedEventArgsinput, e.g. like this:
...
void Start()
{
    OdinHandler.Instance.OnMediaAdded.AddListener(OnMediaAdded);
    OdinHandler.Instance.OnMediaRemoved.AddListener(OnMediaRemoved);
    ...
}
...
 private void OnMediaAdded(object roomObject, MediaAddedEventArgs mediaAddedEventArgs)
{
    if (roomObject is Room room)
    {
        FMODPlaybackComponent newPlayback = Instantiate(playbackPrefab);
        newPlayback.transform.position = transform.position;
        newPlayback.RoomName = room.Config.Name;
        newPlayback.PeerId = mediaAddedEventArgs.PeerId;
        newPlayback.MediaStreamId = mediaAddedEventArgs.Media.Id;
        _instantiatedObjects.Add(newPlayback);
    }
}
- Keep track of the instantiated objects and destroy FMODPlaybackComponent , if the OnMediaRemoved callback is invoked, e.g. like this:
private void OnMediaRemoved(object roomObject, MediaRemovedEventArgs mediaRemovedEventArgs)
{
    if (roomObject is Room room)
    {
        for (int i = _instantiatedObjects.Count - 1; i >= 0; i--)
        {
            FMODPlaybackComponent playback = _instantiatedObjects[i];
            if (playback.RoomName == room.Config.Name
            && playback.PeerId == mediaRemovedEventArgs.Peer.Id
            && playback.MediaStreamId == mediaRemovedEventArgs.MediaStreamId)
            {
                _instantiatedObjects.RemoveAt(i);
                Destroy(comp.gameObject);
            }
        }
    }
}
For the full implementation details, take a look at the AudioReadData script on our sample project repository.
How it works
To playback data from the microphone stream supplied by ODIN, we’ll need to perform the following steps:
- Setup and create a
FMOD.Soundobject, into which we’ll transfer the audio data received from ODIN. FMOD will then use theSoundobject to playback that audio. - Continually read the ODIN media stream data and transfer it to FMOD for playback.
1. Setup
We perform the setup in Unity’s Start() method.
Setup Playback Sound Info
First, populate the CREATESOUNDEXINFO object with the settings FMOD needs to play back the audio streams correctly.
_createSoundInfo.cbsize = Marshal.SizeOf(typeof(FMOD.CREATESOUNDEXINFO));
_createSoundInfo.numchannels = (int) OdinHandler.Config.RemoteChannels;
_createSoundInfo.defaultfrequency = (int) OdinHandler.Config.RemoteSampleRate;
_createSoundInfo.format = SOUND_FORMAT.PCMFLOAT;
_pcmReadCallback = new SOUND_PCMREAD_CALLBACK(PcmReadCallback);
_createSoundInfo.pcmreadcallback = _pcmReadCallback;
_createSoundInfo.length = (uint)(playBackRate * sizeof(float) * numChannels);
Here, we pull the number of channels and the sample rate from OdinHandler.Config
to configure the playback settings. Similar to how the FMODMicrophoneReader
operates, we specify the audio format as SOUND_FORMAT.PCMFLOAT. This ensures compatibility between FMOD and ODIN’s sampling units. We also set the playback sound buffer to hold one second’s worth of audio data.
The crucial part of this configuration is setting up the PCM read callback. The PcmReadCallback function is invoked by FMOD whenever it needs fresh audio data, ensuring uninterrupted playback.
Initialize Stream and Trigger Playback
In this case, we opt for the createStream method, which is essentially the createSound function with the MODE.CREATESTREAM flag added.
FMODUnity.RuntimeManager.CoreSystem.createStream("", MODE.OPENUSER | MODE.LOOP_NORMAL, ref _createSoundInfo, out _playbackSound);
FMODUnity.RuntimeManager.CoreSystem.getMasterChannelGroup(out ChannelGroup masterChannelGroup);
FMODUnity.RuntimeManager.CoreSystem.playSound(_playbackSound, masterChannelGroup, false, out _playbackChannel);
To initiate playback, we retrieve the Master Channel Group from FMODUnity.RuntimeManager.CoreSystem and use it along with the stream we’ve just created. Keeping a reference to the returned _playbackChannel allows us to configure the channel for 3D positional audio later on.
2. Read and Playing Back ODIN Audio Streams
The task of fetching audio data from ODIN and sending it to FMOD is accomplished within the PcmReadCallback method.
PCM Read Callback
[AOT.MonoPInvokeCallback(typeof(SOUND_PCMREAD_CALLBACK))]
private RESULT PcmReadCallback(IntPtr sound, IntPtr data, uint dataLength){
    ...
}
To enable calls between native and managed code, we annotate the method with the [AOT.MonoPInvokeCallback(typeof(SOUND_PCMREAD_CALLBACK))] attribute. The callback function is provided with three parameters, of which we only need data and dataLength. These values indicate where to store the ODIN audio data and the number of required samples, respectively.
Data Validation
Next, we include some validation logic:
int requestedDataArrayLength = (int)dataLength / sizeof(float);
if (_readBuffer.Length < requestedDataArrayLength)
{
    _readBuffer = new float[requestedDataArrayLength];
}

if (data == IntPtr.Zero)
{
    return RESULT.ERR_INVALID_PARAM;
}
Similar to our approach in the FMODMicrophoneReader
, we use sizeof(float) to switch between the byte-size units used by FMOD and the sample-based units used by ODIN. If needed, we resize the _readBuffer and check the data pointer for validity.
Read ODIN Data and Transfer to FMOD Stream
In the final step, we read the requested amount of samples from the ODIN media stream into _readBuffer. Then we copy this data to FMOD using the provided data pointer.
if (OdinHandler.Instance.HasConnections && !PlaybackMedia.IsInvalid)
{
    uint odinReadResult = PlaybackMedia.AudioReadData(_readBuffer,  requestedDataArrayLength);
    if (Utility.IsError(odinReadResult))
    {
        Debug.LogWarning($"{nameof(FMODPlaybackComponent)} AudioReadData failed with error code {odinReadResult}");
    }
    else
    {
        Marshal.Copy(_readBuffer, 0, data, requestedDataArrayLength);
    }
}
The AudioReadData
method pulls the specified amount of data from the PlaybackMedia stream into _readBuffer. We then use ODIN’s Utility.IsError
method to verify the operation’s success. If everything checks out, Marshal.Copy is used to transfer the _readBuffer contents to FMOD’s designated playback location in memory, identified by the data pointer.
Accessing the PlaybackMedia
To access a specific ODIN media stream, you’ll need three identifiers: a room name, peer id, and media stream id. You can use these to fetch the media stream with a function like the following:
private PlaybackStream FindOdinMediaStream() => OdinHandler.Instance.Rooms[RoomName]?.RemotePeers[PeerId]?.Medias[MediaStreamId] as PlaybackStream;
The values for RoomName, PeerId, and MediaStreamId can be obtained, for instance, from the OnMediaAdded callback.
FMODPlayback3DPosition
After setting up the basic FMOD playback, you may want to enhance your audio experience by adding 3D positional sound features. The FMODPlayback3DPosition script is designed to handle this.
Usage
To add the 3D audio features to your playback, simply add the component to the same game object your FMODPlaybackComponent is attached to. The FMODPlayback3DPosition behaviour will automatically connect to and setup the playback component, as well as update the 3D position of the FMOD playback channel.
How It Works
Setup
To incorporate 3D audio capabilities into your FMOD playback, you’ll need to modify some channel settings. The first step is to ensure that the FMOD Sound and Channel objects are fully initialized by the FMODPlaybackComponent
(or a comparable setup).
private IEnumerator Start()
{
    // Wait until the playback component is initialized
    while (!(_playbackComponent.FMODPlaybackChannel.hasHandle() && _playbackComponent.FMODPlaybackSound.hasHandle()))
    {
        yield return null;
    }
    // Initialize 3D sound settings
    _playbackComponent.FMODPlaybackChannel.setMode(MODE._3D);
    _playbackComponent.FMODPlaybackChannel.set3DLevel(1);
    _playbackComponent.FMODPlaybackSound.setMode(MODE._3D);
}
After confirming initialization, we enable 3D audio by applying the MODE._3D flag to both FMODPlaybackChannel and FMODPlaybackSound. Additionally, we set the 3DLevel blend level to 1 to fully engage 3D panning.
Positional Updates
To keep the FMOD sound object’s position in sync with the Unity scene, we fetch the Unity GameObject’s transform and convey its position and rotation to FMOD.
 private void FixedUpdate()
{
    if (_playbackComponent.FMODPlaybackChannel.hasHandle())
    {
        ATTRIBUTES_3D attributes3D = FMODUnity.RuntimeUtils.To3DAttributes(transform);
        _playbackComponent.FMODPlaybackChannel.set3DAttributes(ref attributes3D.position, ref attributes3D.velocity);
    }
}
This approach ensures that the sound source remains spatially accurate within your Unity environment, enhancing the 3D audio experience.
Using ODIN with Unity and Photon
David Liebemann at SciCode Studio created a sample game with Unity and Photon PUN 2 that showcases all features of ODIN in a simple example.
It’s open source and available in our Github repository. You can download the binaries to test it here:
In this guide we’ll walk you through the basic concepts of integrating ODIN into a multiplayer game. This demo will use the Photon PUN 2 multiplayer framework, but ODIN can be integrated into your game using any multiplayer solution or even without multiplayer. The ODIN-Demo itself also allows us to easily switch out Photon for another framework.
If you are unsure why you should use ODIN for that, learn more about our features and what makes us special in our introduction.
Screenshot from the sample project
How does it work?
The basic network topology looks like this:
graph LR
  subgraph ODIN Server
    OR[Odin Room]
  end
  subgraph Photon Cloud
    GS[Gameserver]
  end
  subgraph Game
    GS[Game Server] --> ClientA[Player A] --> OR[ODIN Room]
    GS[Game Server] --> ClientB[Player B] --> OR[ODIN Room]
    GS[Game Server] --> ClientC[Player C] --> OR[ODIN Room]
  end
Players connect to the Photon PUN 2 cloud and use that to sync the players position, name and colors. Every player is also connected to the same ODIN room - therefore all players that see each other also hear each other - of course only if they are close enough to each other and there is no wall between them.
In other voice SDKs you would need to transfer a lot of information to the voice cloud or you would need to process the game world to set the volume and balance of players. We can improve a lot on this process.
In ODIN, nothing like that is required. There is one place where all information comes together: Within the player’s Unity game client. Therefore, ODIN just uses the game engines audio features. You only need to map the corresponding player media stream coming from the ODIN server to the correct GameObject representing the player and use AddPlaybackComponent to attach it. That’s it.
The sample comes with the AOdinMultiplayerAdapter class - it’s an abstract base class that you can use to implement a mapping solution for any multiplayer framework. If you are using Photon PUN2, you can just use our implementation for that adapter for PUN 2: PhotonToOdinAdapter .
Cloning the repository
Please note: The repository uses LFS. You need to clone this repo with LFS enabled. Downloading the ZIP file via Githubs Download ZIP functionality does not work!
To enable git lfs, enter git lfs install in your git bash in your local repository.
Project Structure
The ODIN-Demo project’s scripts are split up into the categories:
- Audio: Scripts in here handle the custom Audio System behaviour like directional audio and occlusion effects.
- ODIN: Handles anything related to core ODIN-features, without external dependencies. If you’d like to use a multiplayer framework other than Photon, you can safely reuse the files contained in this assembly.
- Photon: Anything Photon specific is contained in here, like joining Photon Rooms or synchronizing Player Position.
- GameLogic: Anything else required for the demo, like the player’s movement or view state (1st-person or 3rd-person).
You can find demo settings in the Assets > ODIN-Demo > Settings directory, e.g. settings for the occlusion effects, ODIN room names, Push-To-Talk settings and Input definitions. Any prefabs used in the demo can be found in the Assets > ODIN-Demo > Prefabs directory, with the player prefab being located in the Resources.
The demo scene’s hierarchy contains three root game objects used for categorizing behaviours:
- Environment: Contains all visible objects or lights that contain the scene’s visuals.
- Gamelogic: Behaviours like the
PhotonPlayerSpawneror the ODIN room join logic are placed here. - UI: The root object for in-game UI, like the settings menu or the radio room’s active user display.
ODIN terms and behaviours
This is a short introduction into the most important ODIN terms - for more in-depth information please take a look at the ODIN documentation.
Rooms, Peers and Media
Every client connects to an ODIN server, authenticates with an access token and joins a room. Once the client has joined a room, they are a peer inside the ODIN room. Every peer can add media to that room, linked to a physical device like a microphone. Clients can join multiple rooms at the same time and can add multiple media streams at the same time.
To find more information on the basic ODIN topology, please take a look at the Basic Concepts documentation.
OdinHandler
The OdinHandler script is a singleton behaviour, wrapping the functionality of the native ODIN SDK for use in Unity. You can access the script via OdinHandler.Instance.
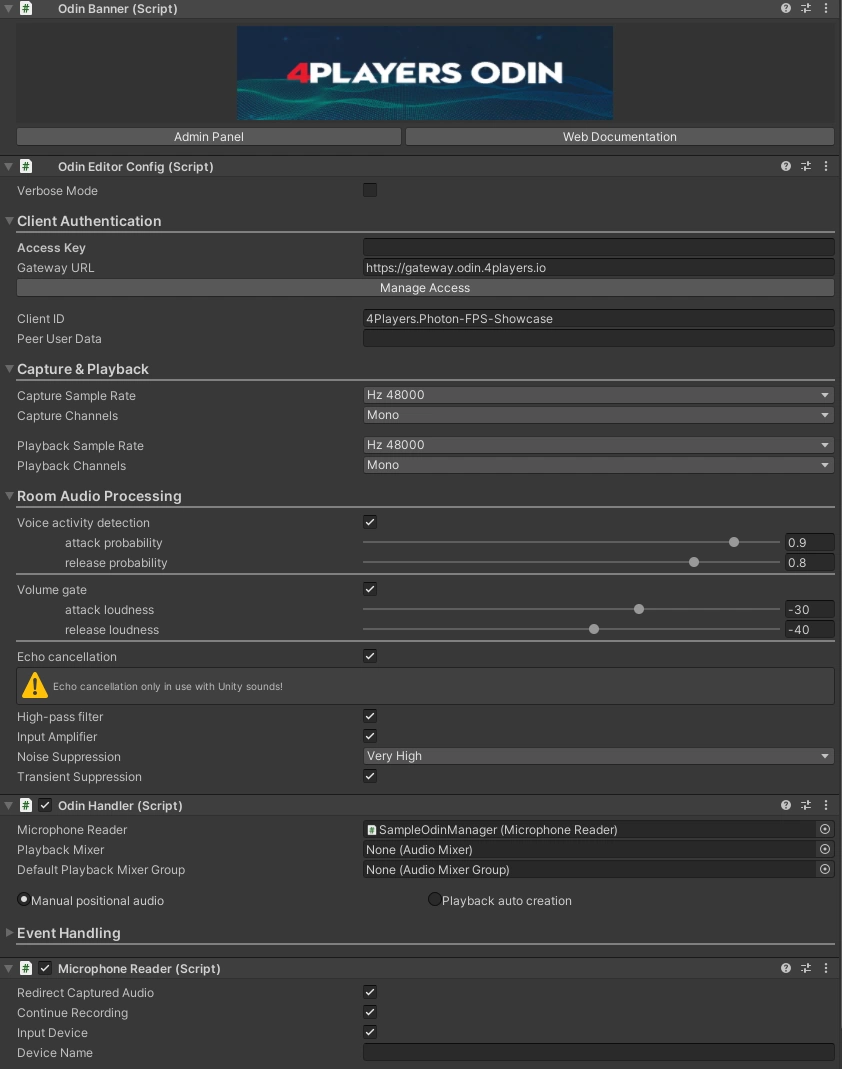
The most important use-cases are the OdinHandler.Instance.JoinRoom method for joining ODIN rooms and the events for listening for ODIN events, like OnRoomJoin, OnPeerJoined and OnMediaAdded. To use the OdinHandler, make sure to add a variant of the OdinManager prefab into your project. The prefab also contains the OdinEditorConfig script, which allows us to set the Access Key and Room Audio Processing settings in the inspector.
If you don’t yet have an ODIN subscription and just want to test out ODIN’s functionality, you can use a generated key by pressing the Manage Access Button and then selecting Generate Access Key. The resulting access keys can be used to access the ODIN network with up to 25 concurrently connected users free of charge.
The OdinManager prefab in the inspector view.
PlaybackComponent
The ODIN SDK provides the PlaybackComponent script to easily play back audio data received from
the ODIN server. Each PlaybackComponent represents one media stream and is identified by a media id, a
peer id and a room name.
User Data
Every peer in Unity can store arbitrary information as user data. When local user data is updated, the server updates user data on all clients. Read more about user data in the guide: Understanding User Data.
Multiplayer
Lobby
Because ODIN works framework independent, we won’t go too much into detail on how to set up Photon - for an in-depth explanation, please take a look at Photon’s starter guide.
Note: When first entering the Unity project, Photon will require you to add an App Id - simply follow the instructions to add or create your own App Id.

The Lobby Scene.
We wait for a connection to the photon network, before allowing users to join a Photon room. In the demo we’ll simply add all players to the same room. We also use the PhotonNetwork.AutomaticallySyncScene = true option to automatically load the correct scene for each player joining.
After pressing the Join Button, the player will either connect to an existing Photon room or create a new Photon room as a Master Client. As a master client, we’ll use the call:
PhotonNetwork.LoadLevel(sceneToLoad);
Otherwise Photon will automatically load the correct scene.
Demo Level
When entering the Demo Level scene, two things happen:
We instantiate the player over the Photon network using
PhotonNetwork.Instantiateand theODINPlayerprefab. This is kicked off by thePhotonPlayerSpawnerscript on Start. Note: The player prefab needs to be located in aResourcessubdirectory, in order for Photon to be able to instantiate the player correctly.We automatically connect to two ODIN rooms (Voice and Radio) with
OdinSampleUserData userData = new OdinSampleUserData(refPlayerName.Value);
OdinHandler.Instance.JoinRoom(refRoomName.Value, userData);
We don’t have to send user data when joining an ODIN room, but in this case we already have access to the player name from the value entered in the Lobby scene, so it makes sense to supply it while joining.
OdinSampleUserData is a serializable C# class which implements the IUserData interface. This is a requirement for any userdata transmitted using ODIN. The interface member function ToBytes() simply provides an UTF8 encoding of a JSON representation of the class. The class contains app specific properties like the player’s name, his capsule color and a unique user id. The unique user id is used to connect an ODIN media stream to a Photon View - specifically the unique user id is equal to the photon view id - and therefore required for the proximity chat.
ODIN
Global Voice Chat - Radio transmissions
In the demo project, users automatically join the ODIN room named Radio, in
which players can communicate as if using radio transmitters - when pressing down the V key, the microphone input
can be heard by all players in the room independent of their position.
For this scenario, the demo project provides the OdinDefaultUser script, which uses the
OdinHandler.Instance.OnMediaAdded Event to spawn an instance of a prefab with a PlaybackComponent for
each media stream in the ODIN room. The event provides the room name, peer id and media id required
for the PlaybackComponent to work.
We added the OdinDefaultUser script as a local-player-only behaviour - so it will only spawn Playbacks as children of the Player.
This doesn’t matter for our radio transmissions, because they can be heard globally and shouldn’t react to the distance between the
local Player and remote Players. It also ensures, that each radio stream will only be spawned once for the player. But it also
entails that the OdinDefaultUser script should only be used for ODIN rooms which do not make use of proximity voice chat.
In the next paragraph we’ll take a look at how the Tech Demo implements a Proximity Chat which reacts to the distance between local Player and remote Players. We’ll also take a look at how to create the “Radio Crackling” Effect in paragraph Playback Settings.
Proximity Chat - connecting ODIN to the multiplayer framework
In a multiplayer scenario, we encounter the issue of connecting a user’s ODIN media stream to the user’s avatar in the game, e.g. in our demo project we’d want a player’s voice in the proximity chat to come from the player’s capsule. But because ODIN and the multiplayer framework don’t know of each other’s existence, we first have to logically connect the two concepts.
The abstract AOdinMultiplayerAdapter script gives access to the methods string GetUniqueUserId() and
bool IsLocalUser(). This adapter is used to connect the player’s representation in the multiplayer
framework (using the framework’s equivalent of an unique user id) to an ODIN peer. On ODIN’s side we use
custom user data to keep track of that id. When joining an ODIN room, the AOdinMultiplayerAdapter
automatically sets the uniqueUserId of our custom ODIN user data for the current peer and sends an
update to the other peers in the room. On receiving the update, those clients then use a reference to AOdinMultiplayerAdapter
to compare the remote peer’s uniqueUserId to the id supplied by the remote adapter’s GetUniqueUserId().
If both ids are equal,we know that an ODIN peer is represented by the referenced AOdinMultiplayerAdapter.

Diagram showcasing the adapter pattern for connecting ODIN to a multiplayer framework.
In the demo project
we use this information to correctly play black the proximity chat audio at a player’s location -
specifically using the Odin3dAudioVoiceUser, which automatically creates a PlaybackComponent for each remote user.
The demo project utilizes Photon as a multiplayer framework, so we add the
PhotonToOdinAdapter to our player. The adapter uses PhotonView.ViewID as a unique user id and
PhotonView.IsMine
to determine whether the adapter represents a local or a remote player. To switch out Photon for another
multiplayer framework, simply provide your own class extending AOdinMultiplayerAdapter.
Playback Settings - Distance and Radio Effects
ODIN relies on Unity’s AudioSource Components to play Media Streams. We can therefore just use the built in functionality of Audio Sources to adjust the distance at which players can hear each other. For any AOdinUser implementation (i.e. OdinDefaultUser for Radio transmissions and Odin3dAudioVoiceUser for Proximity Voice Chat) we can reference a prefab that will be spawned for each
Media Stream. These Prefabs not only have a PlaybackComponent on them, but also contain an AudioSource. So, to change the Playback Behaviour of Media Streams in-game, we have to change the AudioSource Settings on the prefab. The Tech Demo uses the prefabs OdinRadioAudioSource and OdinVoiceAudioSource in the ODIN-Sample > Prefabs folder.
The OdinRadioAudioSource prefab simply has a full 2D Spatial Blend setting and the Bypass Reverb Zone enabled. The latter lets us avoid Unity’s Reverb Zones, e.g. Echo effects in large rooms. The most interesting setting can be found in the Output option - here we reference an Audio Mixer Group Controller. The Radio Group Controller defines the list of effects that the incoming Radio room Media Streams go through, before being output to the User. The combination of these effects creates the Radio’s crackling effect, giving Players a more immersive experience.

The Radio Mixer Settings for creating the crackling effect.
The OdinVoiceAudioSource prefab on the other hand has a full 3D Spatial Blend setting and does not bypass reverb zones - we want this AudioSource to simulate a human voice in the real world, which is naturally affected by the environment. The prefab uses the 3D Sound Settings of the AudioSource component to further specify this effect - the Min Distance value defines the distance at which the voice will be heared at full volume and the Max Distance defines the distance at which we won’t hear the voice anymore.
Additionally we can see the Volume Rolloff set to Logarithmic Rolloff - this best approximates a real world setting. If required, the rolloff can easily be customized by choosing a linear or custom setting.
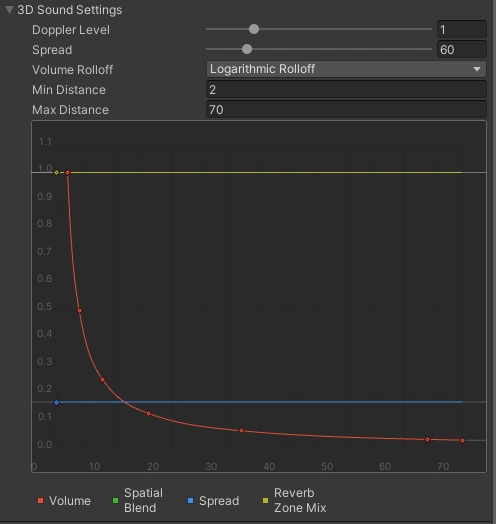
The AudioSource component’s 3D sound settings.
These three options majorly define the fading behaviour of a player’s voice in the distance - at least when there aren’t any objects between the audio source and listener. Occlusion effects are not part of Unity’s Audio System, but we’ve included our own, custom solution for this in the Tech Demo, which is explained in-depth in the Audio Occlusion paragraph.
Proximity Chat - Room Optimization
Another feature of ODIN is, that the ODIN servers can automatically stop the transmission of Media Streams based on the spatial distance between the local player and other players in the ODIN room. This allows us to optimize the bandwidth required for each player, avoiding unnecessary downstreams for voice transmissions that can’t be heard by the player due to distance anyway! Of course, we only want to use this for proximity-based ODIN rooms, not for global rooms like the Radio Chat.
To enable this feature, we use the methods
room.SetPositionScale(scale);
and
room.UpdatePosition(position.x, position.y);
As ODIN is not aware of the scale your game is operating at, it initially uses a Unit Circle as the cutoff radius. If we use the previously mentioned Max Distance to calculate scale as
float scale = 1.0f / MaxVoiceDistance;
we can automatically disable streams that wouldn’t be transmitted by the Audio Source due to distance anyway.
Note: The position scale should be set to the same value for all Peers in the ODIN room. The scale value also has to be set individually for each room that will utilize ODIN’s optimization feature.
Invoking room.UpdatePosition too frequently can lead to operational issues where the optimization of audio streams may not function correctly. Limit the frequency of calling room.UpdatePosition to a maximum of 10 times per second. This equates to one update every 100 milliseconds. We recommend using a Unity Coroutine to update the position in Odin rooms.
For ODIN to be able to use the distance values for optimization, we have to transmit player positions at regular intervals. The function room.UpdatePosition lets us define the client’s current position in the room. If we define the correct room scale, we can simply use the player’s transform.position x and z values.
Note: For now, we can only transmit 2D positions with this method. But as most games have a wide horizon and aren’t scaled vertically, this is not a real drawback.
In the Tech Demo, the OdinPositionUpdate component regularly updates the player’s position. Using entries to the Room Settings array on the OdinPositionUpdateSettings scriptable object, we can define the activation status and the cutoff radius for each ODIN room individually.
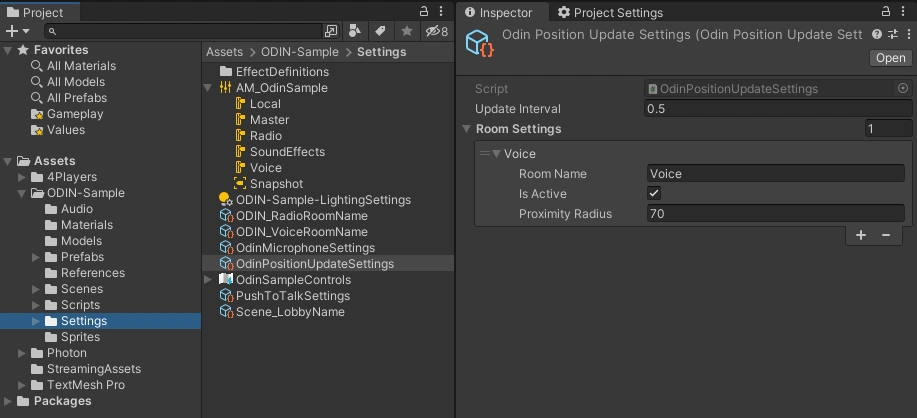
The ODIN room optimization and position update settings.
Push-To-Talk
Push-To-Talk is handled by the OdinPushToTalk script using settings defined in a OdinPushToTalkSettings scriptable object. If the push-to-talk button for a specific room is pressed, the script will access the user’s mediastream and set a user’s mute status using targetRoom.MicrophoneMedia.SetMute().
The OdinPushToTalkSettings scriptable object allows rooms to be either be voice-activated or require a button press to talk - if you’d like to make this available as a user-setting, you can use the OdinPushToTalkSettingsController, which automatically sets the room’s activation method based on a Unity Toggle. Take a look at the Tech Demo’s Settings prefab (found in ODIN-Sample > Prefabs > UI) for more information.
Audio Filter Settings
The ODIN SDK provides quite a few Room Audio Processing settings, like Voice Activity Detection, Echo Cancellation, Noise Suppression levels and more. If you’re content with using the same settings for all users, you can simply adjust the values on the OdinManager prefab (as shown here).
The Tech Demo has a sample implementation on how to allow users to adjust these settings in the game. The Settings prefab (found in ODIN-Sample > Prefabs > UI) uses Unity’s Toggle, Slider and Dropdown UI components to adjust the Audio Settings. The OdinAudioFilterSetingsController script contains entries that map the UI component’s input to ODIN’s filter values and even stores the changes to file. For a fast integration into your game, you can use the Tech Demo implementation and adjust the UI graphics to your liking.
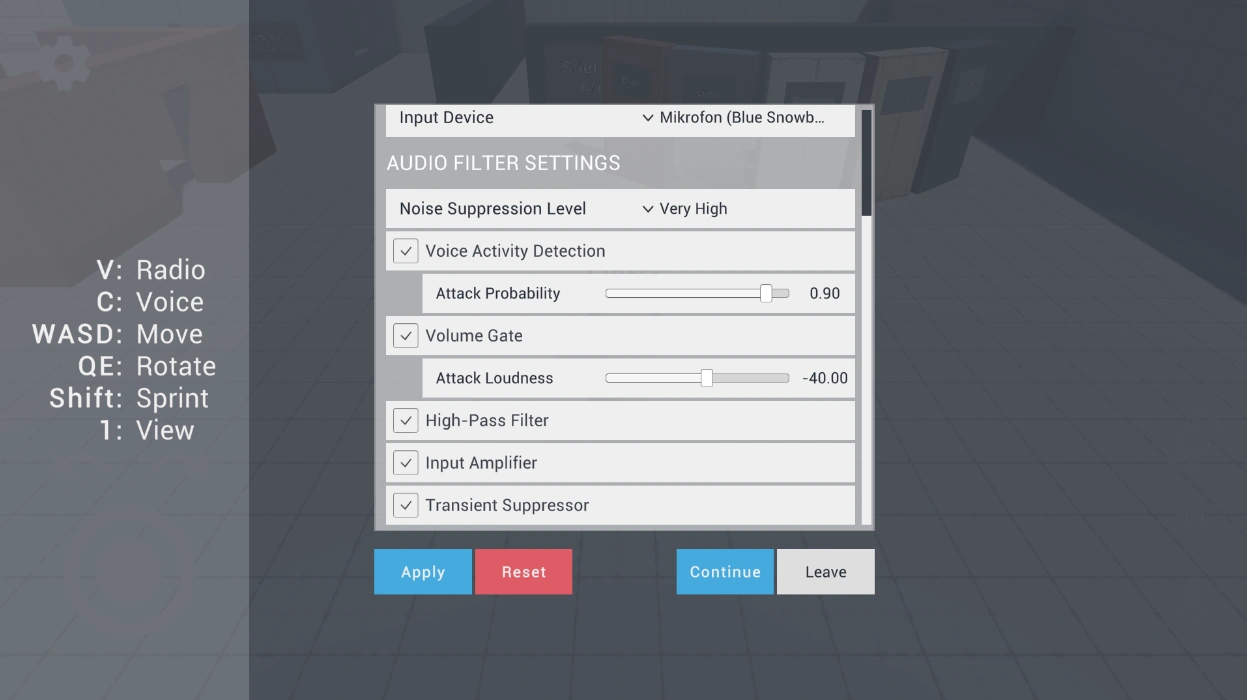
The UI for adjusting the Audio Filter Settings.
Choosing an Input Device
The previously mentioned Settings prefab also allows players to choose their input device. The options that are available are based on Unity’s Microphone.devices ouput and displayed in the dropdown component. Updating the input device used by ODIN is then as simple as calling
MicrophoneReader microphoneReader = OdinHandler.Instance.Microphone;
microphoneReader.StopListen();
microphoneReader.CustomInputDevice = true;
microphoneReader.InputDevice = selectedDevice;
microphoneReader.StartListen();
where the selectedDevice is one of the string options listed in the Microphone.devices array. The Tech Demo uses the implementation in the OdinMicrophoneController script, which also handles saving and loading the users selection in previous game sessions.
Audio
To better showcase the capabilities of ODIN in apps and games, we’ve implemented some audio
features that are often used in games, but not included in Unity’s Audio System: Audio Occlusion and Directional Audio. Because we want to keep things simple and performant, we’re going to approximate those effects, using Unity’s AudioLowPassFilter component
and by adjusting the volume of individual audio sources.
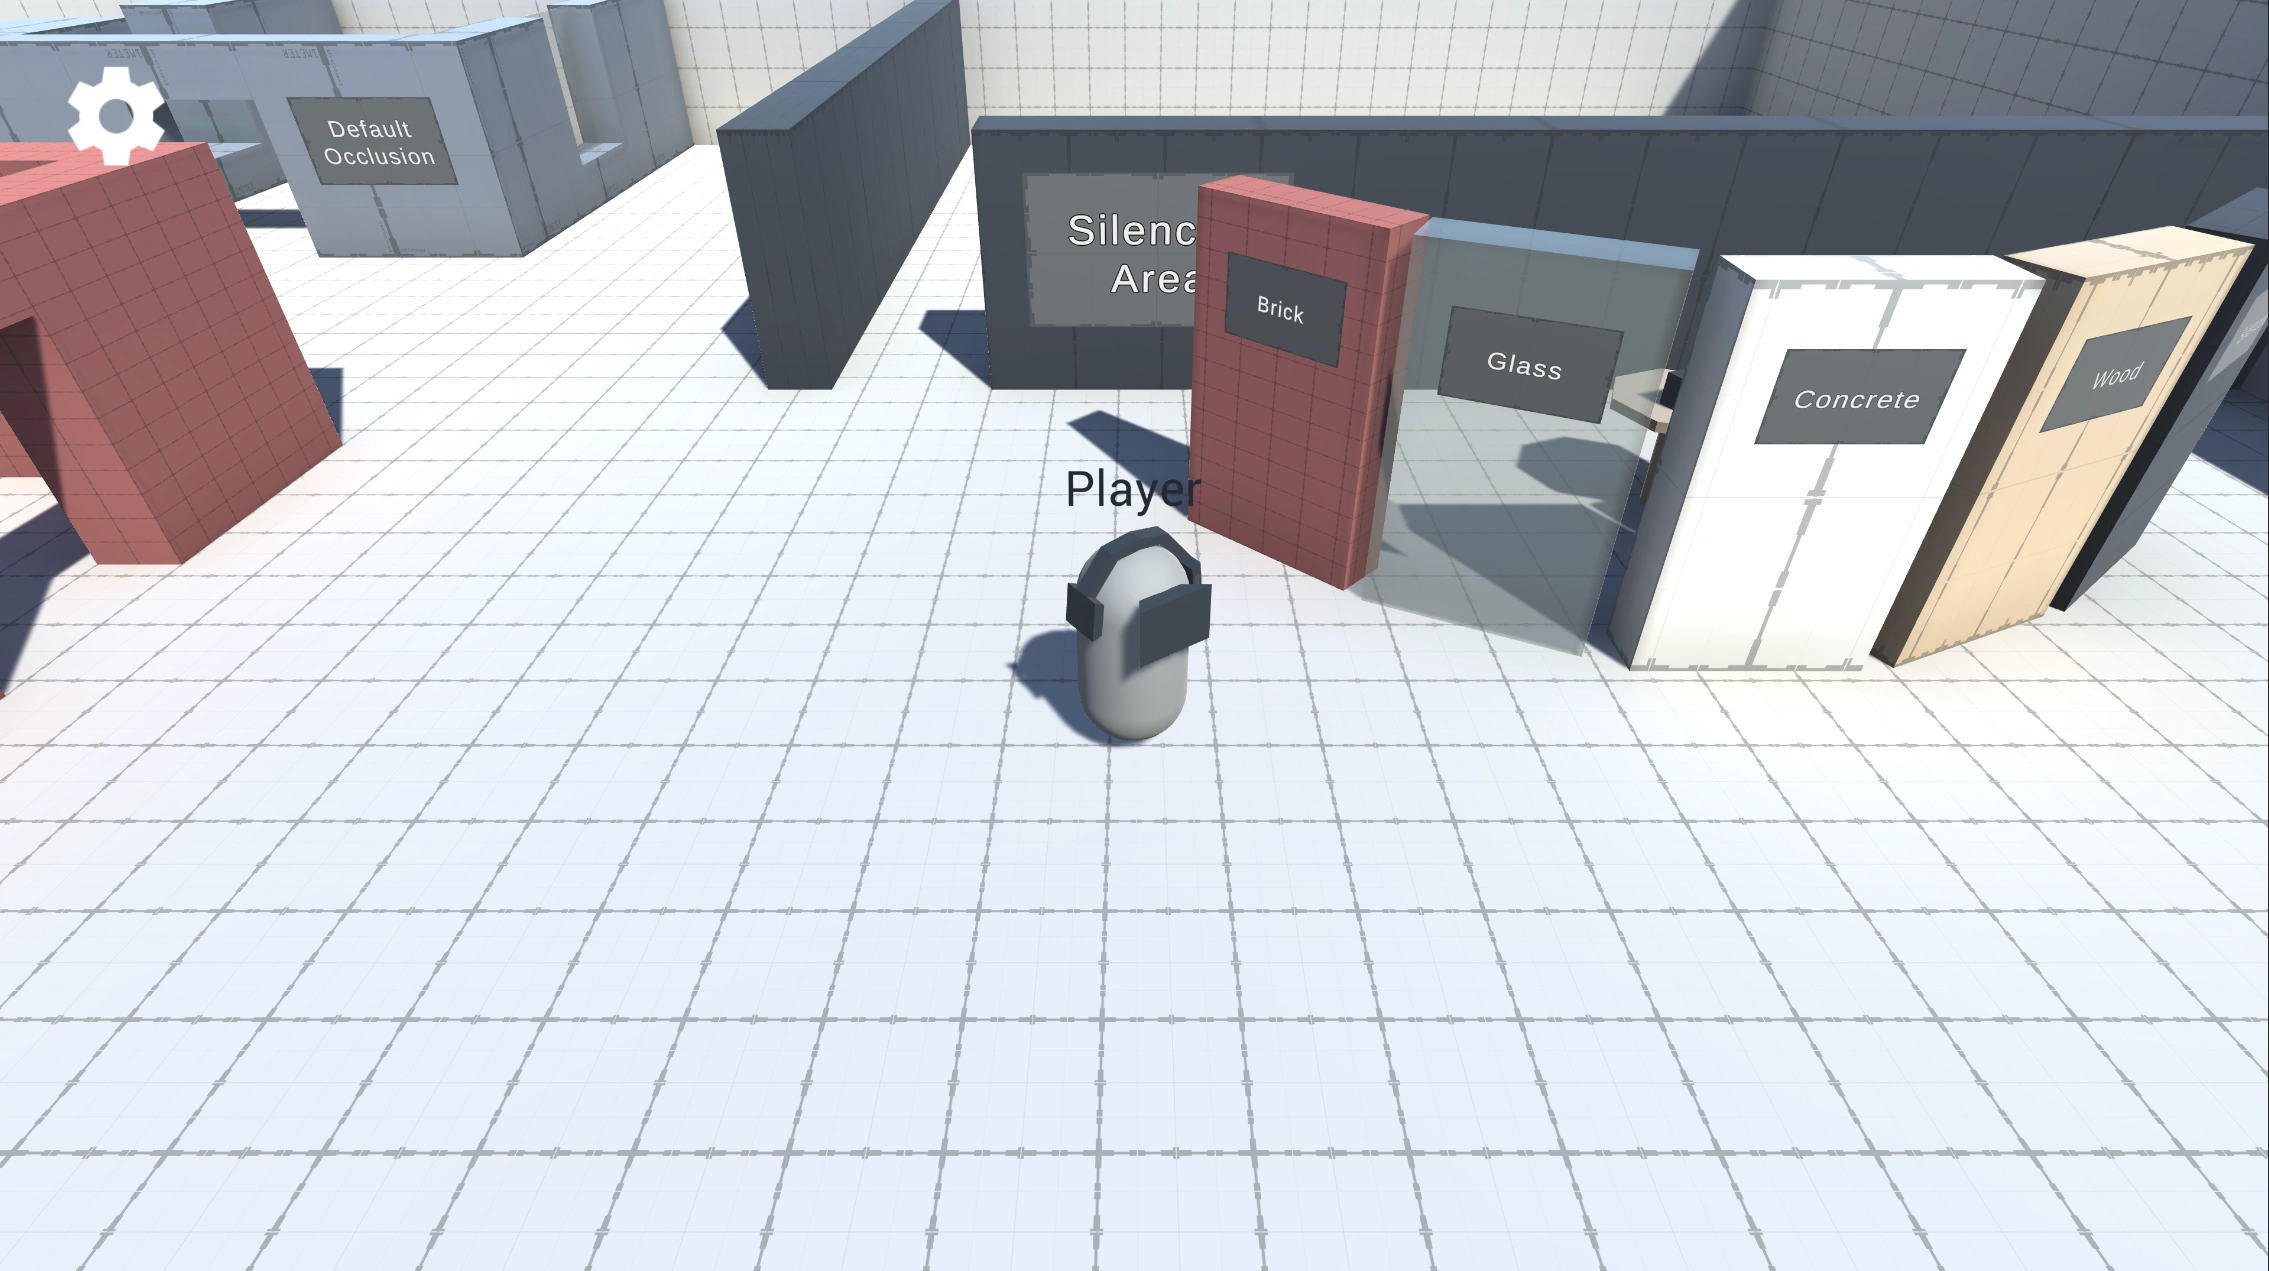
Audio Occlusion
Audio Occlusion should occur when an object is placed between the audio listener (our player) and audio sources in the scene - e.g.
hearing the muffled sounds of an enemy approaching from behind a wall.
Unity does not have any kind of built-in audio occlusion, so we need to implement our own system.
The OcclusionAudioListener script contains most of the occlusion logic and is placed, together with the AudioListener script,
on our local player object. The OcclusionAudioListener registers objects with colliders, that enter the detection range and have at least one AudioSource script attached in the transform hierarchy. By default the detection range
is set to 100 meters - Audio Sources that are farther away than that are usually
not loud enough to be affected meaningfully by our occlusion system.
We then apply the occlusion effects to each of the registered Audio Sources in every frame.
Our occlusion effects have the parameters
Volume, Cutoff Frequency and Lowpass Resonance Q:
- Volume: Multiplier for the audio source’s volume.
- Cutoff Frequency: Removes all frequencies above this value from the output of the Audio Source. This value is probably the most important for our occlusion effect, as is makes the audio sound muffled. The cutoff frequency can range from 0 to 22.000 Hz.
- Lowpass Resonance Q: This value determines how much the filter dampens self-resonance. This basically means, the
higher the value, the better sound is transmitted through the material the filter is representing. E.g. for imitating an iron
door, the
Lowpass Resonance Qvalue should be higher than for imitating a wooden door.
The occlusion effect is based on the thickness of objects between our
AudioListener and the AudioSource. For each audio source we check for colliders placed between the listener and the source using raycasts and
determine the thickness of the collider. This thickness value is then used to look
up the final effect values from an AudioEffectDefinition ScriptableObject. For each of
the three parameters Volume, Cutoff Frequency and Lowpass Resonance Q the ScriptableObject
contains a curve, which maps from the collider’s thickness on the x-Axis to the parameter value
on the y-Axis.
The image below shows an Audio Effect Definition Scriptable Object for the Concrete material. When selecting the Cutoff Frequency Curve, Unity’s Curve Editor window shows up to allow finetuning the settings. The x-axis displays the thickness of an occluding object in meters. The curve then maps to the cutoff frequency displayed on the y-axis.
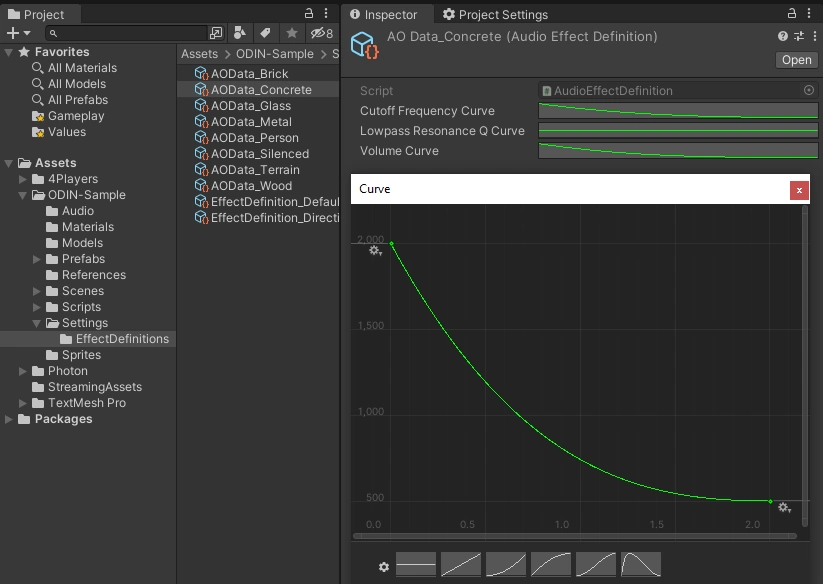
The Audio Effect Definition Scriptable Object.
The AudioEffectDefinition is retrieved using one of two options:
- By placing an
AudioObstaclescript on the collider’s gameobject. This can be used to customize a collider’s occlusion effect and give it a certain material’s damping behaviour. The demo uses theAudioObstacleto define the occlusion effect of a brick wall, a wooden door, a glass pane or even a 100% soundproof barrier. - By falling back to the default
AudioEffectDefinition- this option is used, if noAudioObstacleis attached to the collider.
You can create your own AudioEffectDefinition by using the Create > Odin-Sample > AudioEffectDefinition
menu in your project hierarchy.
Directional Audio
Unity’s built in audio system allows us to hear differences between sounds coming from left
or right, but not whether the object is in front or behind us. The DirectionalAudioListener script will take care
of this using basically the same effects as the audio occlusion system.
Similar to the OcclusionAudioListener, we apply an effect to each Audio Source in
the detection range - but instead of using the thickness of objects between source and listener,
we interpolate the effect based on the angle between the listener’s forward vector and a vector
pointing from the listener to the audio source.
Note: The implementation currently won’t let us differentiate between sound coming from above or below. To implement this behaviour, please take a look at the implementation of Head Related Transfer Functions (HRTF).
Environmental Effects
The Tech Demo Level contains a few rooms, that highlight the Audio Occlusion effect for different materials. Additionally, we’ve used Unity’s AudioReverbZone components to add environmental effects to these rooms, to further increase the players immersion. Unity provides a few presets which simulate different environments - e.g. the Demo Level’s “Brick Room” uses the Stone Corridor preset - but also allows to be set to a custom arrangement. The effect will start to be heared at MaxDistance and is at full force inside of the MinDistance radius.
While the Voice transmissions are affected by the reverb zones, the Radio transmissions are not, due to the Bypass Reverb Zone setting on the Playback Prefab - as described here.
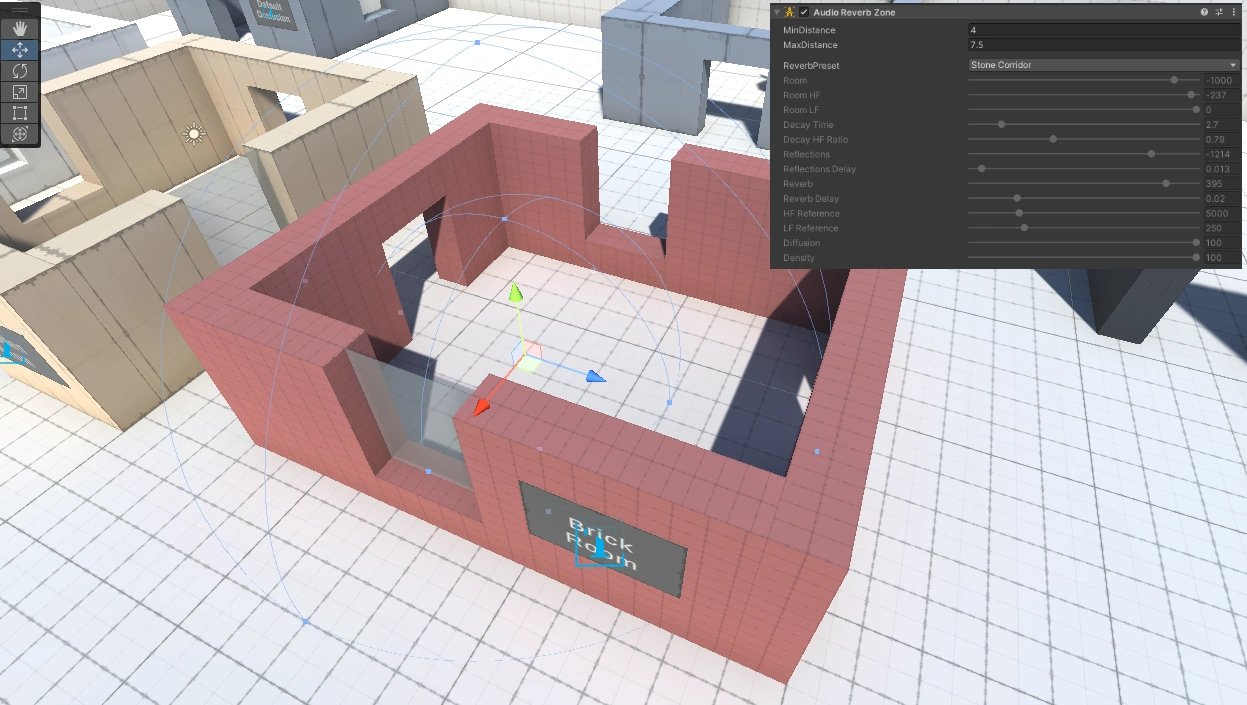
The Brick Room with the highlighted Audio Reverb Zone.
Game Logic
Player Name and Color Synchronization
The OdinNameDisplay and OdinSyncedColor scripts use the ODIN’s custom User Data to synchronize the player’s name and avatar color. With OdinHandler.Instance.OnPeerUserDataChanged.AddListener() we listen to any changes on a remote peers User Data - if the peer’s UniqueUserId equals the Multiplayer Adapter’s GetUniqueUserId(), we read the name and display it above the peer’s avatar using a world-space canvas and display the color on the avatar’s mesh.
Mobile Controls
Because ODIN works on mobile platforms, we’ve added mobile controls to the Tech Demo. The implementation is based on Unity’s new Input System and allows players to move, rotate, use Push-To-Talk and switch from 3rd to 1st-person view with On-Screen controls. Take a look at the UI > MobileControlsCanvas in the DemoLevel scene’s hierarchy for implementation details. The mobile controls can be simulated in Editor by selecting the Enable in Editor option on the ActivateIfMobile script.
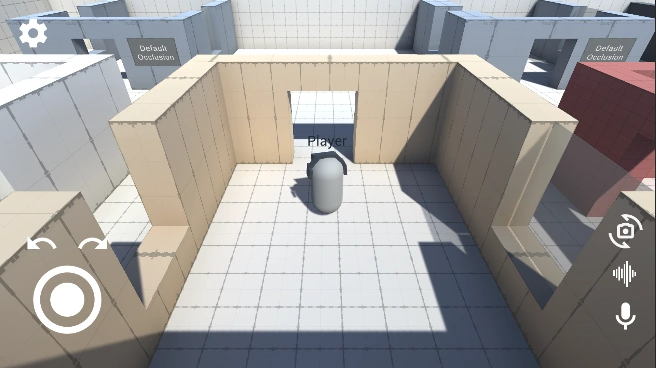
Activated mobile controls in the Tech Demo.
Toggling the in-game radio objects
The ToggleRadioBehaviour script implements the basic behaviour for turning the in-game radio sources on and off - if an avatar enters the detection radio, the controlling player will be able to toggle the radio status with a button press. The status then gets synchronized with the PhotonRadioSynchronization behaviour, which listens to the toggle’s onRadioToggled UnityEvent.
If you’d like to implement another multiplayer framework, simply replace the PhotonRadioSynchronization with your own synchronization behaviour.
Switching Player Views
Users can switch from 3rd-person to 1st-person view on button press - this is implemented in the ToggleViews script by toggling game objects found in the ODINPlayer > LocalPlayerBehaviours > ControllerState hierarchy of the ODINPlayer prefab. The FirstPersonBehavior object contains the camera and behaviours for 1st-person controls, the ThirdPersonBehavior contains everything for 3rd-person controls.
Using ODIN with Unity and Mirror
In this guide we add ODIN to a very simple multiplayer game built with Mirror Networking.
Basic Multiplayer Topology
You might remember this graphic which is provided in the mirror documentation. It’s a good starting point to show how ODIN fits into your multiplayer topology:
This diagram basically outlines the general topology of your multiplayer application.
- Clients connect to the server and send input to the server which handles the games state and the objects
- Depending on the authority input sent to the server is just controller input (server authority) or a combination of controller input and game object positions and spawn requests (client authority)
- The server sends events to the client to keep the clients game state in sync with the master game state on the server
Every client has an exact copy of the scene and its game objects kept on the server. Of course, there is always a slight delay depending on the latency (i.e. connection speed) but overall every client has the exact same state.
Basic Multiplayer Topology with ODIN
Of course, you could build voice into your client server application yourself. Instead of sending packets with controller input or positions, you could also send audio packets. Good luck with that. Audio is extremely hard to get right and there are many different input devices (microphone, headsets, etc). So, it’s easer to just use our technology to add voice communication to your application.
This is the same graphic as above, just with ODIN added to the topology. Let’s dive into it:
- Your client/server structure and code is mostly untouched. You can add ODIN without changing anything on your core game
- ODIN can also be removed very easily without touching your game logic and topology!
- ODIN integration is a pure client side implementation, that is, you don’t need to add anything to the server at all!
- Once your player has been connected to the server and the games state is mirrored to the client, ODIN comes into play.
- The client joins a room by name and starts sending audio data captured from the input device.
- The ODIN server sends events to the client (as your game server does).
- Whenever a client is connected to the ODIN server an OnPeerJoined event is sent to the server. An OnMediaAdded event is sent directly after that if the client is sending audio data (someone might be connected to ODIN but without sending any audio - i.e. just a listener)
- The client attaches the audio source to the corresponding players game object and removes it once the client disconnects from ODIN
- That’s it. The players running around the scene will act as a audio source and it’s up to you how to handle that voice stream in the game
Let’s dive into the actual integration.
Creating a simple multiplayer game
Mirror networking has a very good guide on how to get started. We don’t want to replicate that excellent document here, so head over to Mirror networking and follow the steps. We stopped at Part 11 (as subsequent steps like weapons and switching is not relevant for this guide).
After you have followed the steps, you have created these things:
- A new Unity project with a scene that has the NetworkManager script attached to a game object
- A player prefab which is a basic capsule with a PlayerScript added and some basic movement.
- You can start a
Client + Hostand run around the scene with WASD on your keyboard and connecting another client will show both clients in the scene
Image from Mirror Getting Started Guide
Adding ODIN
In this section, we’ll add ODIN to our simple multiplayer example. Every user connected to the server will join the same
ODIN room once connected to the multiplayer server. Each player will act as an AudioSource
and will play
the voice of the corresponding player in real-time. Audio will use a spatialBlend
of 1.0 and as such
the 3D position will be taken into account by Unity automatically.
Players voice will come out of the direction they are on screen (or even behind you) and the volume will increase or decrease depending on how close these players are.
Let’s get started!
First, we need to add the Unity ODIN SDK to our project.
Download SDK and install
Follow these steps to install the ODIN SDK into the project. For this guide, we recommend using the Unity Package as it’s the simplest way of installing it.
4Players ODIN supports Unity 2019.4 or any later version. The latest version is always available in our Github
repository or in the
Unity Asset Store.
There are numerous ways to install ODIN into your project. We recommend using Package Manager.
Install via Asset Store
4Players ODIN package has been in the asset store for many months and has been updated every week and passed the approval process numerous times. But suddenly Unity pulled our package from the asset store claiming that we have to be part of their Verified Partner Solutions program. We are in the process to get that resolved, but in the meantime you need to install ODIN using the Package Manager manually. Sorry for the inconvenience. Please contact our support if you have any issues with the installation.
Install via Unity Package
Please download the latest version of the ODIN Unity SDK as a .unitypackage from the [Github releases page]
(https://github.com/4Players/odin-sdk-unity/releases). Just double-click the .unitypackage to import it into your
current Unity editor project.
Package Manager
Using the Package Manager will ensure that all dependencies are set up correctly and that you will have the most up to date version of the SDK. In most cases, using the Package Manager is the way to go.
To open the Package Manager, navigate to Window and then click Package Manager in your Unity Editor menu bar.
Using our Git Repository
Click the + button in the upper left and select Add package from git URL. Next, enter this URL and hit enter to import the package:
https://github.com/4Players/odin-sdk-unity.git
Using a Tarball Archive
Click the + button in the upper left and select Add package from tarball. Next, select the odin.tgz archive you’ve downloaded from the Github releases page to import the package.
Add ODIN Handler Prefab
After installation, you’ll find 4Players ODIN in Packages in your asset browser of Unity. Navigate to Samples/Audio3D
and drag & drop the OdinManager 3D Variant prefab into your scene. Click on the prefab and in the inspector you’ll see
something like this:
The ODIN Manager in Unity Inspector
The ODIN Manager will do the following for you:
- Activate the default Microphone and capture it’s input (if Auto-Start Microphone Listener
is active in
Mic-AudioClip Settingssection is activated which is the default) - Handles all ODIN events and exposes delegates to react on those
Set Access Token
Now, that we have added ODIN manager to our scene, we need to set an access key. This is an important topic, that we
don’t want to dive in deeper right now, but you’ll have to take a minute to understand that later. Check out our guide
on this topic here: Understanding Access Keys. As we want to keep things simple, you
can generate an access key right from Unity. Click on the Manage Access
in the inspector in the Client Settings
section in the ODIN Inspector. You’ll see a dialog like this:
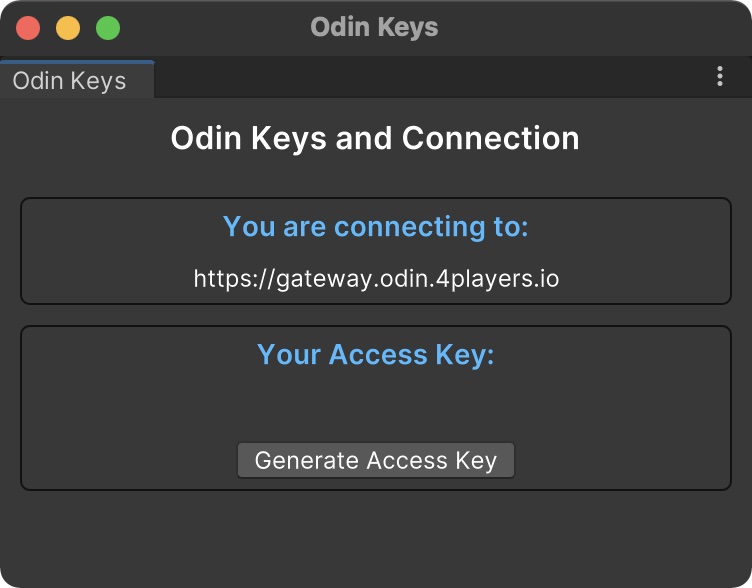
Generate an access token within Unity
You can click on the Generate Access Key to generate an access key for free. This will allow you to connect with up
to 25 users. However, there is no support from us.
Mapping ODIN users to players
As you can see in the diagram above it’s important to match ODIN users to the players in the game, so that you can attach the audio output to the correct player. If you are just using “God Voice” mode, i.e. all players have the same volume and direction (like in radio or video conferencing) then this is not required, but it’s recommend.
In Mirror, every networked object has a NetworkIdentity
. And every NetworkIdentity
has a netId
which is an integer
value that is unique for every object being part of the network. Every player with a PlayerScript attached to it also
has a netId
. We just use that netId
to match ODIN users with networked player objects.
Every Odin peer has UserData
for these use-cases. You can use it to store arbitrary data linked to a user. When the player
has been connected to the server, a local instance of the player is created and the OnStartLocalPlayer
function is called.
With ODIN integrated, the PlayerScript.OnStartLocalPlayer function looks like this:
public override void OnStartLocalPlayer()
{
    sceneScript.playerScript = this;

    Camera.main.transform.SetParent(transform);
    Camera.main.transform.localPosition = new Vector3(0, 0, 0);
    Camera.main.transform.localRotation = Quaternion.identity;

    floatingInfo.transform.localPosition = new Vector3(0, -0.3f, 0.6f);
    floatingInfo.transform.localScale = new Vector3(0.1f, 0.1f, 0.1f);

    string name = "Player" + Random.Range(100, 999);
    Color color = new Color(Random.Range(0f, 1f), Random.Range(0f, 1f), Random.Range(0f, 1f));

    // Generate a JSON User Data object with the players netId and name in the network
    CustomUserDataJsonFormat userData = new CustomUserDataJsonFormat(name, "online");
    userData.seed = netId.ToString();

    // Join ODIN Room ShooterSample and send user data
    OdinHandler.Instance.JoinRoom("ShooterSample", userData.ToUserData());

    // Send users data to the server
    CmdSetupPlayer(name, color, netId.ToString());
}
As you can see, we generate a simple UserData JSON object with name and seed. seed is used as an “external” identifier
that can be used to link the games identifiers to ODIN.
Please note: UserData
in ODIN is just a byte array and can be used for anything. It can be updated with the UpdateUserData
method provided in the Room
class of the ODIN SDK. You can use the class CustomUserDataJsonFormat
which provides a standard
interface that is also used in our Web SDK (so both can work seamlessly together). CustomUserDataJsonFormat
serialized its data
to a JSON (ToUserData
and FromUserData
) representation.
Once that is done, we join the ODIN room ShooterSample. We have also extended
the CmdSetupPlayer function and added another parameter to send the users netId
to the server and to keep it in
sync with the other clients:
[SyncVar(hook = nameof(OnNameChanged))]
public string playerName;

[SyncVar(hook = nameof(OnColorChanged))]
public Color playerColor = Color.white;

// The new SyncVar to store the users netId as an ODIN seed
[SyncVar]
public string odinSeed;
This is the new version of CmdSetupPlayer after integrating ODIN:
[Command]
public void CmdSetupPlayer(string _name, Color _col, string netId)
{
    // player info sent to server, then server updates sync vars which handles it on all clients
    playerName = _name;
    playerColor = _col;
    odinSeed = netId;
    sceneScript.statusText = $"{playerName} joined.";
}
That’s it. Now every user will expose their ODIN identifier to the network and will also send that identifier to ODIN. Of course, many other things can be used as the identifier, being it the user id from authentication or a random id.
Understanding ODIN rooms
ODIN follows a couple of very simple rules:
- All users connected to the same room can here everyone else (except they are muted)
- A room is created if the first users is connected and is being deleted if the last one disconnects from it
- One user can join multiple rooms simultaneously
So, it’s up to us to decide how we leverage that. You can have one large room for all players or you can have a room for each team. And you can also have multiple rooms at the same time. Think about a game like CounterStrike. There could be three rooms:
- In one room, every player is connected and this room uses positional 3D audio
- One room for Terrorists (i.e. all players are connected via virtual radio) which uses layered audio
- One room for Counter Terrorists (i.e. all players are connected via virtual radio) which uses layered audio
In this usage scenario players can talk to everyone else crystal clear as they would in real life via radia or telefone. But players would also expose their voice inside the game at their 3D position. So, if you talk to others, an opponent which is close to you can listen to what you are talking about. This exposes your position and it also gives opponent a chance to learn about your strategy.
In this example, we’ll stick to one room using 3D audio. Every AudioSource in Unity has a property called spatialBlend . Here is an excerpt of the Unity documentation:
Sets how much this AudioSource is affected by 3D spatialisation calculations (attenuation, doppler etc). 0.0 makes the sound full 2D, 1.0 makes it full 3D.
So, what we do with ODIN is that we attach a special ODIN powered AudioSource
to the player object (head) and set
spatialBlend
to 1.0 to make it full 3D audio. If you want to have “Gods voice” mode, i.e. no 3D positioning then
you would set that value to 0.0. That’s it! With ODIN this is all you have to do to have standard, equal volume radio
type voice or 3D positional audio.
Attach ODIN voice to player objects
Let’s recap what we have now:
- We have a simple multiple “game” that allows multiple players to connect and running around the scene
- Every player connects to the
ShooterSampleroom in ODIN and exposes a unique ID (in this case theNetworkIdentity.netId) to the network and ODIN
Once connected to ODIN, the ODIN server will send events whenever something happens of interest. If just connected, ODIN will send a couple of OnPeerJoined and OnMediaAdded events to inform about all players available in that room.
You can hook up those events via code or by linking them in the inspector in Unity. In this example, we do it via Inspector.
So, we create a new Game Object in the scene called Odin Peer Manager and create a new script OdinPeerManager which
is linked to the Odin Peer Manager game object. This is the complete OdinPeerManager script:
using System.Collections;
using System.Collections.Generic;
using Mirror.Examples.Chat;
using OdinNative.Odin;
using OdinNative.Odin.Room;
using OdinNative.Unity;
using OdinNative.Unity.Audio;
using QuickStart;
using UnityEngine;

public class OdinPeerManager : MonoBehaviour
{
    private bool muted = false;

    private void AttachOdinPlaybackToPlayer(PlayerScript player, Room room, ulong peerId, int mediaId)
    {
        PlaybackComponent playback = OdinHandler.Instance.AddPlaybackComponent(player.gameObject, room.Config.Name, peerId, mediaId);

        // Set the spatialBlend to 1 for full 3D audio. Set it to 0 if you want to have a steady volume independent of 3D position
        playback.PlaybackSource.spatialBlend = 1.0f; // set AudioSource to full 3D
    }

    public PlayerScript GetPlayerForOdinPeer(CustomUserDataJsonFormat userData)
    {
        if (userData.seed != null)
        {
            Debug.Log("Player has network Id: " + userData.seed);
            PlayerScript[] players = FindObjectsOfType<PlayerScript>();
            foreach (var player in players)
            {
                if (player.odinSeed == userData.seed)
                {
                    Debug.Log("Found PlayerScript with seed " + userData.seed);
                    if (player.isLocalPlayer)
                    {
                        Debug.Log("Is local player, no need to do anything");
                    }
                    else
                    {
                        // We have matched the OdinPeer with our local player instance
                        return player;
                    }
                }
            }
        }

        return null;
    }

    public void RemoveOdinPlaybackFromPlayer(PlayerScript player)
    {
        PlaybackComponent playback = player.GetComponent<PlaybackComponent>();
        Destroy(playback);

        AudioSource audioSource = player.GetComponent<AudioSource>();
        Destroy(audioSource);
    }

    public void OnMediaRemoved(object sender, MediaRemovedEventArgs eventArgs)
    {
        Room room = sender as Room;
        Debug.Log($"ODIN MEDIA REMOVED. Room: {room.Config.Name}, MediaId: {eventArgs.Media.Id}, UserData: {eventArgs.Peer.UserData.ToString()}");

        CustomUserDataJsonFormat userData = CustomUserDataJsonFormat.FromUserData(eventArgs.Peer.UserData);
        PlayerScript player = GetPlayerForOdinPeer(userData);
        if (player)
        {
            RemoveOdinPlaybackFromPlayer(player);
        }
    }

    public void OnMediaAdded(object sender, MediaAddedEventArgs eventArgs)
    {
        Room room = sender as Room;
        Debug.Log($"ODIN MEDIA ADDED. Room: {room.Config.Name}, PeerId: {eventArgs.PeerId}, MediaId: {eventArgs.Media.Id}, UserData: {eventArgs.Peer.UserData.ToString()}");

        CustomUserDataJsonFormat userData = CustomUserDataJsonFormat.FromUserData(eventArgs.Peer.UserData);
        PlayerScript player = GetPlayerForOdinPeer(userData);
        if (player)
        {
            AttachOdinPlaybackToPlayer(player, room, eventArgs.PeerId, eventArgs.Media.Id);
        }
    }

    public void ToggleMute()
    {
        muted = !muted;

        foreach (var room in OdinHandler.Instance.Rooms)
        {
            OdinHandler.Instance.Microphone.MuteRoomMicrophone(room, muted);
        }
    }
}
We are only interested in the OnMediaAdded
and MediaRemoved events. Those events are
sent whenever a user has joined a room and started to send audio. Or if that player stopped sending audio.
So, we created two functions OnMediaAdded
and OnMediaRemoved and linked those two events in the Odin Manager:
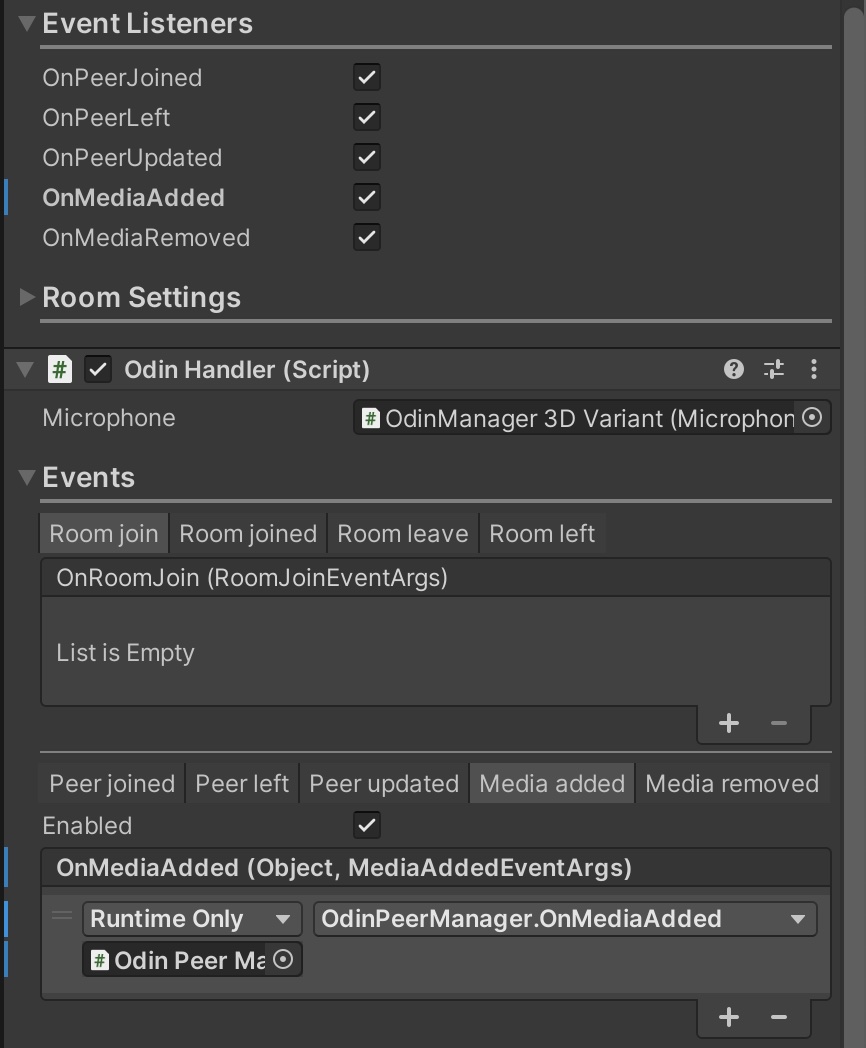
ODIN events linked to our new OdinPeerManager object
So, let’s dive into that a bit. OnMediaAdded is called for each player that is connected to ODIN once the current player connects and is also called if another player joins later.
public void OnMediaAdded(object sender, MediaAddedEventArgs eventArgs)
{
    Room room = sender as Room;
    Debug.Log($"ODIN MEDIA ADDED. Room: {room.Config.Name}, PeerId: {eventArgs.PeerId}, MediaId: {eventArgs.Media.Id}, UserData: {eventArgs.Peer.UserData.ToString()}");

    CustomUserDataJsonFormat userData = CustomUserDataJsonFormat.FromUserData(eventArgs.Peer.UserData);
    PlayerScript player = GetPlayerForOdinPeer(userData);
    if (player)
    {
        AttachOdinPlaybackToPlayer(player, room, eventArgs.PeerId, eventArgs.Media.Id);
    }
}
The sender is a Room object in this case. So we cast it to the Room. In the MediaAddedEventArgs object a lot of
interesting info is sent from the server to the client. We are mostly interested in the UserData object. We can convert
that generic object using the CustomUserDataJsonFormat.FromUserData method to a CustomUserDataJsonFormat object that has this structure :
public class CustomUserDataJsonFormat
{
    public string name;
    public string seed;
    public string status;
    public int muted;
    public string user;
    public string renderer;
    public string platform;
    public string revision;
    public string version;
    public string buildno;

    ...
}
Perhaps you remember that when connecting to the ODIN room (see above) we created a UserData object in OnStartLocalPlayer:
  // Generate a JSON User Data object with the players netId and name in the network
  CustomUserDataJsonFormat userData = new CustomUserDataJsonFormat(name, "online");
  userData.seed = netId.ToString();

  // Join ODIN Room ShooterSample and send user data
  OdinHandler.Instance.JoinRoom("ShooterSample", userData.ToUserData());
As you can see, we used the seed property to set a unique ID within the ODIN ecosystem (which is the netId).
So, the seed in this CustomUserDataJsonFormat is a network identifier which should be available within our current scene. All
we have to do is find all PlayerScript objects in the scene and find that one with this netId and we have matched
the player to the ODIN user. This is done in the GetPlayerForOdinPeer function.
Please note: The OnMediaAdded
event is sent for all players in the room, including the local player. We don’t want
to attach the AudioSource
to the local player, as we would then have an echo. So we check out if the found player
the local player with isLocalPlayer and if that’s the case, we just return null.
Now that we matched the player to the ODIN peer, we just need to attach the special ODIN powered AudioSource
which will
basically just output the users microphone input to the corresponding player object. We do that in the AttachOdinPlaybackToPlayer
function which in turn uses the AddPlaybackComponent
function of the ODIN SDK.
We get back a PlaybackComponent that we can use to adjust the spatialBlend . In this case, we set it to 1.0 to enable full 3D audio. You can also change that to 0.0 to have radio like voice communication.
That’s it!
Congratulations, you have added ODIN to a multiplayer game complete with 3D spatial audio. Multiple players connect to the server and their voice will be coming from the position they are related to the players position and the volume will change with the distance.
Handling User Data
Every peer (players or user connected to an ODIN room) has its own user data. User data within ODIN is always defined like this:
public byte[] UserData { get; set; }
As you can see, it’s just an array of bytes. It’s completely up to you how you use this. For example in simpler games
like casual games, board games or other forms of multiplayer games that don’t need advanced features like movement
prediction, you don’t need to use complex multiplayer frameworks like Mirror Networking
or Unity MLAPI
to build your game. ODINs user data is typically enough as you can link your custom scripts to the OnPeerUserDataChanged
callback which is called, whenever user data changes for a connected peer.
If you plan or already use one of those more complex frameworks, you need to sync ODIN with those tools, as in this case
your players connect to two different servers: The (dedicated) server for the game and ODINs backend servers for voice.
Don’t worry, it’s simpler than it seems as ODIN SDK does all the heavy lifting for you. In your multiplayer game, players
might be in different teams, and only those teams should be in the same ODIN room. To sync up these information between
ODIN and your game you can use UserData.
In our examples we use a simple class that exposes a simple structure and serializes that to a JSON string that is set as the peers user data. Then, “on the other side”, this string is serialized back into a class instance.
You’ll find this class in the samples folder
of the Unity SDK and looks
like this:
using OdinNative.Odin;
using System;
using System.Text;
using UnityEngine;

namespace OdinNative.Unity.Samples
{
    [Serializable]
    class CustomUserDataJsonFormat : IUserData
    {
        public string name;
        public string seed;
        public string status;
        public int muted;
        public string user;
        public string renderer;
        public string platform;
        public string revision;
        public string version;
        public string buildno;

        public CustomUserDataJsonFormat() : this("Unity Player", "online") { }
        public CustomUserDataJsonFormat(string name, string status)
        {
            this.name = name;
            this.seed = SystemInfo.deviceUniqueIdentifier;
            this.status = status;
            this.muted = 0;
            this.user = string.Format("{0}.{1}", Application.companyName, Application.productName);
            this.renderer = Application.unityVersion;
            this.platform = string.Format("{0}/{1}", Application.platform, Application.unityVersion);
            this.revision = "0";
            this.version = Application.version;
            this.buildno = Application.buildGUID;
        }

        public UserData ToUserData()
        {
            return new UserData(this.ToJson());
        }

        public static CustomUserDataJsonFormat FromUserData(UserData userData)
        {
            return JsonUtility.FromJson<CustomUserDataJsonFormat>(userData.ToString());
        }

        public static bool FromUserData(UserData userData, out CustomUserDataJsonFormat customUserData)
        {
            try
            {
                customUserData = JsonUtility.FromJson<CustomUserDataJsonFormat>(userData.ToString());
                return true;
            }
            catch (Exception e)
            {
                Debug.LogException(e);
                customUserData = null;
                return false;
            }
        }

        internal string GetAvatarUrl()
        {
            return string.Format("https://avatars.dicebear.com/api/bottts/{0}.svg?textureChance=0", this.seed);
        }

        public string ToJson()
        {
            return JsonUtility.ToJson(this);
        }

        public override string ToString()
        {
            return this.ToJson();
        }

        public byte[] ToBytes()
        {
            return Encoding.UTF8.GetBytes(this.ToString());
        }
    }
}
If you like this way of handling user data, copy & paste this code into your own Unity project, rename it to whatever pleases you (and change the namespace). Then, just use it to set User Data when joining a room:
// Generate a JSON User Data object with the players netId and name in the network
CustomUserDataJsonFormat userData = new CustomUserDataJsonFormat(name, "online");
userData.seed = netId.ToString();

// Join ODIN Room ShooterSample and send user data
OdinHandler.Instance.JoinRoom("ShooterSample", userData.ToUserData());
Customize the structure that makes sense for your own game.
We have a comprehensive guide on how to leverage UserData to sync up ODIN with a multiplayer game created with Mirror Networking
.
FAQs
Does 4Players ODIN support Apple Silicon?
Yes. It does. But its important that you run the Unity Editor with Apple Silicon support. At time of this writing only version 2021.2 and above are available in an Apple Silicon version. Install the Unity Hub in version 3.x to install Apple Silicon Unity editor.
Using the Unity Hub to install Apple Silicon version
Download the Unity Hub here:
How do I access the live audio feed?
Sometimes, for example if you want to do lip-syncing or if you want to add an graphical equalizer representing the audio
coming from ODIN, you need to get access to the AudioSource and AudioClipfrom ODIN.
This is how you can get access to those information. Somewhere in your code, you attach the ODIN playback component
representing a user to the game object using the function OdinHandler.Instance.AddPlaybackComponent. This will
return an instance of PlaybackComponent. Use this component to get access to the AudioClip:
Playback = gameObject.GetComponent<PlaybackComponent>();
AudioSource source = Playback.PlaybackSource;
AudioClip clip = Playback.PlaybackSource.clip;
What is UserData?
Every peer (i.e. player) connected to ODIN has it’s own user data. Within ODIN, this is just a byte array that you can use for everything. We provide a class that provides basic user data as a JSON object. CustomUserDataJsonFormat exposes that interface and provides convenience functions for serialization.
You can set the user data before joining a room or you can also update the user data afterwards:
// Generate a JSON User Data object with the players netId and name in the network
CustomUserDataJsonFormat userData = new CustomUserDataJsonFormat(name, "online");
userData.seed = netId.ToString();

// Join ODIN Room ShooterSample and send user data
OdinHandler.Instance.JoinRoom("ShooterSample", userData.ToUserData());
The method ToUserData serializes the data stored in the CustomUserDataJsonFormat
instance to a JSON string and FromUserData will
take the serialized JSON string and return an instance of CustomUserDataJsonFormat
as shown in this code snippet:
public void OnMediaRemoved(object sender, MediaRemovedEventArgs eventArgs)
{
    OdinUserData userData = OdinUserData.FromUserData(eventArgs.Peer.UserData);
    PlayerScript player = GetPlayerForOdinPeer(userData);
    if (player)
    {
        RemoveOdinPlaybackFromPlayer(player);
    }
}
Please check out our guide on user data:
I get an UnityException when leaving PIE or loading a new scene.
UnityException: get_dataPath can only be called from the main thread.
Due to the asynchronous nature of leaving a room operation, the current recommendation is to avoid invoking this
function within OnDestroy if the scene is being unloaded. Scene unloading could occur when transitioning between
scenes or shutting down an application.
Instead, the best practice is to call the LeaveRoom
function and subsequently wait for the
OnRoomLeft
event to be triggered. Once this event has been triggered, it is then safe to perform further actions,
such as calling LoadScene or Application.Quit.
room.UpdatePosition does not work or works incorrectly
Please make sure to follow these tips:
- The position scale should be set to the same value for all Peers in the ODIN room. The scale value also has to be set individually for each room that will utilize ODIN’s optimization feature. You can set the position scale using
room.SetPositionScale. - Invoking
room.UpdatePositiontoo frequently can lead to operational issues where the optimization of audio streams may not function correctly. Limit the frequency of callingroom.UpdatePositionto a maximum of 10 times per second. This equates to one update every 100 milliseconds. We recommend using Unity’sCoroutinesto update the position in Odin rooms.
Components
The ODIN SDK for Unity comes with four components. OdinEditorConfig is the place for all ODIN specific settings. Here
you’ll setup sample rate, event callbacks and more. The OdinHandler is the singleton class that is persistent throughout
the lifecycle of your game ( uses DontDestroyOnLoad) and is used to join rooms and exposes callback functions and
delegates that allow you to customize the experience. Next, MicrophoneReader is the component that handles the devices
audio devices (microphones), captures audio and sends them to ODIN servers. Last but not least, the PlaybackComponent
is the “speaker” in the system. It’s basically a standard Unity AudioSource that does play the microphone of the
connected player right in the Unity scene.
In a nutshell, the MicrophoneReader component is the mic, the PlaybackComponent is the speaker playing in real-time
what is recorded by the connected mic and the OdinHandler manages these connections and their lifecycle using settings
and event callbacks stored in the OdinEditorConfig.
Odin Editor Config
The OdinEditorConfig
component class allows you to setup various aspects of ODIN within your game.
If you follow our guide on settings up ODIN within your game, you should see
this in your Unity inspector if the Odin Manager Game Object is selected. Odin Editor Config is one of three parts
of the Odin Manager Game Object.
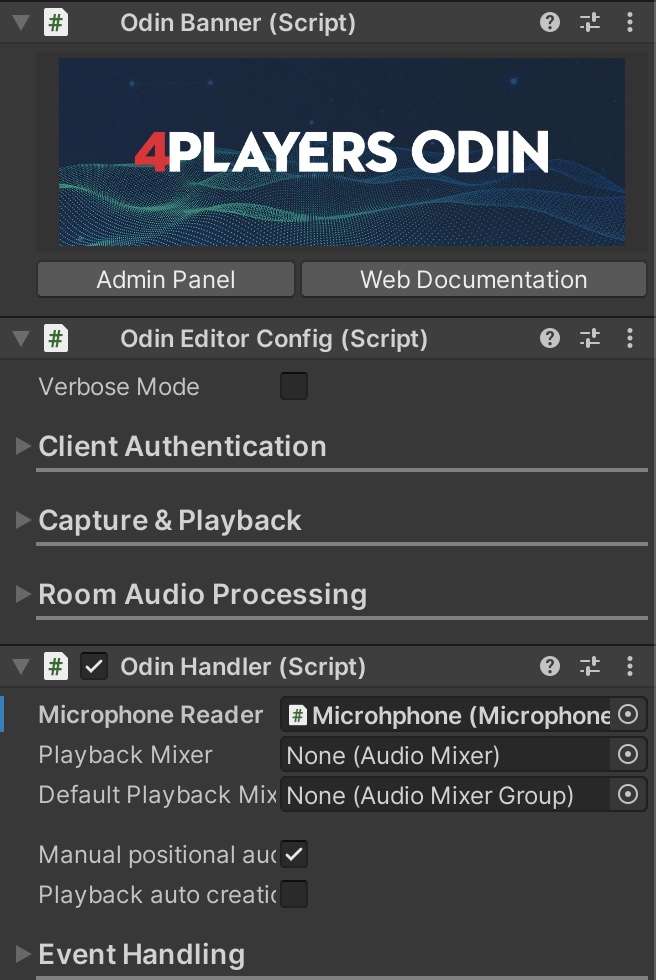
Client Authentication
Use the first section Client Authentication to set up your access key and user data. This is for development purposes only as you should not expose your access key in the production version of your game. You should rather request the access key from a secure server backend. We have compiled a document explaining access keys and how to generate and use/store them: Access Keys in ODIN.

Properties
| Property | Description |
|---|---|
| Access Key | The access key that shall be used to generate access tokens for individual users. Read here on how to generate it. |
| Gateway URL | The base URL of the gateway. If you are using our hosted solution, leave it as is, otherwise if you are hosting yourself you need to adjust the URL |
| Manage Access | You can generate an access token for testing purposes right in the Unity editor for up to 25 users by pressing this button. See below for more details. |
| Client ID | The client id of your application. Use the Player Settings of Unity to set this value |
| User Data | This is the default user data that will be used for each player (if nothing is provided by you when joining the room) |
More info on the user data can be found in the user data guide. A sample of what you can do with user data can be found in one of our integration guides.
Create access token
You don’t need to talk to anyone at 4Players or subscribe to our tiers to test ODIN. After clicking on the Manage Access
button, this window will popup. Click on the “Generate Access Key” button to create an access key that allows you to test
ODIN for up to 25 players.
You don’t need a (paid) tier for testing and development purposes. But you may not go into production with access keys generated this way. There is no guarantee that they will work for a longer period of time and there is also not any support.
Capture & Playback
Use this section to setup your audio settings.
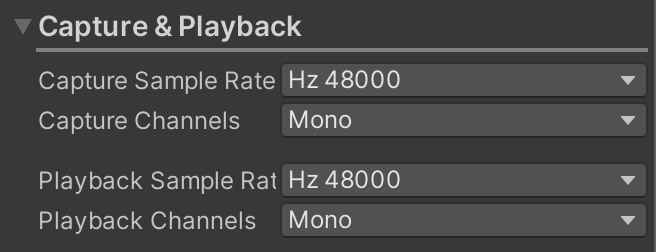
Properties
Room Settings
ODIN provides latest audio technology based on machine learning and other advanced techniques to make sure, that audio quality is excellent for your players. It’s important, that the game experience and immersion is not destroyed by noise like cars, airplanes, kids screaming or just the noise produced by cheap microphones.
Our mission is to provide the best audio experience for each of your players. Some of these features can be enabled or disabled or adjusted directly in the Unity editor. You’ll find these settings in this section.
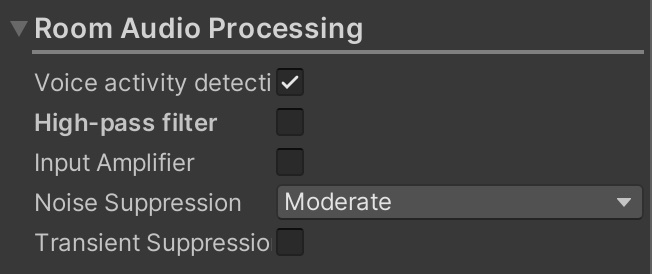
Event Listeners
ODIN Handler
Let’s have a look at the settings exposed by the next component of a typical ODIN Manager Game Object: Odin Handler .
Odin Handler
The OdinHandler component class is the global manager (singleton) for Odin inside your game. You can use it to connect your own callbacks.
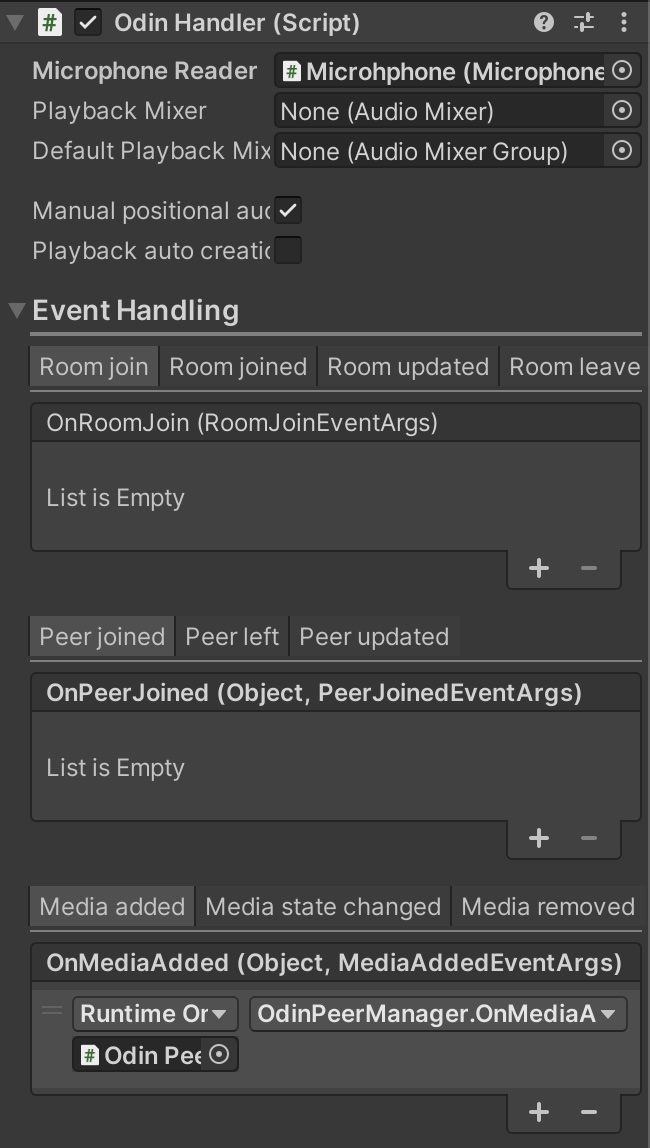
ODIN uses DontDestroyOnLoad in this class to make sure that this component and game object survives scene changes.
Microphone
The first option provided in the Odin Handler Inspector is the microphone setting:

Drag & Drop the Game Object within your scene that has the Microphone Reader component attached. If you have created a standard ODIN Manager Game Object by following our manual then this will be the same game object that the Odin Handler is attached to.
If you put the Microphone Reader component on a different game object than the Odin Handler you need to make sure that
the other game object also uses DontDestroyOnLoad to survice scene changes. Otherwise, your players will not be able
to talk to other players as their microphone game object got removed. Of course, you can also use that as a feature to
disable microphone input in specific scenes. But you need to be careful with lifecycle management of your game objects
if you separate Odin Handler and Microphone Reader into different game objects.
Mixer Settings
Another set of options is playback mixer settings.

Sometimes you want to apply some audio effects to voice, like cell broadcast interferences or noise. Create a Unity AudioMixerGroup or AudioMixer and assign it to one of these options.
| Setting | Description |
|---|---|
| Playback Mixer | Create a Unity AudioMixer asset and drag it into this field. |
| Playback Mixer Group | Create a Unity AudioMixerGroup asset and drag it into this field. |
Playback Creation
In this section, you can activate some SDK automations, that make your life easier. In some special cases you might take control of various aspects yourself, but for most use-cases you can make use of these automations.

Please note: You should only select one of these checkboxes. We’ll change that to a drop down field in the next version of the SDK.
If both settings are unchecked you’ll need to handle the events like OnMediaAdded yourself and you’ll also need to create audio pipeline elements yourself. See the source-code of the SDK on how to do that.
Playback auto creation
If you check this box, the ODIN SDK will automatically create an AudioSource and link that to the ODIN server for
you and will handle the lifetime for you.
In addition to that, and that distinguishes this setting to Manual Positional Audio is that the
PlaybackComponent
will be automatically attached to the GameObject with the OdinHandler
attached.
This is the easiest way to implement a simple “video conferencing” like use case where you don’t have positional audio or specific teams.
As all users voice is attached to one GameObject automatically you cannot implement any form of 3D audio this way. If
you want to have 3D audio, you need to deactivate this setting and activate Manual Positional Audio instead (see
description below).
Manual Positional Audio
If you check this box (and uncheck the other setting) ODIN will automatically create an AudioSource for you and
link that to the ODIN server and handles the lifetime of it.
However, you are responsible to attach the PlaybackComponent to a GameObject representing the player (in space) and thus allowing you to implement 3D audio with ease.
Check out these guides on how to get notified of the SDK once an audio stream has been prepared and how to handle the event:
- Getting Started with Unity: Create a simple Unity project and add ODIN to it. Shows the basic workflow and basic event handling.
- Unity with Mirror Networking: Shows how to implement ODIN into a multiplayer game built with mirror networking. Create a simple multi-player game and add ODIN to it in under 20 minutes.
What you basically have to do is to listen on the OnCreatedMediaObject and OnDeleteMediaObject events of the OdinHandler instance like this:
void Start()
{
    OdinHandler.Instance.OnCreatedMediaObject.AddListener(OnCreatedMediaObject);
    OdinHandler.Instance.OnDeleteMediaObject.AddListener(OnDeleteMediaObject);
}
ODIN will call these events once a user joined the room and added a media object or removed it (i.e. muted their audio). Please note, that users can join a room without adding their own media stream (i.e. spectators).
You’ll need to call AddPlaybackComponent method which will create a PlaybackComponent and attach it to the Game Object that you provide. Of course, you’ll need to have some logic to find the correct player GameObject for the ODIN. Every ODIN user (peer) has it’s own user data which you can use to link your GameObjects to ODIN. The best place to learn how to do that is our guide Unity with Mirror Networking.
Here is a simple example on how to handle the event. More examples can be found in the reference documentation of PlaybackComponent , the OnMediaAdded event and the guides linked above.
private void OnCreatedMediaObject(string roomName, ulong peerId, int mediaId)
{
    Room room = OdinHandler.Instance.Rooms[roomName];
    if (room == null || room.Self == null || room.Self.Id == peerId) return;

    // Create or find a player object in the scene
    var peerContainer = CreateOrFindGameObject(peerId, roomName);

    // Create PlaybackComponent and add to the players GameObject
    PlaybackComponent playback = OdinHandler.Instance.AddPlaybackComponent(peerContainer, room.Config.Name, peerId, mediaId);

    // Set spatialBlend to 1.0f to activate fill 3D audio and adjust some 3D audio settings
    // This is basic Unity stuff. PlaybackSource is an AudioSource object. See Unity documentation for more info
    playback.PlaybackSource.spatialBlend = 1.0f;
    playback.PlaybackSource.rolloffMode = AudioRolloffMode.Linear;
    playback.PlaybackSource.minDistance = 1;
    playback.PlaybackSource.maxDistance = 10;
}
Events
ODIN has a couple of events that allows you to react on things that happen within the ODIN runtime. Use these settings to connect your own game objects and scripts to ODIN. You can also do that in code if you like. Have a look at the OdinHandler class for more infos about that.
These are standard Unity events. Click on the + button to add a listener and than drag & drop the game object that
has your handler script attached exposing public callbacks for the events you want to listen to.
Read more about the events available in our Scripting documentation:
Room events
These events are sent if anything happens with the rooms the player has joined. Use the JoinRoom method of the OdinHandler class to connect the player to one or more rooms. These events will then trigger and allow you to react on these in your own scripts by attaching callbacks.
Peer events
Whenever something happens in the room the player is connected to, i.e. another player joins the room or updates his user data, these events are triggered and allow you to react on those in your own scripts.
It’s important to understand the difference between a peer and a media stream. In ODIN it’s possible to join a room as a listener but not sending media into the room. A typical use case for this is a spectator or in a podcast, only the podcaster is able to say something while the others are just listening.
It’s the same in ODIN: If a player connects a room, the Peer Joined event is triggered. Now, the player listens to
the audio streams in this room. If the Odin Handler of the other player has a Microphone Reader
attached and is active and recording, a Media Added event will be triggered once the audio stream of the other player
notifying all other peers, that there is an additional audio stream they need to listen to now.
If the other player disables his microphone, a Media Removed event is triggered and all other peers will stop listening
on this audio source.
Media events
When media streams are added or removed, you’ll receive these events.
Microphone Reader settings
In a typical ODIN Manager Game Object a Microphone Reader component is attached which handles the players microphone and audio input. Let’s dig through these settings here: Microphone Reader .
Microphone Reader
The MicrophoneReader component class starts capturing audio input from attached microphones and sends audio packets to the ODIN runtime which distributes them to the other peers joined to the same room.
This component is typically attached to the same game object as the Odin Handler . If you put this object on a different game object, make sure you attach it to the Microphone setting of the Odin Handler component.
Basic Settings
These are the settings exposed in the Unity Inspector for this component:
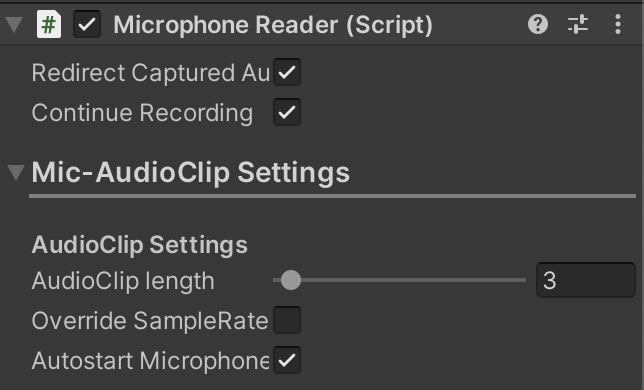
Properties
| Property | Description |
|---|---|
| Redirect captured audio | Automatically send all captured audio data to all rooms this player joined. If you want more control, disable this setting. |
| Continue Recording | Indicates whether the recording should continue recording if AudioClipLength is reached, and wrap around and record from the beginning of the AudioClip. |
Mic Audio-Clip Settings
In this section you can adjust various settings relevant for Audio Clip Management. In Unity all audio is stored in an
AudioClip
. As Unity does not support real-time audio streams, ODIN just modifies an Audio Clip and
overwrites it over and over again once it came to an end.
Use these settings to adjust these behaviors.
Properties
Playback Component
This component is automatically created and attached during runtime when you call the method AddPlaybackComponent on the OdinHandler singleton in your scene.
Do not add this component manually in the editor.
More info on this topic can be found here:
- OdinHandler reference documentation
- OnMediaAdded event and how to use it
- Unity Multiplayer Game Integration Guide
Unity Tech Demo
David Liebemann at SciCode Studio created a multiplayer playroom with Unity and Photon PUN 2, that showcases all features of ODIN with simple example scripts.
If you want to see it in action, we provide binary releases to download for Windows, Mac and Linux. Download it, run it and give it a try:
These ODIN features have been implemented in this sample:
- Integration of ODIN into a multiplayer framework (in this case Photon PUN 2)
- Spatial audio - creating a 3D proximity voice chat by using standard Unity components for voice audio playback
- Usage of audio occlusion and directional effects
- Ambient effects in some rooms that are automatically applied to voice audio
- Simulating a radio channel by using a second ODIN room
- Increasing performance by transmitting player position to the ODIN server to prevent streaming from players too far away
- Making available various filters (APMs) to improve the audio capture quality
The project is open source and can be found in our Github repository. If you want to get started with ODIN, give it a try as it contains a lot of useful scripts that you can use in your own game (MIT License).
For more in-depth information, take a look at our Multiplayer with Photon guide.
Screenshot from the sample project
User manual
After launching the demo you’ll see the lobby screen. Enter a name and press the Join button. You’ll see a
cylinder character that you can navigate around using these keys:
| Input | Description |
|---|---|
| W | Move forward |
| S | Move backward |
| A | Strafe left |
| D | Strafe right |
| Q | Rotate left |
| E | Rotate right |
| SHIFT | Sprint |
| 1 | Toggle between first person and third person view |
| C | Keep pressed to talk in 3D space |
| V | Keep pressed to talk via radio |