
As you may have noted, we have been at a lot of events recently, all around the world. Games Convention in Cologne in August, Scottish Games Week, Megamigs in Montreal, and recently we were at the G-Star in South Korea. In all of these conventions we had a booth and showcased our real-time voice SDK - ODIN Voice. Users could enjoy one of our demos in real-time and talk to each other enjoying the 3D spatial audio.
But, it’s 2022, and we still face the same issues and hurdles we faced 10 years ago when attending conventions: Bad internet connection. Although we are able to run the whole ODIN stack on a laptop (i.e. the server and the client running on the same machine without requirement of internet connection) the experience is not as great as you just talk to someone standing next to you.
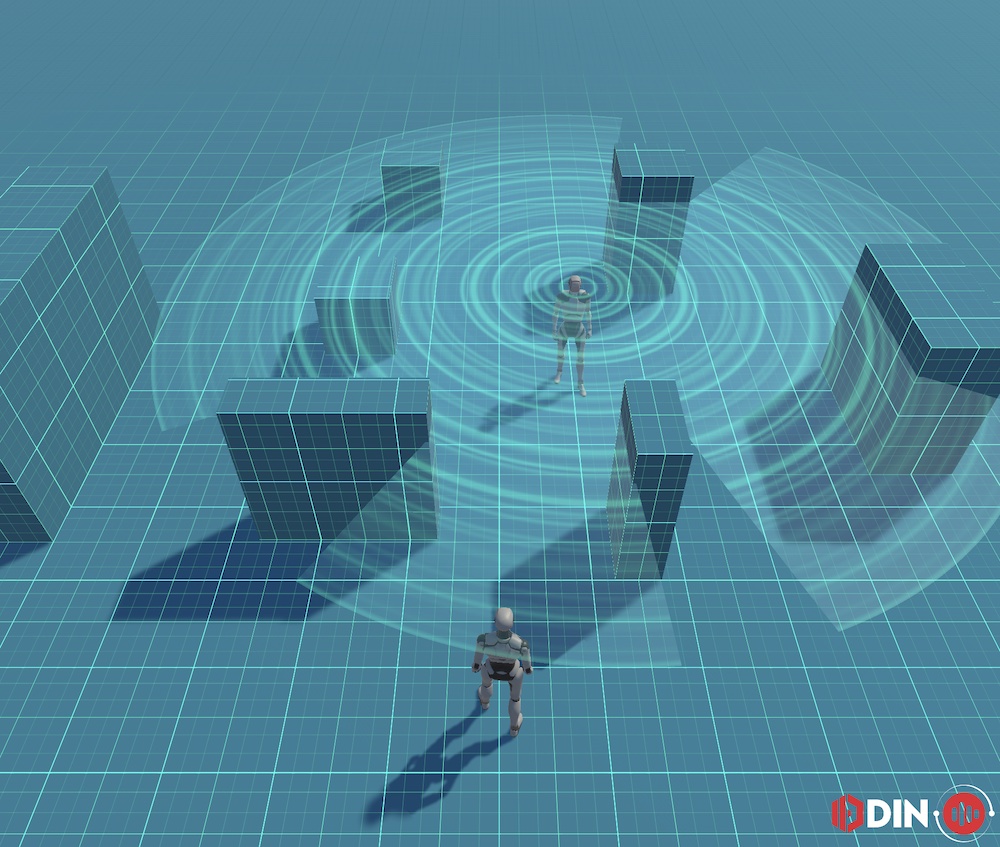
So, we decided to create a video to show-off what ODIN is all about and what 3D spatial audio is. It’s easier to run a video on a booth and having on-demand demos after the show rather than trying to do everything in a loud, internet-less, crowded environment that is a convention.
Here is the video we came up with:
A very important part of ODIN is its effortless 3D spatial audio system with audio occlusion. So, what does that mean:
- If you are standing next to someone, you hear them loud and clear.
- If you are standing behind someone, you hear them less loud.
- If you are standing behind a wall, you hear them even less loud or you don’t hear them at all, depending on thickness and material of the wall.
- If someone stands right next to you, you’ll hear them on your right ear
- If someone walks away volume decreases with the distance until you don’t hear them anymore.
So, it’s basically a simulation of voice chatting in the real world. You can hear people around you as you would in real world. Of course, however with all the benefits of a digital, software driving simulation. You can work out the benefits and reduce the caveats.
We believe, that especially in experiences with a lot of people enjoying it at the same time. In a separate voice-chat application, you need to manage channels, people need to be in the right channels, they should be muted when not talking, etc. With ODIN, you don’t need to worry about any of that. You just join a room, and you can literally talk to anyone by just coming close. You can build separate spaces using our audio occlusion system to make sure they can have one-on-one meetings that are private. Of course, you don’t need to use the 3D spatial audio. You can also use radio like voice chat, where you can talk to everyone in the room at the same time always in full volume and without occlusion. It’s up to you, but that 3D spatial audio system sometimes needs some explanation, like I did in the last paragraphs. The video should just show that without many words.
Preparing the video
When creating a video, it’s always important to have a good idea of the goal. In this case, we had these goals:
- Visualize audio volume fall-off (i.e. full volume close and silent “far” away)
- Visualizing the nature of voice
- Visualize audio occlusion
- Make users hear the voice of the person simulated in the video
We came up with this idea to achieve these goals:
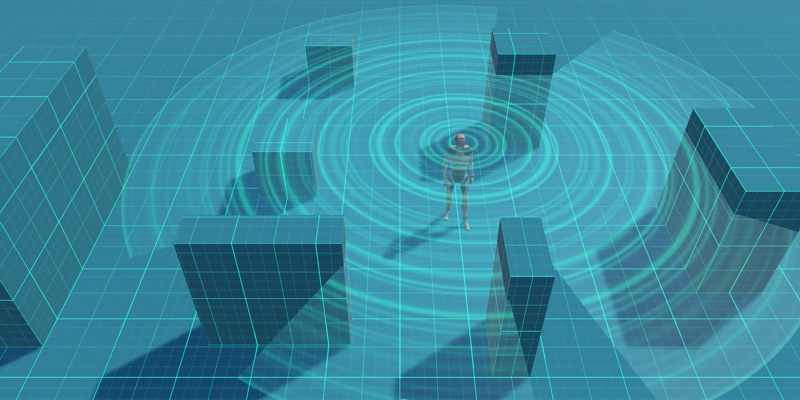
- We have a simple scene in a Tron-style like look & feel
- Our player (i.e. the player that “simulates” the viewer of the video) is located at the bottom center of the screen.
- Another player is running around and talking at the same time
- A few cubes are distributed around our scene acting as walls dampening the sound if between the player and the listener.
- We try to visualize the audio and audio effects
We quickly decided to build the video in Unity as it gives as the possibility to provide an interactive demo via WebGL, and we don’t need to fake audio occlusion by putting tons of audio volume key frames in a video editor like Final Cut of Adobe Premiere. Instead, we just fired up Unity and our ODIN Unity SDK and just recorded a real-time editor session using the Unity Recorder. You can experience the demo in real-time by downloading the source-code from Github.
We also used our Audio Occlusion system that is part of our Unity demo
.
This will be bundled in the next version together with the Unity SDK. I had to copy a few files from the demo into
my own project to make Audio Occlusion work. We attached the OcclusionAudioListener script to the listener player
at the bottom of the screen and attached AudioObstacle script to the cubes with various different
AudioEffectDefition assets like concrete, and fully silence.
As we wanted to create a self-running demo that we could record we used the character of Unitys Third Party Controller demo and created a simple waypoint system feeding the direction to the next waypoint as “joystick” inputs. The waypoints have a small box collider as trigger. Whenever our character gets triggered we select the next waypoint and navigate to that.
One important thing to remember. In Unity you have the Audio Listener component that is typically attached to the
main camera. In our scene, the main camera is located way above our third person character. So, we need to attach
the Audio Listener to the player standing in the bottom center of the screen as he should be listening to the
voice in the scene, not the camera.
Visualizing audio volume fall-off
One of the key principles of 3D audio is that there is a relation between the distance and the volume, i.e. if you
are far away from the audio source you here it less loud. Unity has a “fall-off” setting that you lets you adjust
in detail how this works. Here is an image of the settings of the Audio Source:
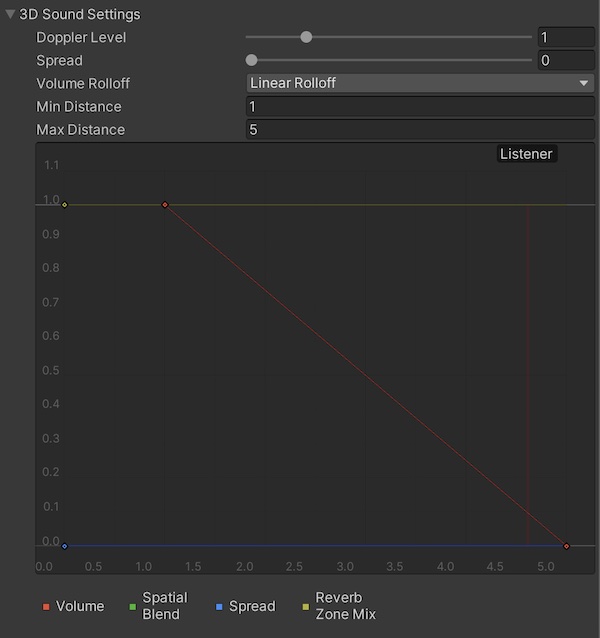
What that means is, that if you are close the audio source plays with full volume, linearly decreases to 0% volume in 5 units. It’s basically the same as a point light that attenuates over distance until it has no effect.
To do that, we created these game objects within Unity:
- Player (center of the player)
- Plane (with our audio visualization shader and materials)
We also created a transparent Shader Graph shader and a material. The new shader and material will be used to visualize the audio volume of the simulated player, and it’s attached to the plane.
The plane has a standard scale of 1,1,1 and therefore is 10 units long and 10 units wide and thus extends 5 units
from center. As you may have noticed, we set the audio falloff to 5 units, so that’s a good fit. Our plane is large
enough to visualize the audio volume fall-off.
This is the simple Shader Graph for this shader and what it looks like:
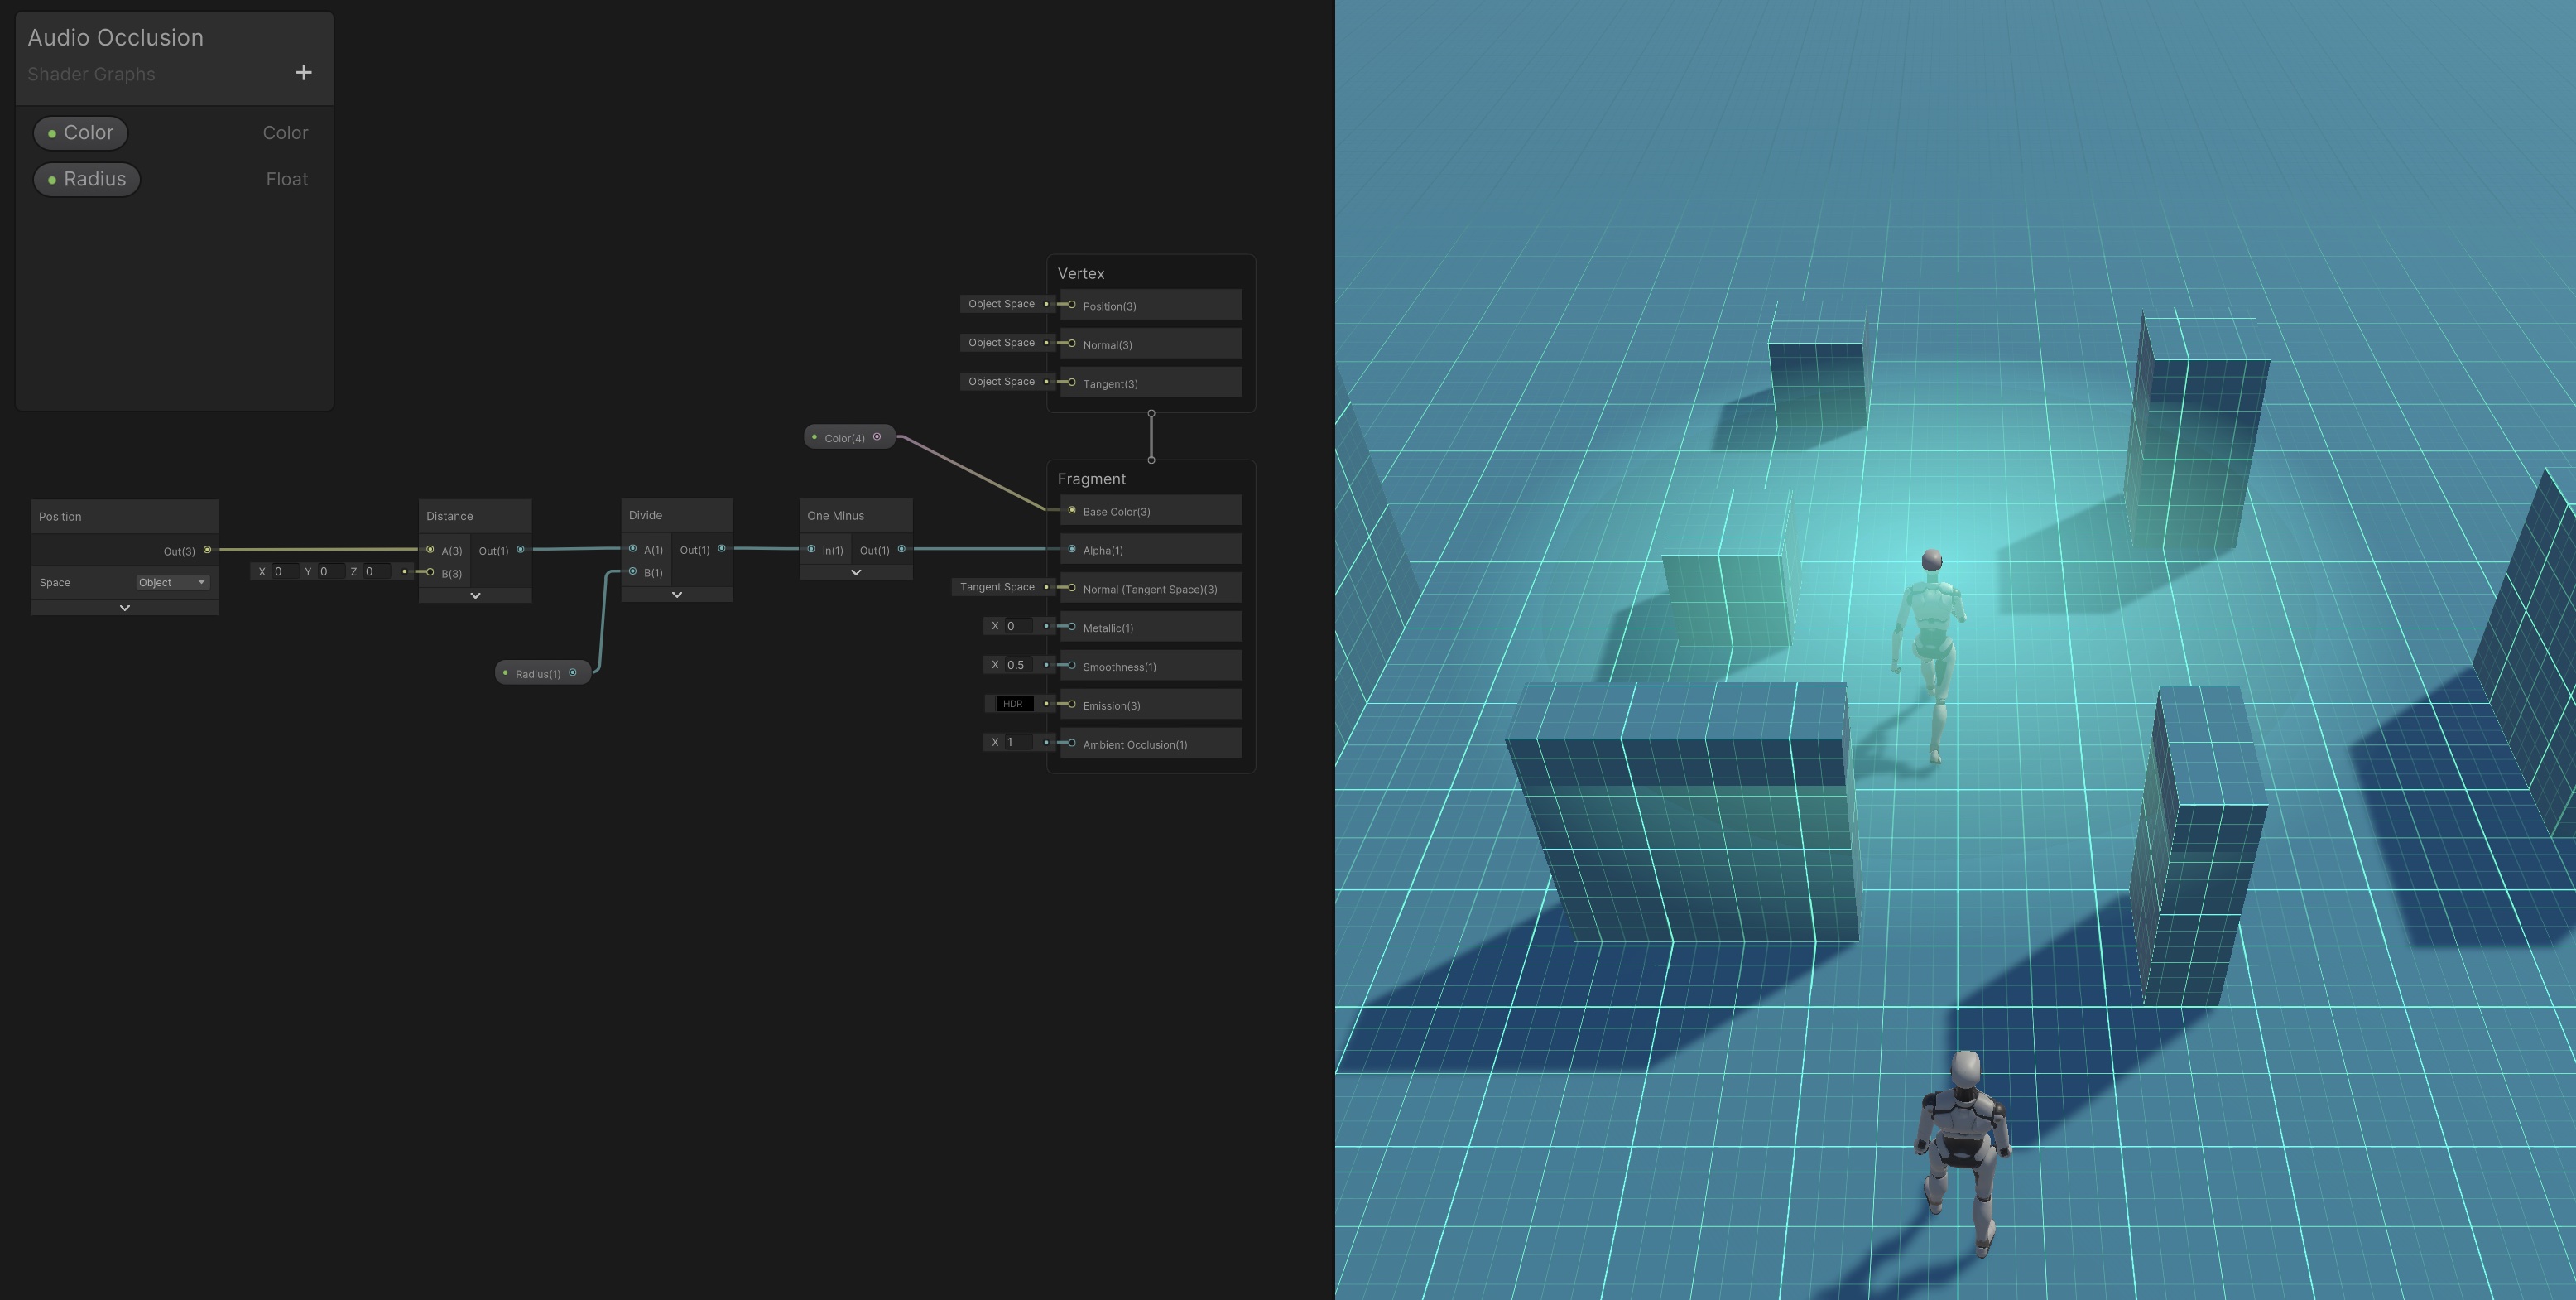
The shader is very simple. It just takes the distance from the center of the plane and maps it to a color. What we
do here is taking the point in object space. We can do that, as the plane is not scaled, and we don’t plan to rotate
it. However, of course you could also take the sample point in world space and subtract it from the planes center.
This would make things more complicated and for our needs that works great. Once we have the distance to the planes
center which is the radius of the audio circle we can multiply it through the radius - which we provide via material
variable radius which we set to 5 to be corresponding with the planes width and the fall-off settings of the
Audio Source. Calculating the On Minus of that value we have a nice alpha value which is 1.0 in
the center of the plane and linearly falls-off to 0.0 at the radius of the audio circle which is also the outer edge
of the plane.
Visualizing the nature of voice
Still a little boring. We want to make sure that users watching the video immediately get the idea of the video, showing audio waves and not a nice implementation of a point light or a “fog of war”. I wanted to simulate audio waves moving like waves from the center of the circle to the outside. First, I experimented with a sinus wave and a time variable. That did look quite ok, but it has been missing the dynamics of voice which has ups and downs infrequently as shown in this waveform of a piece of voice saying something:

As you notice, the waveform looks a lot like a mirrored heightmap and this is exactly what we need. What we do is this:
- Sample audio in real-time and create a heightmap of the audio. Loud pieces will be white, while silent pieces will be black.
- Feed that shader into the shader to visualize the audio ripples.
How do we do that:
- Create a texture of
128x1and make it writable. - Create an array of floats of size
128that will hold the heightmap (you’ll see later why) - Every few frames
- move the texture by one pixel to the right - this will create the impression of waves moving to the outside
- sample the current audio loundness in the range of
0.0to1.0and write it to the texture at position0,0
So, why creating an array of floats which is duplicate of what we already have in the texture? The reason is simple: Because as we want to move the pixels by one in the memory it would require us to read from the texture and moving this array by one, writing it back. I thought that reading from textures is slow, reading from memory is fast. So we build the texture in memory and just write the pixels to the texture.
I also experienced with changing UVs on the texture rather that moving pixels. While this is getting a bit smoother animations, in the end it’s more complicated especially at the texture bounds that I rather concentrated on getting the video done rather than optimizing the shader. Perhaps that is good exercise for you.
Here are a few snippets:
public class AudioVisualizer : MonoBehaviour
{
    public AudioVisualizerPlane plane;
    public AudioVisualizerRenderOcclusion occlusionRenderer;
    public bool sampleAudio = true;
    public float loudnessScale = 10.0f;
    public int sampleDataLength = 100;
    public AudioSource audioSource;
    public Transform followObject;

    public Texture2D voiceTexture;
    private Color[] loundness = new Color[128];
    private float nextUpdate = 1.0f;
    private float[] clipSampleData;

    private void Awake()
    {
        if (!voiceTexture)
        {
            voiceTexture = new Texture2D(128, 1, TextureFormat.RGB24, false);
        }

        for (var i = 0; i < 128; i++)
        {
            loundness[i] = Color.black;
        }

        if (!audioSource)
        {
            audioSource = GetComponent<AudioSource>();

            if (!audioSource)
            {
                Debug.LogError("Voice Texture needs to have an AudioSource assigned or must be part of the Component");
            }
        }

        clipSampleData = new float[sampleDataLength];
    }

    private void Start()
    {
        if (!plane)
        {
            plane = GetComponentInChildren<AudioVisualizerPlane>();
            if (!plane)
            {
                Debug.LogError("You need to create a plane as children and assign the AudioVisualizerPlane component to it");
            }

            if (sampleAudio)
            {
                var renderer = plane.GetComponent<Renderer>();
                renderer.material.SetTexture("_RippleTexture", voiceTexture);
            }
        }

        UpdateTexture();
    }

    private void UpdateTexture()
    {
        voiceTexture.SetPixels(0, 0, voiceTexture.width, 1, loundness);
        voiceTexture.Apply();
    }

    private void Update()
    {
        if (followObject)
        {
            transform.position = followObject.transform.position;
        }

        if (!sampleAudio) return;

        //if (Math.Truncate(Time.time) % 500 != 0) return;
        if(Time.time>=nextUpdate){
            //Debug.Log(Time.time+">="+nextUpdate);
            // Change the next update (current second+1)
            nextUpdate=Time.time+0.025f;
            // Call your fonction
            SampleAudio();
        }
    }

    private void SampleAudio()
    {
        // Move audio out
        for (var i = 127; i >= 1; i--)
        {
            loundness[i] = loundness[i-1];
        }

        var loudness = SampleLoudness() * loudnessScale;
        //float loudness = Random.Range(0.0f, 1.0f);
        loundness[0] = new Color(loudness,loudness, loudness);

        UpdateTexture();
    }

    private float SampleLoudness()
    {
        audioSource.clip.GetData(clipSampleData, audioSource.timeSamples); //I read 1024 samples, which is about 80 ms on a 44khz stereo clip, beginning at the current sample position of the clip.
        var clipLoudness = 0f;
        foreach (var sample in clipSampleData) {
            clipLoudness += Mathf.Abs(sample);
        }
        clipLoudness /= sampleDataLength; //clipLoudness is what you are looking for

        return clipLoudness;
    }
}
Sampling audio gives you quite small float values. I used a scale of 10.0f to make it more visible. As we create
the average audio volume of all samples we need to make sure that the number of samples is too large as the whole
thing blurs too much. A good value for this visualizing has been 100 samples.
This is what the texture looks like:

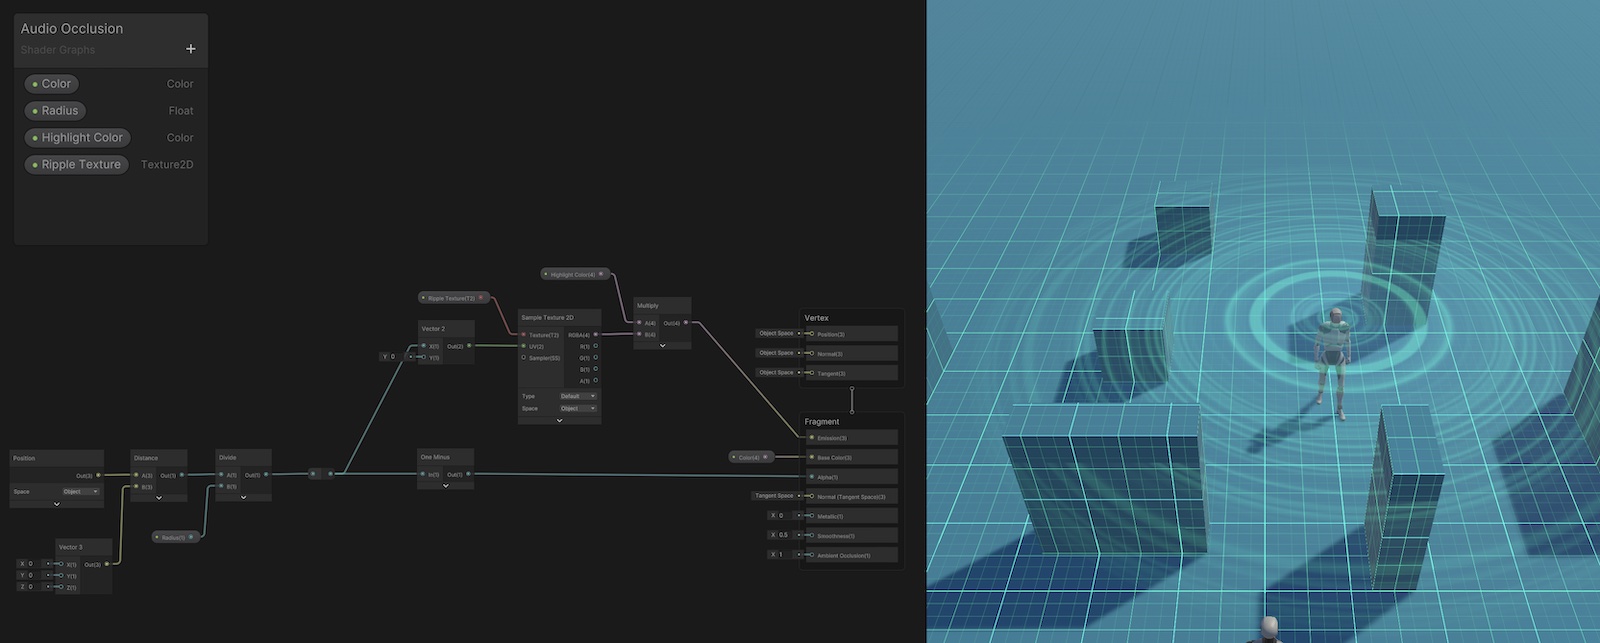
Looks great, doesn’t it? And the ripples move from left to right. We feed it into our shader. Back in Shader Graph we need to make use of that texture:
- We already have a value from
0.0to1.0indicating the radius ratio from the center to the outside, meaning that we are close to the center at0.0and close to the outside at1.0. - Remember that ripple texture with the hightmap moving from left to write. Well, our radius ratio is the x coordinate of the texture.
- So, this is basically the
uof the texture sample vector. We just feed that value in the texture sampler and multiple that value (which is from0.0to1.0) with a color of the ripples. - We put that value in the
emissionslot of our fragment shader
That’s it. Looks great, doesn’t it:
Visualizing audio occlusion
We have a pretty cool video already with a player running around a scene, and you can hear the direction of the other player and when a cube is between both players that audio is silent or less loud. And we have a nice circular plane visualizing audio ripples and fall-off. But, we also wanted to visualize audio occlusion. What that means is, that we want an “audio-shadow” to be casted by the cubes.
I try to explain my solution to that in this ugly, little scribble:
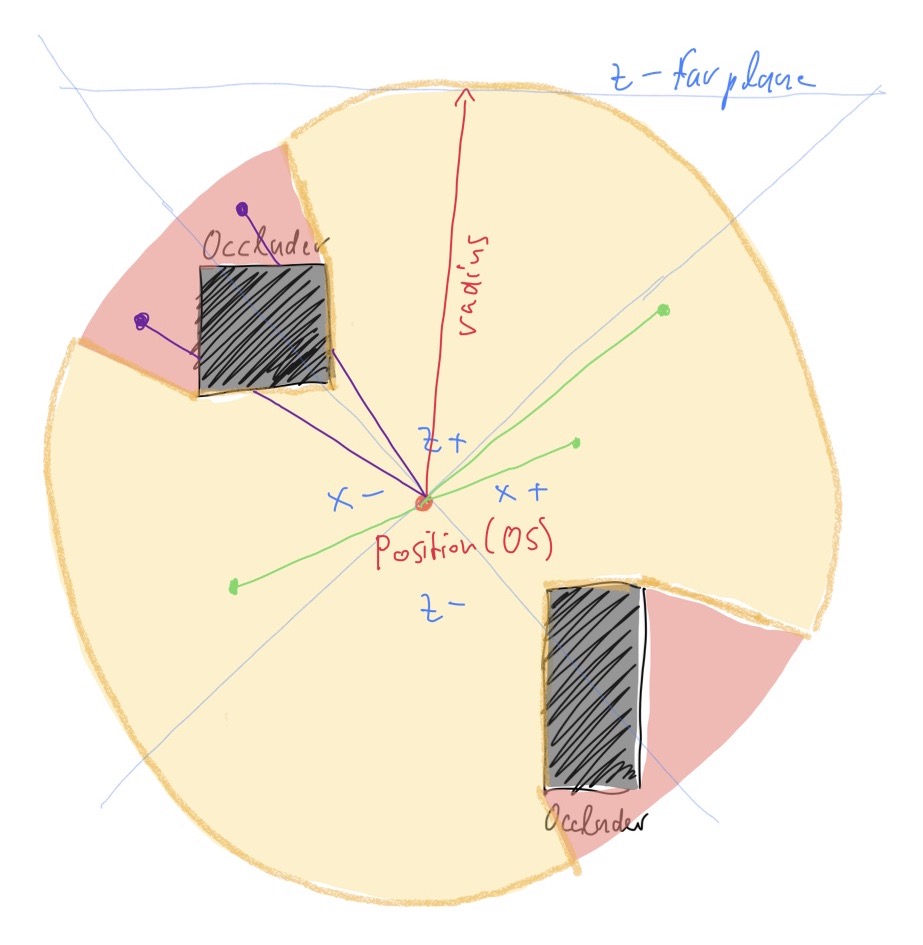
This scribble shows our player position in the center of the plane and the audio occluders (which are cubes) around it. In orange is our audio circle around the center of the plane. However, there are areas of that circle that are red, which lie in the shadow of the audio occluders. Audio will not get to this point, because they are blocked by the occluders. The green dots and lines show places where audio can travel to, the have direct line of sight to the center of the plane. The purple dots haven’t got a direct line of sight, as the center of the plance is blocked by the occluders.
How do we know if an occluder is blocking the audio at a specific location on our plane and within our shader? The solution I came up with is a custom 360° depth buffer around the center of our plane holding the distance to occluders. In our shader we can sample that depth buffer and check if the distance to the occluder is smaller than the distance of our point on the plane. If that is the case, we know that the occluder is blocking the audio at that point and don’t render anything. If not, we can render our audio circle with the fall-off and audio ripples as we did before.
Creating the distance buffer
As discussed before, we need to have a 360° depth buffer with the distance between the occluder and the center of
the plane. We can use Unitys APIs to render a camera into a cubemap, which will give us exactly what we want, as we
can sample that cubemap very easily in our shader. Of course, we only got 50% of what we need, as a normal rendering
of the scene will not help us. First, we put a camera as a child to our Player game object. Our hierarchy will
look like this:
- Player (center of the player)
- Occlusion Camera
- Plane (with our audio visualization shader and materials)
We create a new script and attach it to our occlusion camera:
public class AudioVisualizerRenderOcclusion : MonoBehaviour
{
    // Attach this script to an object that uses a Reflective shader.
    // Real-time reflective cubemaps!

    bool oneFacePerFrame = false;
    Camera cam;
    public RenderTexture cubemap;

    public int textureSize = 128;

    private void Awake()
    {
        cam = GetComponent<Camera>();

        if (!cubemap)
        {
            cubemap = new RenderTexture(textureSize, textureSize, GraphicsFormat.R32_SFloat, GraphicsFormat.D32_SFloat_S8_UInt);
            cubemap.dimension = TextureDimension.Cube;
        }
    }

    void Start()
    {
        // render all six faces at startup
        UpdateCubemap(63);
    }

    void LateUpdate()
    {
        if (oneFacePerFrame)
        {
            var faceToRender = Time.frameCount % 6;
            var faceMask = 1 << faceToRender;
            UpdateCubemap(faceMask);
        }
        else
        {
            UpdateCubemap((int)CubemapFace.PositiveX | (int)CubemapFace.NegativeX | (int)CubemapFace.PositiveZ | (int)CubemapFace.NegativeZ); // all six faces
        }
    }

    void UpdateCubemap(int faceMask)
    {
        //if (!cubemap) return;


        cam.RenderToCubemap(cubemap, 51);
    }
}
We create a new RenderTexture and set it to a cubemap. We set the format to R32_SFloat as one float channel for
the distance data is enough. Every frame we either render all faces or only one frame per frame to save performance.
Depending on how fast the player moves that might be working fine.
However, this will just render the scene as usual. I did not find an API to sample the depth buffer of the Cubemap in shader graph and even if I could do that, there is a difference between the depth in the depth buffer and the distance of the point to the camera center. In fact, it took me a while to figure that out. First, I sampled the depth of the depth buffer at the point. This however resulted in strangely curved shadows. The reason for that is quite complicated, but in the Unity forum bgolus always show this image which shows that very good and that has been very helpful for me:
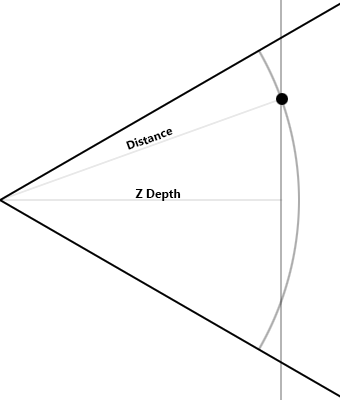
You know, in our shader we already have a calculation that calculates the distance of the point on our current fragment to the center of the plane. By just feeding that value in our comparison to the depth buffer got me these strange curves that you can see above in the image. That is, because you are comparing apples with pears.
So, what we need is either complicated maths in our shader to calculate the depth buffer to the distance, or creating a customized renderer for our occlusion camera. I went for the second option, as it was easier for me and to be honest, after hours of building huge shader graphs with a lot of maths and custom functions I couldn’t figure it out!
But, I didn’t need to:
- As the plane and the occlusion camera will not be rotated or scaled and also not being transformed (as only the player parent object will be translated) we can just work in “object space”, which makes things a lot easier.
- So, we don’t need all those transforms and matrix stuff, both pixel spaces will be the same for the occlusion camera and the plane.
I started the project as a Universal Render Pipeline, so I can quickly create my own renderer for the occlusion camera even without writing much code.
I finally came up with this solution:
- Create a new Shader Graph for the occlusion camera
- Create a new Render Pipeline and render the scene with that shader (I think you could do the same without URP by setting the shader for the camera in script) in the occlusion camera
- The shader does not write the depth but the actual distance between the center of plane and the point on the plane, corresponding to the way we do it in the plane shader - this way we compare apple to apples!
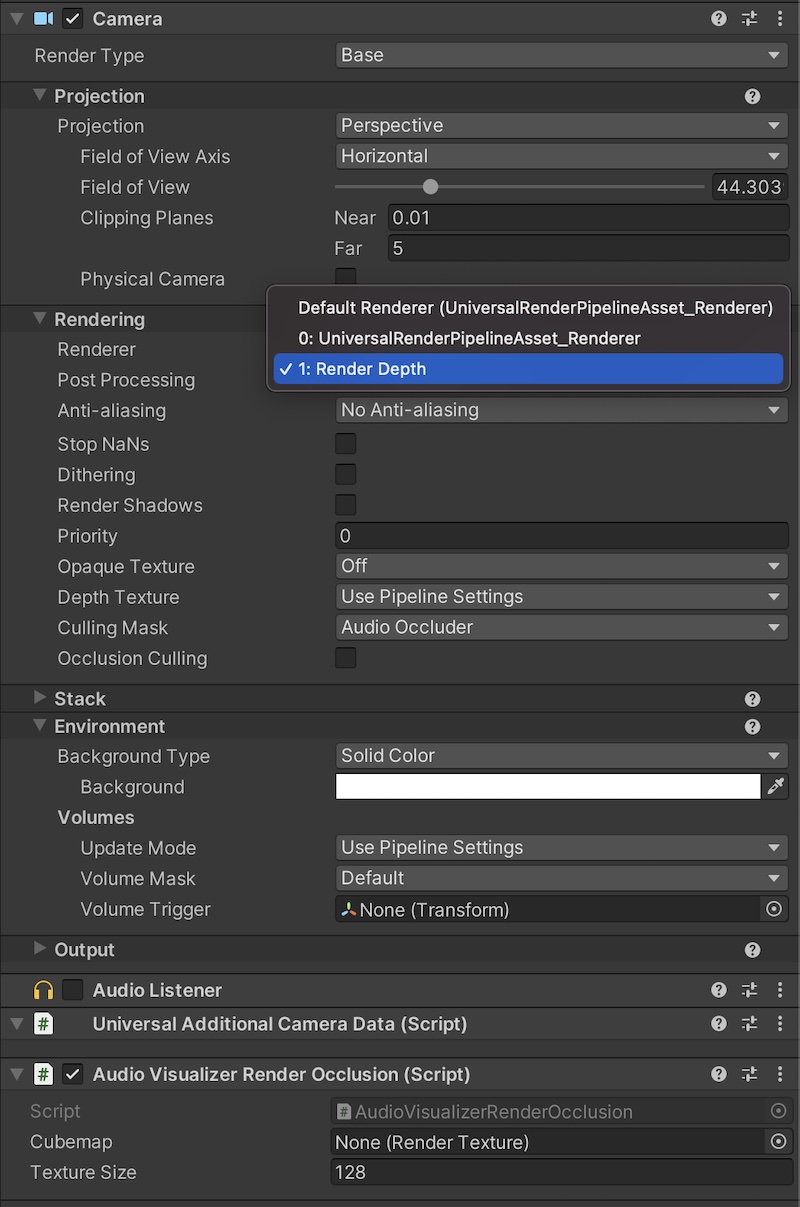
So, I created a new renderer asset and set that as the renderer of our occlusion camera. I also created a new Layer
Audio Occluder and made the camera to only render audio occluders.
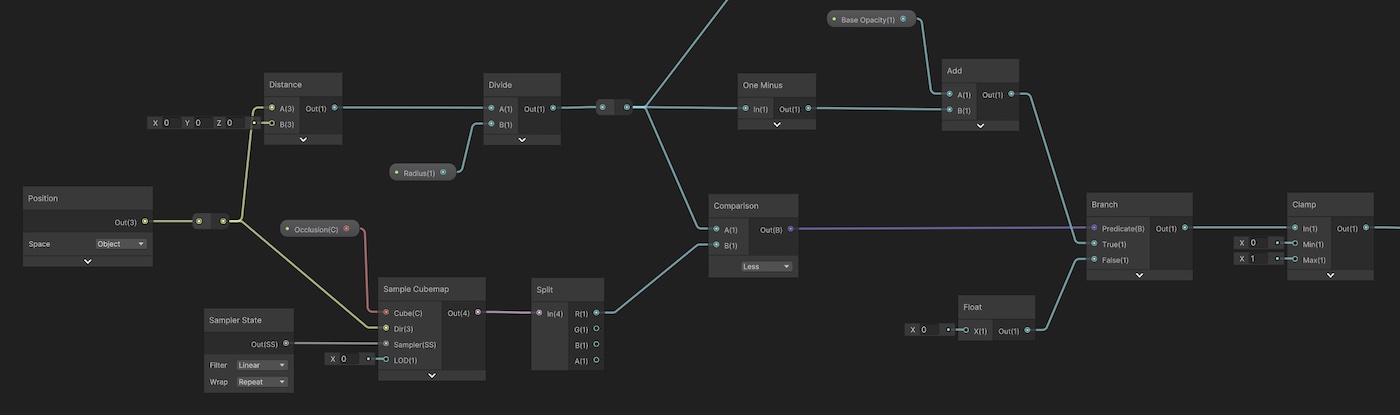
Next, we have to create our “Depth Shader” in Shader Graph. It looks like this:
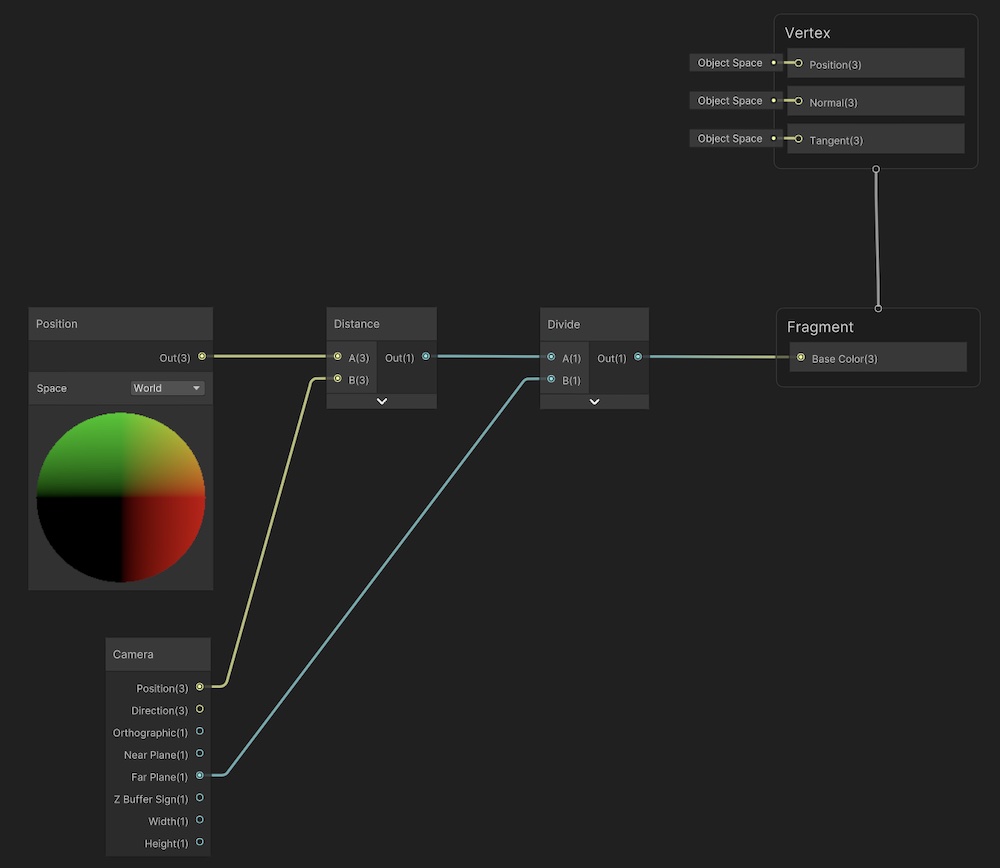
As you can see, it’s super simple. As in our shader before, we just calculate the distance between the center of the
plane and the point on the plane. However, we need to map that value to the range of 0 to 1, so we need to divide by
the radius. It’ll be 5 as we set that in our shader before. In this case, we don’t put in a shader variable but we
just set the far plane of the camera to 5 and use that value in the depth shader. Setting the far value of the
camera made also sense because we don’t need to render the whole scene, just what is in our radius.
Then, we feed that shader in our Render Depth pipeline like this:
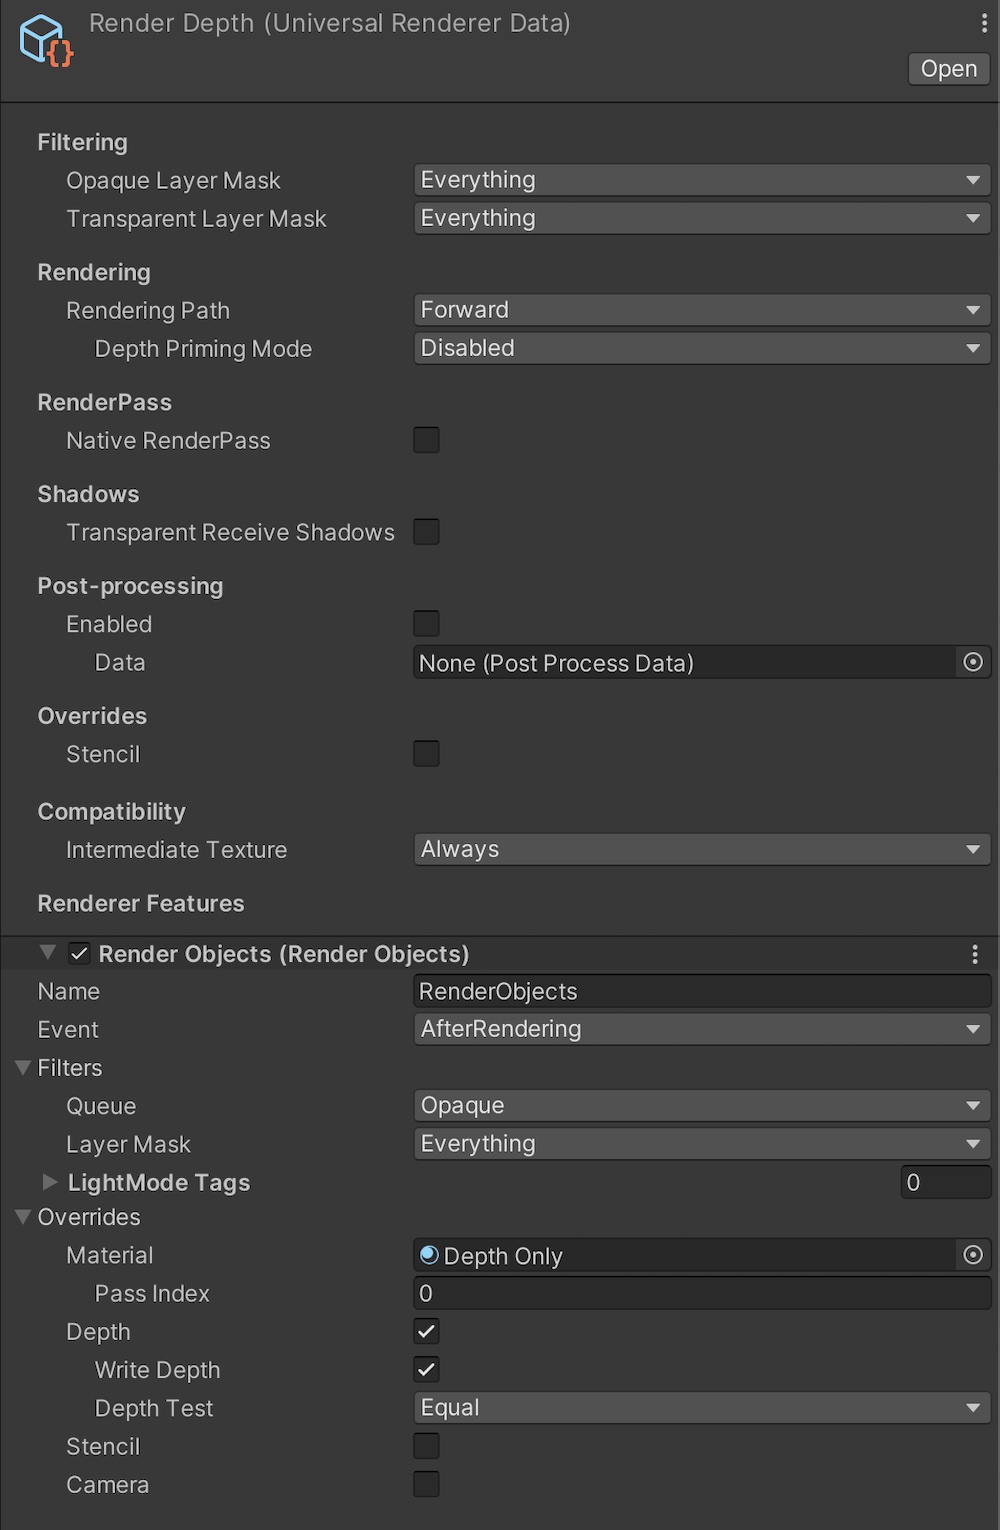
So, what this does, is overriding all materials in the scene with our depth shader and rendering the audio occluders into our cubemap.
The cubemap looks like that:

The top and bottom is black, because we don’t render them. In our script we had this line:
cam.RenderToCubemap(cubemap, 51);
51 is the bitflag for front, back, left and right. The typical value you see in the Unity documentation and many
examples is 63 which is the bitflag for all six sides. But we only render into a plane, so we don’t care about top
and bottom.
Using the distance buffer
Now that we have our distance buffer indicating the distance of all occluders 360° around the center of the plane we
need to do something with it. In fact that’s pretty easy. We just sample the point on the plane and on the cubemap
and figure out if the point is occluded or not. If it is, we just set the alpha value to 0. If not, we set it to our
usual 0.0 to 1.0 distance range that we use to calculate fall-off and ripple intensity. Here is the relevant
part of the shader:
Pretty simple, right? We can just use the position of the fragment in object space and feed that as the view direction into our cubemap. Please note, this only works, because we never rotate or scale the plane and the camera.
This is the complete shader. I added normals based on the ripples and a few other things like a base color, highlight color for the ripples and also a base opacity if you want to show the whole radius.
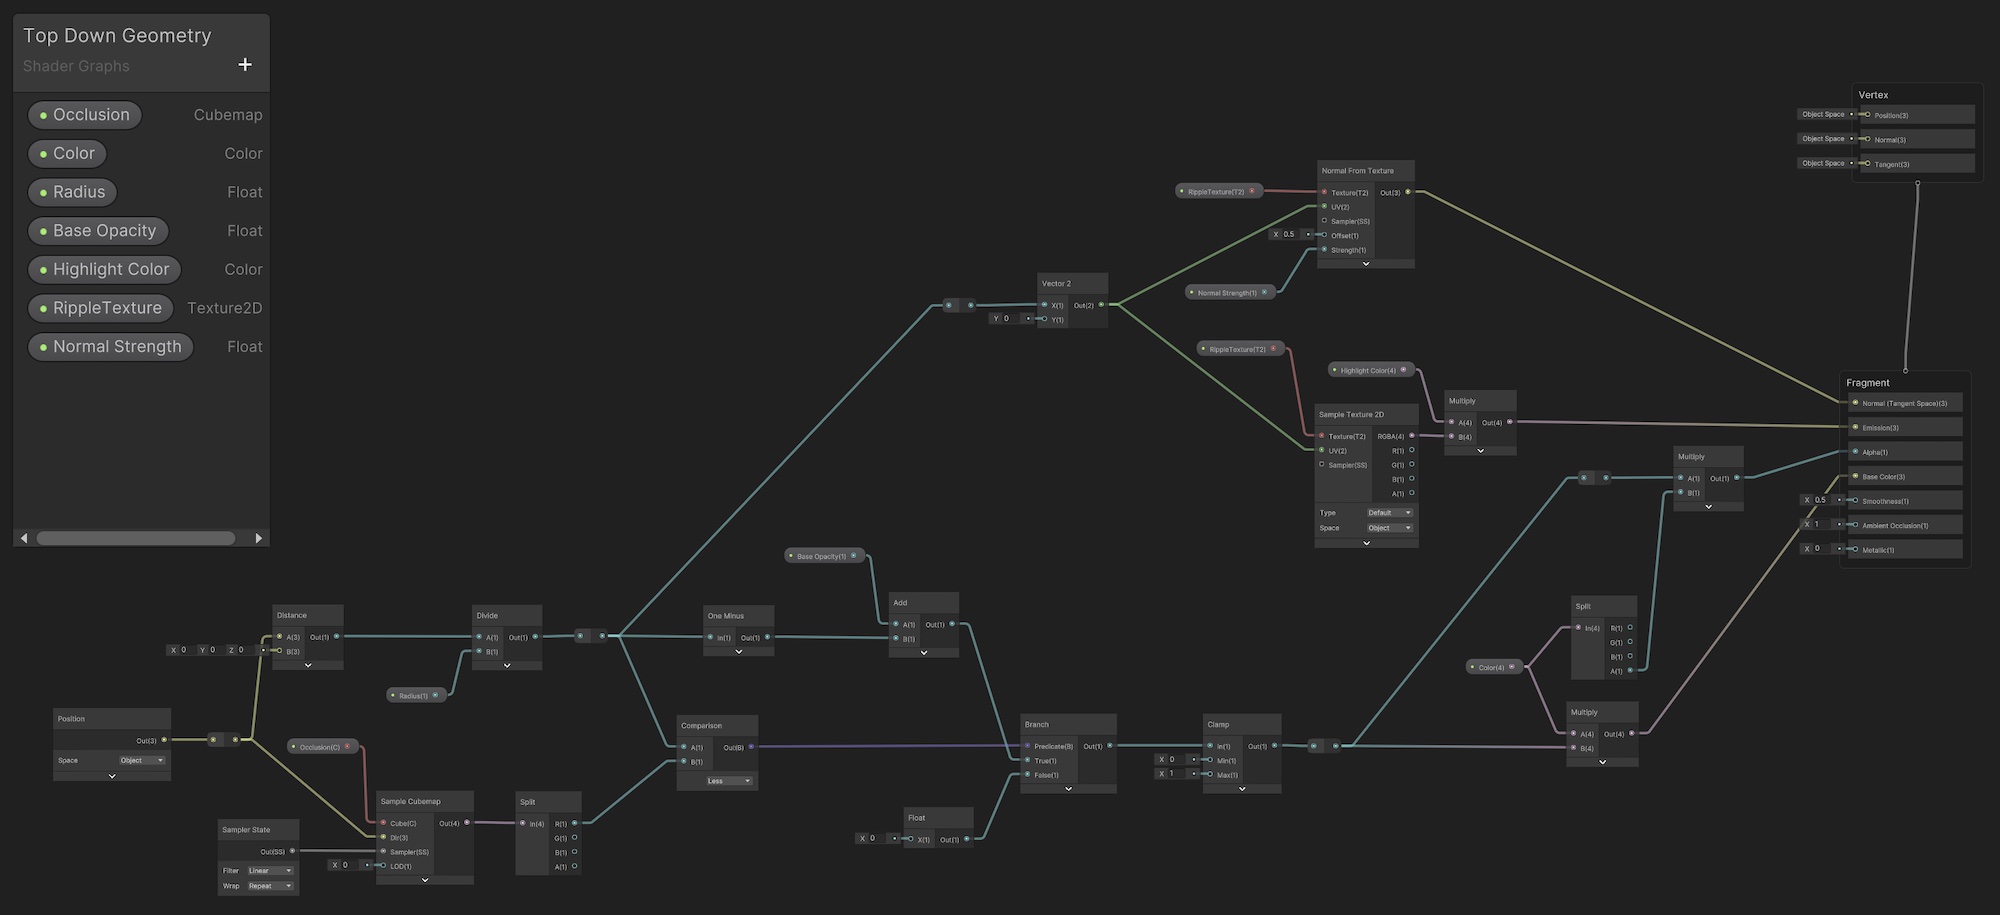
If we use this shader, we get what we wanted, a nice looking circle with audio ripples falling-off to the edges of our audio falloff settings and with “audio shadows” generated by the occluders.
Conclusion
It’s been a lot of fun figuring out all of that. And I think the results are great. If you have any comments or additional info on how to improve that, please tweet me at @ursuppe .
When I created that, I thought that it’s also worth taking into consideration not only for audio occlusion system, but you can also create nice effects. Like spherical explosions that don’t run through buildings but stop behind buildings. A texture map with occlusion could also mask damages to the scene behind buildings, so you would only render the “fire” material only where the explosion could be exposed and not being blocked by buildings. This is why I wrote that blog post. Perhaps it’s inspiration for many other use cases.
Universal Rendering Pipeline in Unity is great for these kind of things. It’s easy to create your own renderers can do a lot more than in the built-in render pipeline.
Last but not least I want to link a few resources that have been very useful for me: